Yolo Object Detection – Machine Learning Project
FREE Online Courses: Click for Success, Learn for Free - Start Now!
In this yolo object detection project, we will use yolo library to identify and classify different objects in an image.
What is Object detection?
Object detection simply means identifying the objects in a particular image. As we know how our models detect objects present in an image- first by finding the location of objects, creating bounding boxes around those objects, and classifying that bounding box, that is, what is the object present in that bounding box.
It is a challenging problem to build a model for:
- the object recognition: finding where is the object,
- object localization: creating bounding boxes around an object,
- object classification: what is the object present in that box.
But in recent years, deep learning techniques are achieving very large accuracy for object detection.
Now let’s Understand how object detection Works:
There are basically two approaches to detect objects, the first approach is two shot detection: In this approach there are two stages, we first find regions on which objects are present, and in the second stage we classify those regions and create bounding boxes around that detected region.
RCNN, Fast-RCNN and Faster-RCNN models are very popular while we are detecting objects using this approach.
And the second approach is one shot detection: In this approach, we find the region and classify objects present at that region, and also create bounding boxes all at once. YOLO (You Only Look Once ) is a very popular example of this approach to detect objects.
As our project is YOLO object detection that’s why we are going to learn, and understand the use of the Yolo model.
YOLO Object Detection Model:
YOLO (You Only Look Once), is a Convolutional Neural Networks that achieve very accurate, efficient and fast results for detecting objects (using one shot approach) on a particular image or on a video, or in real-time.
Let’s Understand YOLO Object detection Algorithm:
The working of YOLO is such that it splits the input image into small parts or we say number of cells, and that cells will be responsible for detecting the existence of objects.
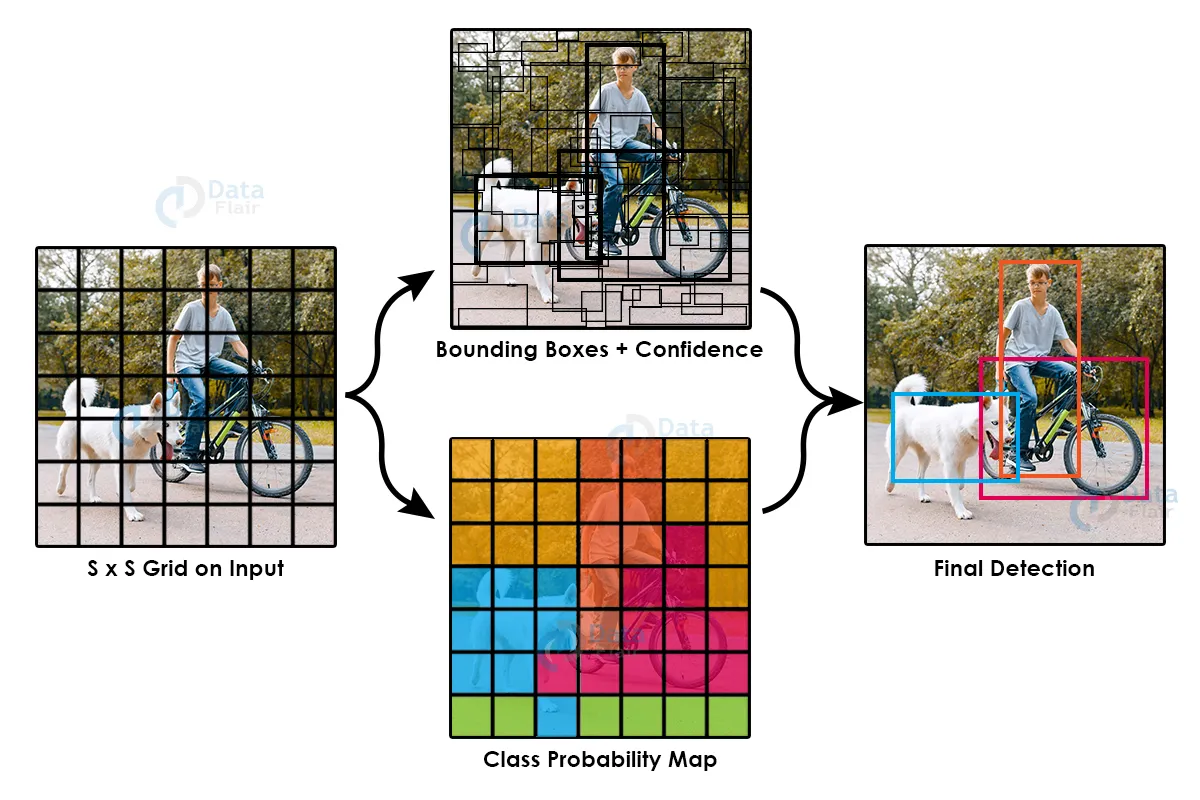
Image Source: DataFlair
- Each cell predicts number of bounding boxes, (we will get coordinates of this bounding boxes directly from YOLO as it predicts 4 coordinates for each bounding boxes(x,y,w,h)),
- its confidence (which tells us probability of object present in that cell)
- and its class predictions (If objects are present in the bounding boxes the model will determine the object belongs to which class or say detect what is the object present in that box) .
The predicted boxes look something like this as shown in an image: the higher the confidence score, the thicker the box will be.
At last, bounding boxes and class prediction are combined together to detect the objects present in an image. As you can see in the image below.
In Yolo, the authors have used softmax function for predicting classes rather than sigmoid function, as authors want to confirm that if the object belongs to a particular class , then it is confirmed that it does not belong to any other class.
About YOLO Object detection Project:
In this project by ProjectGurukul, we will develop and use a yolov3 model for detecting objects present in a particular image.
Now let’s start Implementing our Project:
Before the implementation, let’s talk about prerequisites.
Software Prerequisites
You should have this software present in your system to create yolo object detection, and also you should know how to use this so the required software are:
- Python
- Jupyter Notebook (you should know how to work on jupyter notebook)
Required Libraries:
- OpenCV (pip install opencv)
- Numpy ( pip install numpy)
- Matplotlib (pip install matplotlib)
If you don’t have installed these libraries in your system, install it using pip. Open your command prompt and type pip install as written inside brackets.
YOLO Object Detection Project Code
Please download the yolo object detection project code from the following link: YOLO Object Detection Project Code
Now let’s understand Files Present in our Source Folder
In this folder we have :
- Coco.names file: which consist of all the available classes on which the yolov3 model has been trained.
- yolov3.cfg, and yolov3.weights: these two file you have to download from yolo official website. And click on the cfg and weights file as given in the image below.
- Yolo_object_detection.py: this is the main file in which we load the yolov3 model and run it to identify objects present in an image.
Now let’s go through the Yolo_Object_detection.py file and learn how to use the yolov3 model, and perform object detection on a particular image.
1.) Importing Required libraries:
We will import libraries that we have installed above in our system.
import cv2
import numpy as np
import matplotlib.pyplot as plt
import random
2.) Loading Yolo:
In this step we load our network, using cv2.dnn.readNet() method in which we have to pass weights and cfg, which we have downloaded above from the official website of yolo.
# load Yolo
net = cv2.dnn.readNet('yolov3.weights', 'yolov3.cfg')
3.) Creating labels to classify objects:
Now we will create our classes list(labels) which contains a list of all the objects that the Yolo model can detect.
labels = []

with open('coco.names', 'r') as f:
  labels = [line.strip() for line in f.readlines()]

len(labels)
4.) Creating layer_names and output_layers using predefined methods:
layer_names = net.getLayerNames()
output_layers = [layer_names[i[0]-1] for i in net.getUnconnectedOutLayers()]
colors = np.random.uniform(0,255,size = (len(labels),3))
And also in this we have created colors, so that there will be different colors of boxes for different objects present in an image.
5.) Load image and Visualize it:
In this step we are going to load an image on which we want to detect objects. And also we will visualize our image using plt.imshow().
#loading Image:
image = cv2.imread("person.jpg")

plt.imshow(image)

height,width,channels = image.shape
6.) Detecting Objects in an image:
# Detecting objects:

blob = cv2.dnn.blobFromImage(image, 0.00392,(416,416),(0,0,0),True,crop = False)

net.setInput(blob)
output = net.forward(output_layers)
These are predefined methods that we are using to detect objects present in an image.
7.) Showing Information on Screen:
# Showing Information On Screen:

boxes = []
confidences = []
class_ids = []

for out in output:
    for detection in out:
        scores= detection[5:]
        class_id = np.argmax(scores)
        confidence = scores[class_id]
        if confidence>0.5:
            # Object Detected:
            center_x = int(detection[0]*width)
            center_y = int(detection[1]*height)
            w = int(detection[2]*width)
            h = int(detection[3]*height)

            # Rectangle Coordinates:
            x = int(center_x - w / 2)
            y = int(center_y - h / 2)

            boxes.append([x,y,w,h])
            confidences.append(float(confidence))
            class_ids.append(class_id)
In this block of code, we will create a list of boxes which will tell us about how many objects are detected in a particular image.Confidence is that which tells the probability of classifying the object. If the confidence is greater than 50% then we will find the x,y,w,h coordinates, so that we can create bounding boxes around that detected object.
8.) Creating Boxes around detected objects:
indexes = cv2.dnn.NMSBoxes(boxes,confidences,0.5,0.4)
font = cv2.FONT_HERSHEY_PLAIN
for i in range(len(boxes)):
    if i in indexes:
        x,y,w,h = boxes[i]
        label = str(labels[class_ids[i]])
        color = colors[i]
        cv2.rectangle(image,(x,y),(x+w,y+h),color,2)
        cv2.putText(image,label,(x,y+30),font,2,color,3)
In this above code, we have created a rectangle box around an object, and classify the object by giving it its label.
Also in above code ve have used NMS (Non-maximum Suppression) by using this we ensure that there are no multiple detections of the same image.
Let’s understand Non-maximum Suppression(NMS) theory in brief:
NMS Uses the “Intersection over Union”.
So, to implement non-max suppression, first we have to select the box with the highest score, and then we remove boxes that overlap, and again select the box with the highest score. In this way we will be able to remove all the unwanted boxes, and only the best boxes will remain that consist of our objects.
9.) Lastly, let’s see our objects present in an image:
cv2.imshow("ProjectGurukul",image)
cv2.waitKey(0)
cv2.destroyAllWindows()
And save it into an image folder present in our source folder:
cv2.imwrite("./images/detected_img2.jpg" , image)
Summary:
We have successfully used the yolov3 model to detect objects present in an image. We learned how to use YOLOv3, the most recent variant of the YOLO family. Also in this we have learned the use of OpenCV library to create rectangle boxes and put text on detected objects in a particular image.