React Project – Photo Gallery Application
FREE Online Courses: Click, Learn, Succeed, Start Now!
A photo gallery is an application that helps manage photos in one place. It can be anywhere, either online or offline, or both, like syncing data online using the internet from the offline gallery. A photo gallery stores all your pictures and videos in one convenient place. You can browse through your moments with ease, zoom in on funny faces, or relive cherished adventures. We can delete unwanted images from the list of images in one place.
The more advanced gallery can store the images in Google Drive and sync the images. We can also create the images, and hide them; if deleted, also manage the recovery and delete them when required or out of space, or it manages the memory as well in the advanced one. That’s all about the photo gallery.
A photo gallery is like a picture album where you can see lots of photos all in one place. It’s a way to show off or share pictures with others, whether from a trip, a special event, or just for fun. A photo gallery lets you browse and enjoy memories or artwork without having to shuffle through physical prints.
About React Photo Gallery Application
The photo gallery app project is all about making a website or an app where you can easily put and organize your pictures. You can upload photos, group them into albums, and even add tags to find them later. People can look at your pictures, and you can share them with friends. It’s designed to be easy to use and keep your photos safe. We’re working to make sure it looks good and works well on phones, tablets, and computers. We’re also making sure nobody can see your pictures unless you want them to.
Overall, we want to make a simple and fun way for people to enjoy their photos online. The gallery will prioritize user privacy and data security, implementing robust measures to safeguard personal information. Integration with social media platforms will enable the effortless sharing of favourite photos with friends and followers.
Through meticulous attention to detail and continuous refinement, the photo gallery capstone project seeks to set a new standard for digital image repositories. Advanced algorithms will enhance the browsing experience by suggesting related photos based on user preferences. Interactive features such as tagging and commenting will foster community engagement.
Prerequisite For React Photo Gallery Application
- React
- API Integration
Download React Photo Gallery Application Project
Please download the source code of React Photo Gallery Application Project: React Photo Gallery Application Project Code.
Installation Steps:
Download the Visual Studio
You can choose the appropriate installer for your operating system (Windows, macOS, or Linux) on the download page. Once the installer is downloaded, run it and follow the installation instructions to install VS Code on your computer.
For the installation of React, I have explained some of the steps as follows:
1. The first step is to download the node( as it will help to install react) from the below link:
The LTS version is recommendable:
2. Now, check the version of the node in Windows by following the command on the terminal:
node --version or node -V
Also, check the npm version using the following command as it is a tool to download the react
npm --version

Note – The above thing will show the version of the above thing node or npm respectively. It will show the version if the version is successfully downloaded.
3. Now, create one folder on the desktop as react, open the terminal inside the react app, and go to the react folder using the following command as `cd react` and run the command:
npm init react-app myapp

4. myapp is created, go inside the myapp folder using the command `cd myapp` and then npm start and boom react will run the browser.
Your app react is successfully installed, let’s move towards project building.
Steps to Create a React Photo Gallery Project:
1. Create gallery.js inside the src folder, under which there is a folder named dashboard.
import React, { useState, useEffect } from 'react';
2. Create a function named Gallery, and we will write logic inside it. First, we will initialize as the line below.
const Gallery = () => {
  const [images, setImages] = useState([]);
  const [selectedImages, setSelectedImages] = useState([]);
  const [selectAll, setSelectAll] = useState(false);
3. The useEffect hook is triggered when the component mounts. Inside, it defines a function ‘fetchImages’ that creates an array of image URLs. Finally, it updates the state variable ‘images’ with the new array using ‘setImages’.
useEffect(() => {
const fetchImages = () => {
const newImages = [
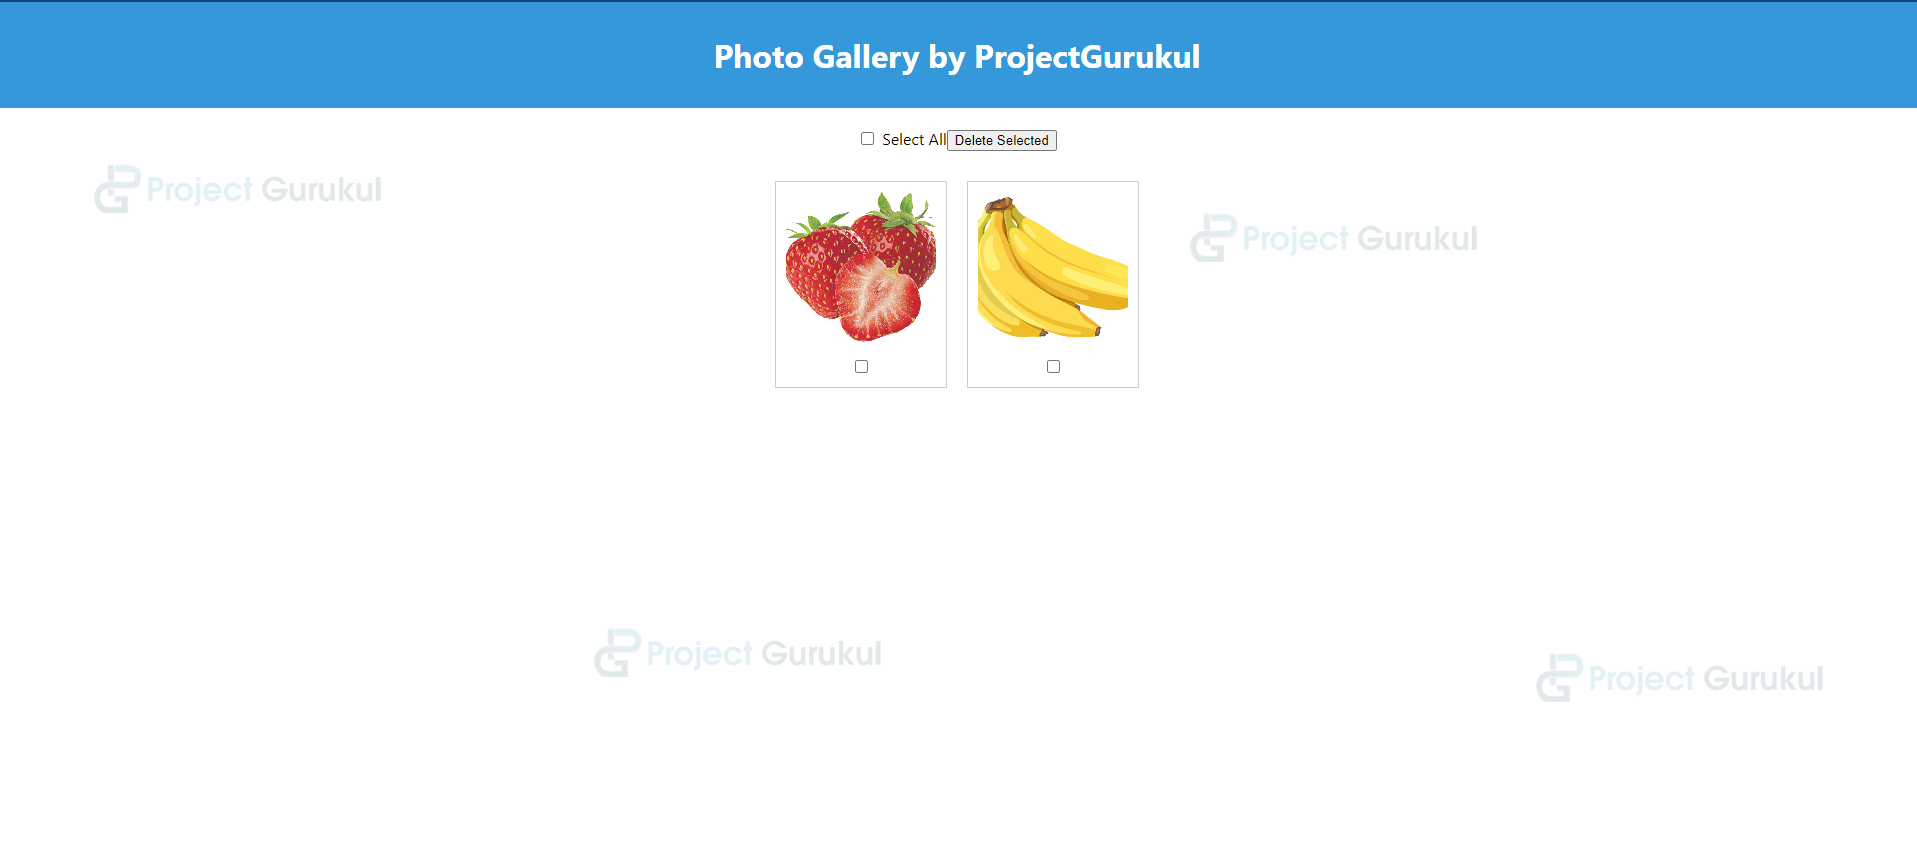
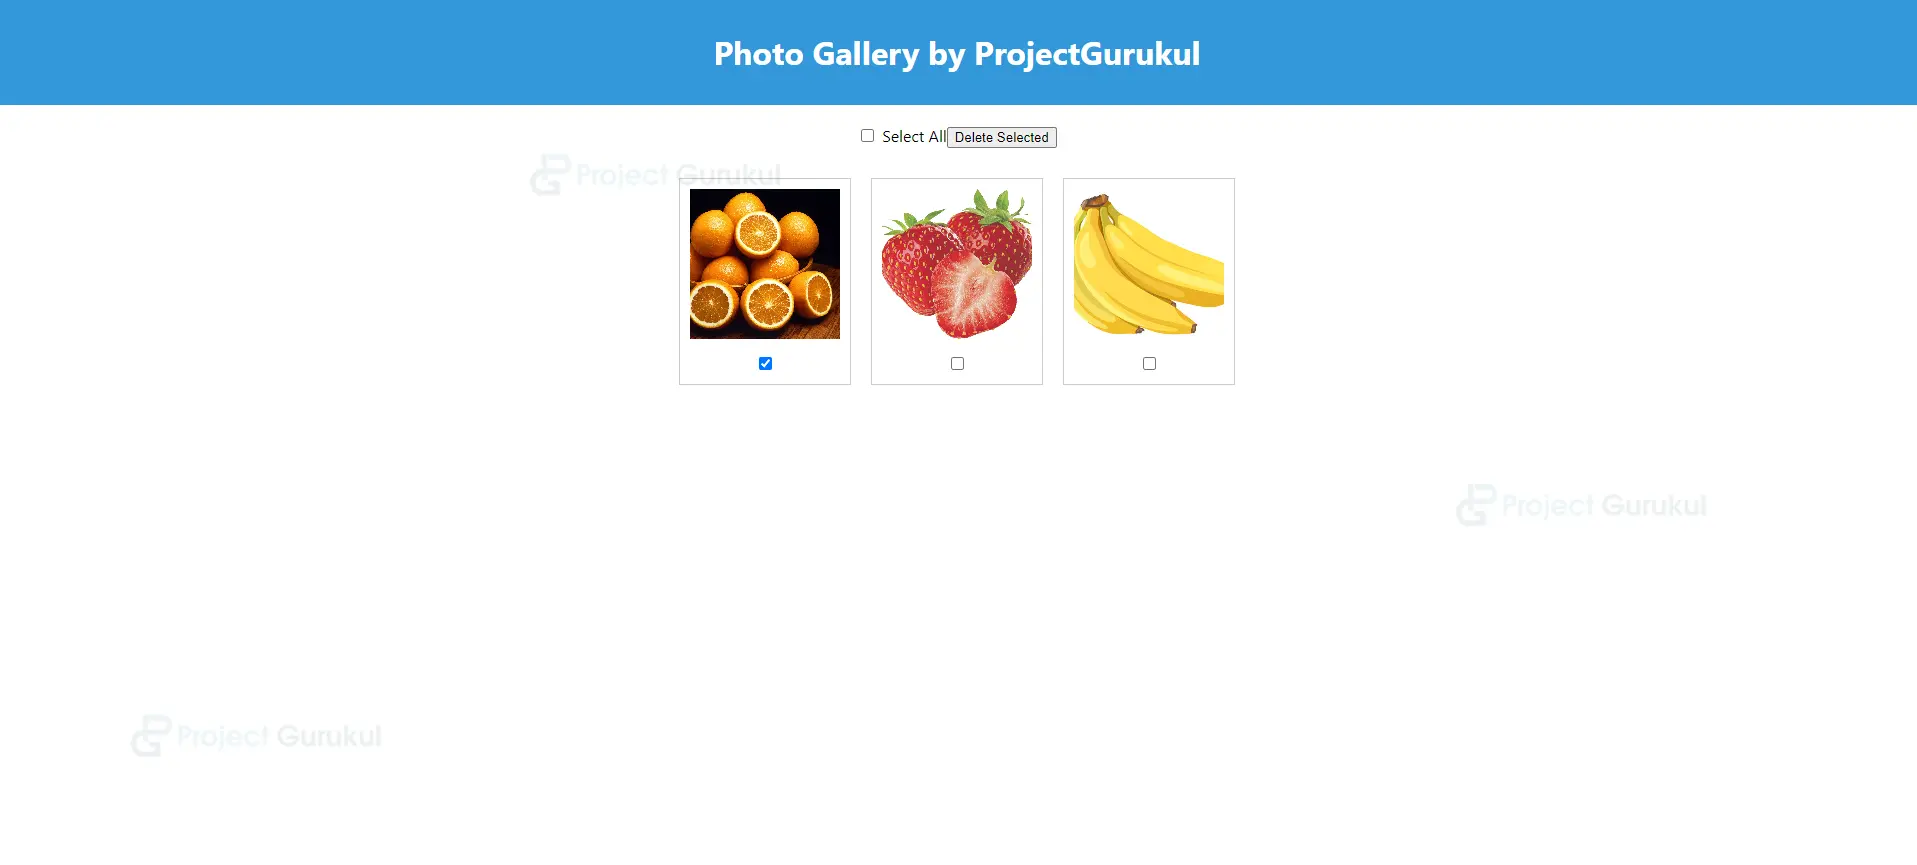
'/images/orange.jpg',
'/images/strawberry.jpg',
'/images/banana.jpg',
];
setImages(newImages);
};
The code calls ‘fetchImages’ immediately upon the component mount and then sets up a recurring fetch every 60 seconds using setInterval. Upon component unmount, it clears the interval to prevent memory leaks.
fetchImages();

    const intervalId = setInterval(fetchImages, 60000);

    return () => clearInterval(intervalId);
  }, []);
4. The function ‘handleCheckboxChange’ toggles the selection of an image path. If the path is already selected, it removes it; otherwise, it adds it to the list of selected images.
const handleCheckboxChange = (imagePath) => {
    setSelectedImages((prevSelectedImages) => {
      if (prevSelectedImages.includes(imagePath)) {
        return prevSelectedImages.filter((selectedImage) => selectedImage !== imagePath);
      } else {
        return [...prevSelectedImages, imagePath];
      }
    });
  };
5. The function toggles the ‘selectAll’ state and updates ‘selectedImages’ accordingly.
const handleSelectAllChange = () => {
    setSelectAll((prevSelectAll) => !prevSelectAll);
    setSelectedImages(selectAll ? [] : images);
  };
6. The function deletes selected images from the ‘images’ state array, clears ‘selectedImages’, and resets ‘selectAll’ to false. It logs the paths of the deleted images to the console.
const handleDeleteSelected = () => {
    const updatedImages = images.filter((image) => !selectedImages.includes(image));
    setImages(updatedImages);
    setSelectedImages([]);
    setSelectAll(false);
    console.log(`Deleting selected images: ${selectedImages.join(', ')}`);
  };
7. A container with a checkbox to select all images, a “Select All” label, and a button to delete selected images.
<div style={{ display: 'flex', flexDirection: 'column', alignItems: 'center' }}>
        <div style={{ margin: '20px' }}>
          <input
            type="checkbox"
            checked={selectAll}
            onChange={handleSelectAllChange}
            style={{ marginRight: '8px' }}
          />
          <label>Select All</label>
          <button onClick={handleDeleteSelected}>Delete Selected</button>
        </div>
8. A container displaying images in a flexible grid layout, centered horizontally, with each image contained in a bordered box with spacing and centered text.
<div style={{ display: 'flex', flexWrap: 'wrap', justifyContent: 'center' }}>
          {images.map((image, index) => (
            <div
              key={index}
              style={{
                border: '1px solid #ccc',
                margin: '10px',
                padding: '10px',
                textAlign: 'center',
              }}
            >
9. An image element with specified dimensions and cover object-fit, followed by a checkbox below it, controlling selection status.
<img
                src={image}
                alt="Gallery Item"
                style={{ width: '150px', height: '150px', objectFit: 'cover' }}
              />
              <div style={{ marginTop: '10px' }}>
                <input
                  type="checkbox"
                  checked={selectAll || selectedImages.includes(image)}
                  onChange={() => handleCheckboxChange(image)}
                />
              </div>
            </div>
Here is the complete code for above project:
import React, { useState, useEffect } from 'react';

const Gallery = () => {
  const [images, setImages] = useState([]);
  const [selectedImages, setSelectedImages] = useState([]);
  const [selectAll, setSelectAll] = useState(false);

  useEffect(() => {
    const fetchImages = () => {
      const newImages = [
        '/images/orange.jpg',
        '/images/strawberry.jpg',
        '/images/banana.jpg',
      ];
      setImages(newImages);
    };

    fetchImages();

    const intervalId = setInterval(fetchImages, 60000);

    return () => clearInterval(intervalId);
  }, []);

  const handleCheckboxChange = (imagePath) => {
    setSelectedImages((prevSelectedImages) => {
      if (prevSelectedImages.includes(imagePath)) {
        return prevSelectedImages.filter((selectedImage) => selectedImage !== imagePath);
      } else {
        return [...prevSelectedImages, imagePath];
      }
    });
  };

  const handleSelectAllChange = () => {
    setSelectAll((prevSelectAll) => !prevSelectAll);
    setSelectedImages(selectAll ? [] : images);
  };

  const handleDeleteSelected = () => {
    const updatedImages = images.filter((image) => !selectedImages.includes(image));
    setImages(updatedImages);
    setSelectedImages([]);
    setSelectAll(false);
    console.log(`Deleting selected images: ${selectedImages.join(', ')}`);
  };

  return (
    <div>
      <header style={{ background: '#3498db', padding: '10px', color: 'white', textAlign: 'center' }}>
        <h1>Photo Gallery by ProjectGurukul</h1>
      </header>
      <div style={{ display: 'flex', flexDirection: 'column', alignItems: 'center' }}>
        <div style={{ margin: '20px' }}>
          <input
            type="checkbox"
            checked={selectAll}
            onChange={handleSelectAllChange}
            style={{ marginRight: '8px' }}
          />
          <label>Select All</label>
          <button onClick={handleDeleteSelected}>Delete Selected</button>
        </div>
        <div style={{ display: 'flex', flexWrap: 'wrap', justifyContent: 'center' }}>
          {images.map((image, index) => (
            <div
              key={index}
              style={{
                border: '1px solid #ccc',
                margin: '10px',
                padding: '10px',
                textAlign: 'center',
              }}
            >
              <img
                src={image}
                alt="Gallery Item"
                style={{ width: '150px', height: '150px', objectFit: 'cover' }}
              />
              <div style={{ marginTop: '10px' }}>
                <input
                  type="checkbox"
                  checked={selectAll || selectedImages.includes(image)}
                  onChange={() => handleCheckboxChange(image)}
                />
              </div>
            </div>
          ))}
        </div>
      </div>
    </div>
  );
};

export default Gallery;
React Photo Gallery Application Output:
Conclusion
In conclusion, creating a react photo gallery application involves designing user-friendly features like uploading, organizing, and sharing images. Utilizing React hooks such as useEffect and useState facilitates dynamic interactions and state management. Functions like handleCheckboxChange and handleDeleteSelected handle user actions like selecting and deleting images.
The interface layout is structured using HTML elements with inline styling for responsiveness. Implementation of logic ensures efficient management of image data and user interactions. Regular testing and optimization enhance the application’s performance and user experience.
Overall, the project aims to provide a seamless and enjoyable platform for users to curate and enjoy their photo collections. the photo gallery capstone project represents a significant leap forward in user-centric digital image exploration. Its innovative features and emphasis on community engagement redefine the traditional photo browsing experience.
Focusing on privacy and security, it ensures user trust and confidence. Seamless integration with social media platforms amplifies sharing capabilities, fostering widespread adoption. This project heralds a new era of immersive and collaborative visual storytelling.
React photo to recover photo
React to recover