Convert Text to Speech and Speech to Text in Python
FREE Online Courses: Enroll Now, Thank us Later!
In this Python project, we will build a GUI-based text to speech and speech to text converter using python Tkinter, gTTS, Speech Recognition, and OS modules. It is an intermediate-level python project that is used on a daily basis by some people and you will be able to create and apply it in real life. Let’s get started!
About Text to Speech (TTS) Converters:
Text to speech converters convert text into speech using various algorithms. They have multiple applications and are especially useful when you have a sore throat. Generally, python Text to speech converters operate via CLI only if you have an active internet connection, but for this project, we will create a GUI python Text to speech converter which you can operate from your computer offline as well.
About Speech to Text (STT) Converters:
Speech to text converters, just as their name, convert spoken language to a text form. They are most useful when you have to constantly write a long document instantaneously without typing before you forget what to write. The APIs for python speech to text conversion use an active internet connection and use online or offline engines. We will use an online engine, but also guide you through using an offline engine as per your convenience.
About the project:
The objective of this is to create a GUI-based text to speech and speech to text converter. To build this, you will need basic understanding of the Tkinter, pyttsx3, and speech recognition libraries.
Download Text to Speech and Speech to Text Converter Python Project
Please download the source code of python Text-to-Speech and Speech-to-Text Converter: Text-to-Speech and Speech-to-Text Converter Python Code
Project Prerequisites:
To build this project, we will need the following libraries:
- Tkinter – To create a GUI for the project.
- pyttsx3 – To convert text to speech; it will be used as TTS Conversion engine.
- Speech Recognition – To convert speech to text; it is STT Conversion API.
Although the Tkinter library comes pre-installed with Python, the pyttsx3 and Speech Recognitions modules do not.
To install these libraries, you need to run the following commands on your terminal one by one:
python -m pip install pyaudio
python -m pip install pyttsx3
python -m pip install speech_recognition
The pyaudio library is a prerequisite in Python, to allow audio input to the program.
Note:
If the pyaudio library does not install using the above command, follow the steps mentioned here
Text to Speech and Speech to Text Converter Project File Structure:
Here are the steps you will need to execute to build this project:
- Importing all the necessary modules and classes
- Initialising window and placing all its components
- Creating the backend speak() and record() functions
- Creating the frontend TTS, STT and instruction functions that the buttons on the main window will navigate to
Let’s take a closer look at these steps:
1. Importing all the necessary modules and classes:
from tkinter import *
from tkinter.messagebox import showinfo
import pyttsx3
import speech_recognition as sr
Explanation:
- The showinfo() function is used to display a box with information on it.
- The as keyword is used to import a library (here) on an alias, or an abbreviation.
2. Initialising window and placing all its components:
# Creating the main GUI window
root = Tk()
root.title('ProjectGurukul TTS and STT Converter')
root.geometry('300x300')
root.resizable(0, 0)
root.configure(bg='Salmon')

# Placing all the components
Label(root, text='ProjectGurukul Text-To-Speech and Speech-To-Text Converter',
     font=('Comic Sans MS', 16), bg='Salmon', wrap=True, wraplength=300).place(x=15, y=0)

tts_btn = Button(root, text='TTS Conversion', font=('Helvetica', 16), bg='MediumPurple', command=TTS)
tts_btn.place(x=60, y=150)

stt_btn = Button(root, text='STT Conversion', font=('Helvetica', 16), bg='MediumPurple', command=STT)
stt_btn.place(x=60, y=200)

instruction_btn = Button(root, text='Instructions before starting', font=('Helvetica', 16), bg='MediumPurple',
                        command=instruction)
instruction_btn.place(x=15, y=250)

# Updating main window
root.update()
root.mainloop()
Explanation:
- Firstly, we will be creating a main GUI window. To create that, you need to specify the following properties:
- The Tk() class is used to initialize the python text to speech project window
- The .title() method is used to specify a title of the window.
- The .geometry() method is used to set the initial geometry, the initial dimensions of the window.
- The .resizable() decides whether the user will be allowed to resize the window after initialization or not. It takes the arguments in the form (height, width) and the default is True. However, you can change it to 0 or False to deny that right to the user, so user can’t change the size of python text to speech project window.
- The .configure() method is used to configure certain properties of the window in the form of arguments of this method. Therefore, the bg attribute is used to give a background color to the window.
- The .update() and .mainloop() methods of the Tk() class are used to put the window in a loop such that it does not get destroyed the moment it appears on the screen.
Any code after the .mainloop() method regarding the GUI window will not be executed.
- Now that the window is set, we will create and place all its components. The components in this window are the Label and the Button widgets.
- The Label widget class is used to display static text on the window that cannot be selected or edited by the user in any way. You need to set the following attributes to create a Label widget:
- The master attribute refers to the window it is associated with.
- The text attribute specifies the text that will be present on the Label.
- The font attribute is used to set the font type of the text displayed. It takes the arguments as a tuple, in the form of: (“font_family”, font_size[integer], ‘bold’/’italic’/both[optional])
- The bg attribute gives a color to the widget.
- The wrap attribute, which takes arguments as boolean objects, is used to specify whether the text will be wrapped in multiple lines or not.
- The wraplength attribute, which is recommended to be set to the width of the window, is the length that the text should not exceed (in pixels).
- The Button widget class is used to add a button to the window that performs a command when it is pressed. The attributes it takes to set itself are:
- The master, text, bg, and font attributes are the same as in the Label class.
- The command attribute is used to define the function that the button will execute when it is pressed. Generally, the command attribute sets a function without arguments, but to specify a function with arguments, you need to use the lambda keyword.
- The .place() method, one of the 3 Tk geometry manager methods, is a method that allows the user to give an offset point to the widget it is used on. The offset point, which is in terms of abscissa and ordinate, is a coordinate on a Cartesian Plane where the north west corner is the origin and also the default location of the .place() method.
3. Creating the backend speak() and record() functions:
# Creating the TTS and STT functions
def speak(text: str):
   engine = pyttsx3.init()

   engine.setProperty('rate', 10)
   engine.setProperty('volume', 100)

   engine.say(text)
   engine.runAndWait()


def record():
    r = sr.Recognizer()


    with sr.Microphone() as source:
        r.pause_threshold = 2
        audio = r.listen(source)

        try:
            query = r.recognize_google(audio, language="en-IN")
        except Exception as e:
            showinfo(title='Error!', message=e)
            speak("I am sorry, I did not get that, but could you please repeat that")

            return "Nothing"
        return query
Explanation:
- This is the step where we make use of the pyttsx3 and speech_recognition libraries (imported as sr earlier).
- In the speak() function, we take the text of type str as an argument.
- Firstly, we will initialise the pyttsx3 library and store it in the variable called engine.
- Then we will use the .setProperty() method to set the properties ‘rate’ and ‘volume’ of the voice to 10 and 100 respectively.
- Eventually, we will use the .say() method and provide it with the text taken as the argument to speak the said text.
- We will also use the .runAndWait() method to tell the engine that the words spoken should not collide with any other task to be executed or is being executed.
- In the record() function, we take a StringVar object as an argument.
- Firstly, we will assign the Recognizer() class to the variable r.
- The Recognizer() instance is used to recognize speech from an audio source.
- We will then use the with sr.Microphone() as source statement to get the audio from the default microphone of the computer.
- The sr.Microphone() is used to record the audio.
- The with…as… keywords are used to open a file or the Microphone, in this case.
- Next, we will tell the Recognizer instance to set the pause_threshold attribute to 2 and tell it to listen to what is being said through the Microphone using the .listen() method.
- The pause_threshold attribute defines the number of seconds, in float, after which a phrase is over.
- The .listen() method is used by Recognizer objects to listen through the audio file/audio source that has been provided to it as an argument.
- Next, we will use the try…except block to see if the Google Cloud API, or the chosen supported API, can transcribe the audio or not.
- The .recognise_google() method of the Recognizer is used to transcribe the audio in the language whose code is provided in the lang attribute via the Google Cloud API. If it succeeds, we will return the text out of the function as a variable query. The list of other supported APIs by this library: PyPI – Speech Recognition
- In the except block, we will show an info box if there is an error and the API cannot transcribe the audio; we will return “Nothing” out of the function.
Creating the frontend python text to speech, python speech to text, and instruction functions that the buttons on the main window will navigate to:
# Creating the main TTS and STT functions and the instruction functions
def TTS():
    tts_wn = Toplevel(root)
    tts_wn.title('Text-to-Speech Converter')
    tts_wn.geometry("350x250")
    tts_wn.configure(bg='Brown')

    Label(tts_wn, text='Text-to-Speech Converter', font=("Comic Sans MS", 15), bg='Brown').place(x=50)

    text = Text(tts_wn, height=5, width=30, font=12)
    text.place(x=7, y=60)

    speak_btn = Button(tts_wn, text='Record', bg='LightCoral', command=lambda: speak(str(text.get(1.0, END))))
    speak_btn.place(x=140, y=200)


def STT():
    stt_wn = Toplevel(root)
    stt_wn.title('Speech-to-Text Converter')
    stt_wn.geometry("350x200")
    stt_wn.configure(bg='IndianRed')

    Label(stt_wn, text='Speech-to-Text Converter', font=("Comic Sans MS", 15), bg='IndianRed').place(x=50)

    text = Text(stt_wn, font=12, height=3, width=30)
    text.place(x=7, y=100)

    record_btn = Button(stt_wn, text='Record', bg='Sienna', command=lambda: text.insert(END, record()))
    record_btn.place(x=140, y=50)


def instruction():
    instructions = '''
These are the instructions:
1. Wait for some time because STT and TTS conversions take time.
2. Pause for 2 seconds to end your phrase in STT conversion, because that is the pause_threshold amount.
'''
    showinfo("Instructions before beginning", instructions)
Explanation:
- The Toplevel widget is used to create a window on the top of the windows present. In our case, it is a child window, whose parent is the root text to speech and speech to text window.
- The Text widget is a multiline input field for users to enter text. We will use this window for two purposes: enter text in for the speak() function and display the text after processing in the record() function.
- The .get() method is used to retrieve the text in the widget. To get all the text from the widget, you need to put (1.0, END) as the arguments.
- The .insert() method is used to add text to the widget. The arguments it takes are: [index, char] which specify the index where the text has to be added and the characters, the text to be added respectively.
- The showinfo() box in tkinter.filedialog is used to display some information on a separate window. The 2 arguments it takes are title, message which set the title and the message to be displayed on the box respectively.
The final code:
# Importing all the necessary modules
from tkinter import *
from tkinter.messagebox import showinfo
import pyttsx3
import speech_recognition as sr

# Creating the python text to speech and speech to text functions
def speak(text: str):
    engine = pyttsx3.init()

    engine.setProperty('rate', 10)
    engine.setProperty('volume', 100)

    engine.say(text)
    engine.runAndWait()


def record():
    r = sr.Recognizer()


    with sr.Microphone() as source:
        r.pause_threshold = 2
        audio = r.listen(source)

        try:
            query = r.recognize_google(audio, language="en-IN")
        except Exception as e:
            showinfo(title='Error!', message=e)
            speak("I am sorry, I did not get that, but could you please repeat that")

            return "Nothing"
        return query


# Creating the main TTS and STT functions and the instruction functions
def TTS():
    tts_wn = Toplevel(root)
    tts_wn.title('Text-to-Speech Converter')
    tts_wn.geometry("350x250")
    tts_wn.configure(bg='Brown')

    Label(tts_wn, text='Text-to-Speech Converter', font=("Comic Sans MS", 15), bg='Brown').place(x=50)

    text = Text(tts_wn, height=5, width=30, font=12)
    text.place(x=7, y=60)

    speak_btn = Button(tts_wn, text='Record', bg='LightCoral', command=lambda: speak(str(text.get(1.0, END))))
    speak_btn.place(x=140, y=200)


def STT():
    stt_wn = Toplevel(root)
    stt_wn.title('Speech-to-Text Converter')
    stt_wn.geometry("350x200")
    stt_wn.configure(bg='IndianRed')

    Label(stt_wn, text='Speech-to-Text Converter', font=("Comic Sans MS", 15), bg='IndianRed').place(x=50)

    text = Text(stt_wn, font=12, height=3, width=30)
    text.place(x=7, y=100)

    record_btn = Button(stt_wn, text='Record', bg='Sienna', command=lambda: text.insert(END, record()))
    record_btn.place(x=140, y=50)


def instruction():
    instructions = '''
These are the instructions:
1. Wait for some time because STT and TTS conversions take time.
2. Pause for 2 seconds to end your phrase in STT conversion, because that is the pause_threshold amount.
'''
    showinfo("Instructions before beginning", instructions)


# Creating the main GUI window
root = Tk()
root.title('ProjectGurukul python text to speech and speech to text Converter')
root.geometry('300x300')
root.resizable(0, 0)
root.configure(bg='Salmon')

# Placing all the components
Label(root, text='ProjectGurukul Text-To-Speech and Speech-To-Text Converter',
      font=('Comic Sans MS', 16), bg='Salmon', wrap=True, wraplength=300).place(x=15, y=0)

tts_btn = Button(root, text='TTS Conversion', font=('Helvetica', 16), bg='MediumPurple', command=TTS)
tts_btn.place(x=60, y=150)

stt_btn = Button(root, text='STT Conversion', font=('Helvetica', 16), bg='MediumPurple', command=STT)
stt_btn.place(x=60, y=200)

instruction_btn = Button(root, text='Instructions before starting', font=('Helvetica', 16), bg='MediumPurple',
                         command=instruction)
instruction_btn.place(x=15, y=250)

# Updating main window
root.update()
root.mainloop()
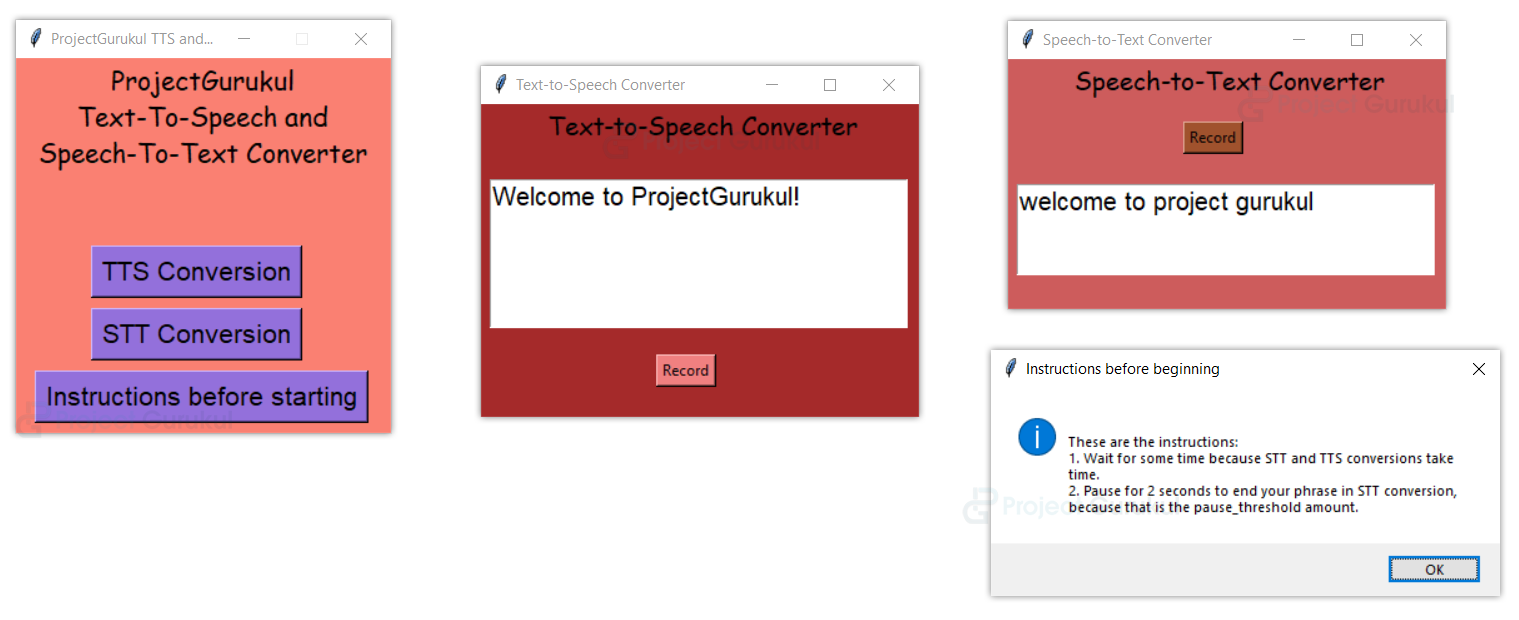
Python Text to Speech & Speech to Text Converter Output
Summary
Congratulations! We have successfully created python text to speech and speech to text converters using the Tkinter, pyttsx3, and speech_recognition modules.
This python project can have multiple applications, including but not limited to transcribing documents, aiding the mute, and talking without opening your mouth. You can customize it a little to suit your needs, and make it more awesome! Have fun with it!
pip install SpeechRecognition
Speech to text is not working how to resolve it..
I’m not getting the output…
Speech recognition is not working??