School Management System Project in Python with Source Code
FREE Online Courses: Enroll Now, Thank us Later!
The School Management System is to manage all student information. In our project, we will use it to manage certain basic student information. Let’s develop Python School Management System.
Python School Management System- Project Details
The purpose of this is to build a GUI-based School Management System. To build this, you will need an understanding between the Tkinter and pymysql libraries as well as a basic understanding of message box and Ttk modules.
Project Prerequisite
The School Management System Project requires good knowledge of python and the Tkinter library as well as a random module. The Tkinter module provides GUI functionality to our program and binds to the Tk toolkit.
Download School Management System Code
Please download the source code of Python School Management System from the following link: School Management System Project
Steps to Build a Python School Management System Project
Following are the steps to develop python school management system project
-
- Create Database
- Importing modules.
- Initializing window frame
- Declaring variables and entry widgets
- Function for fetching data
- The Function to add, update, delete, clear data
- Function for fetching the data from selected row
- Creating buttons
- Make search frame
- Create database frame
Step 1- Create Database
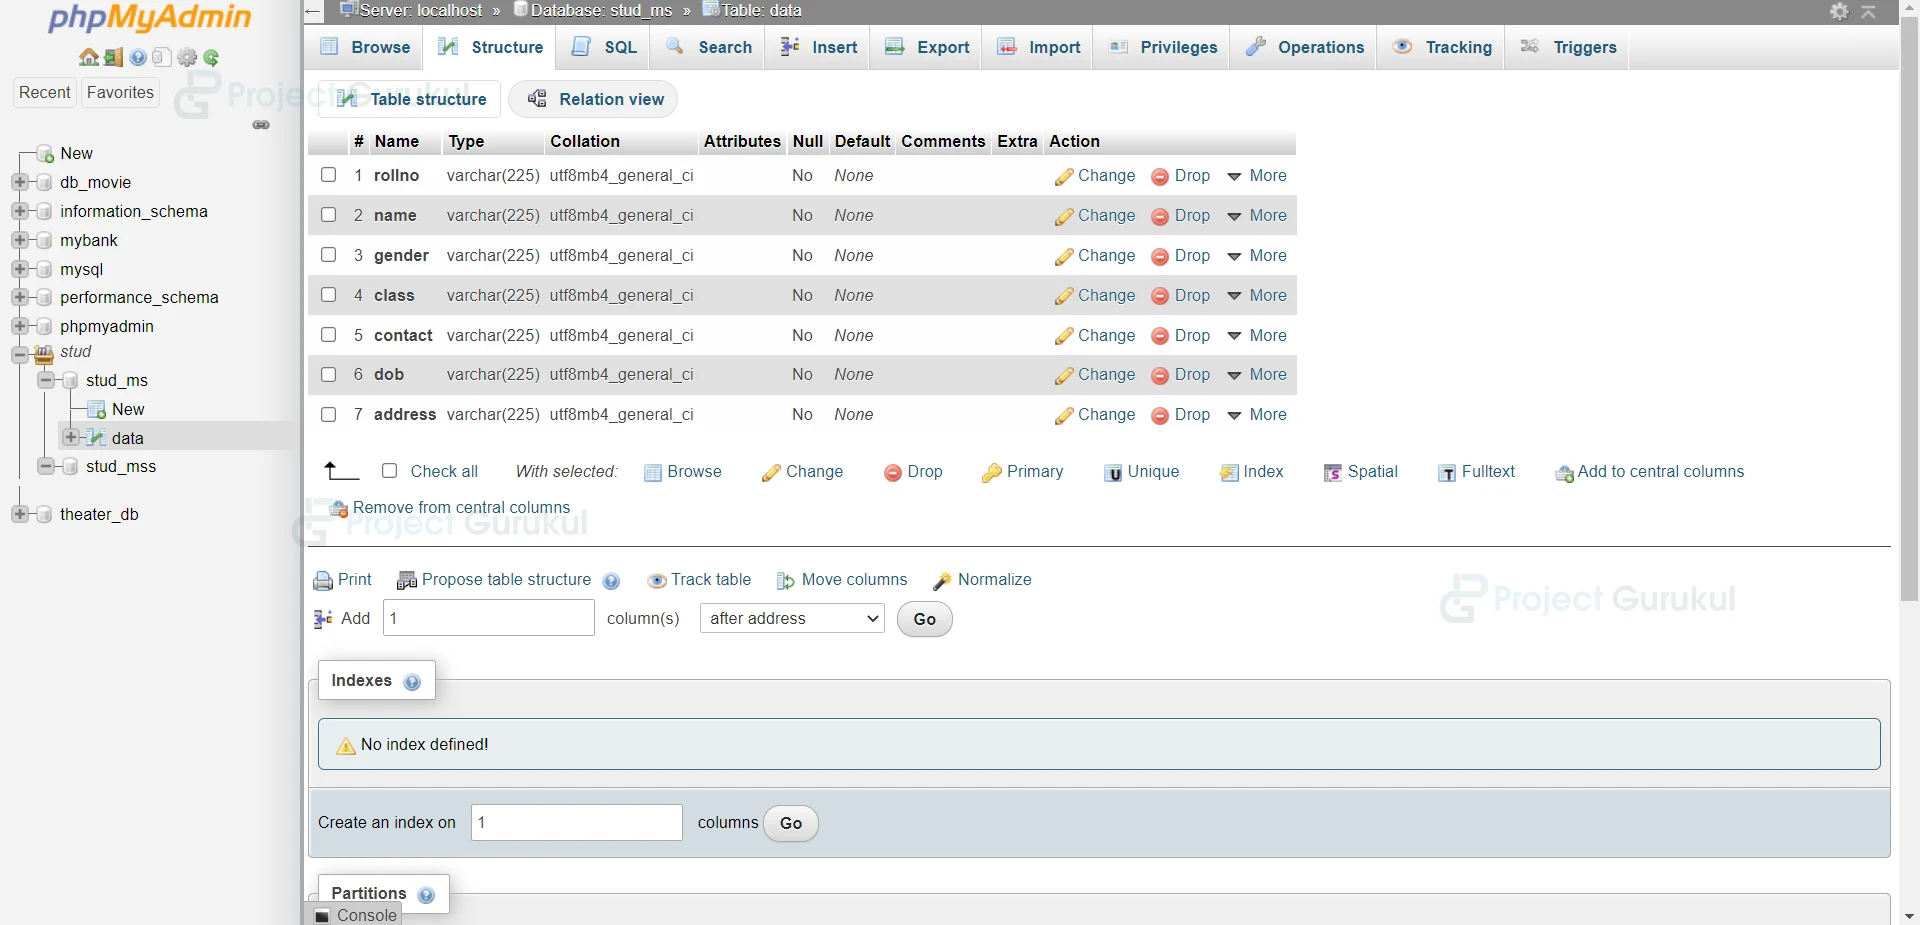
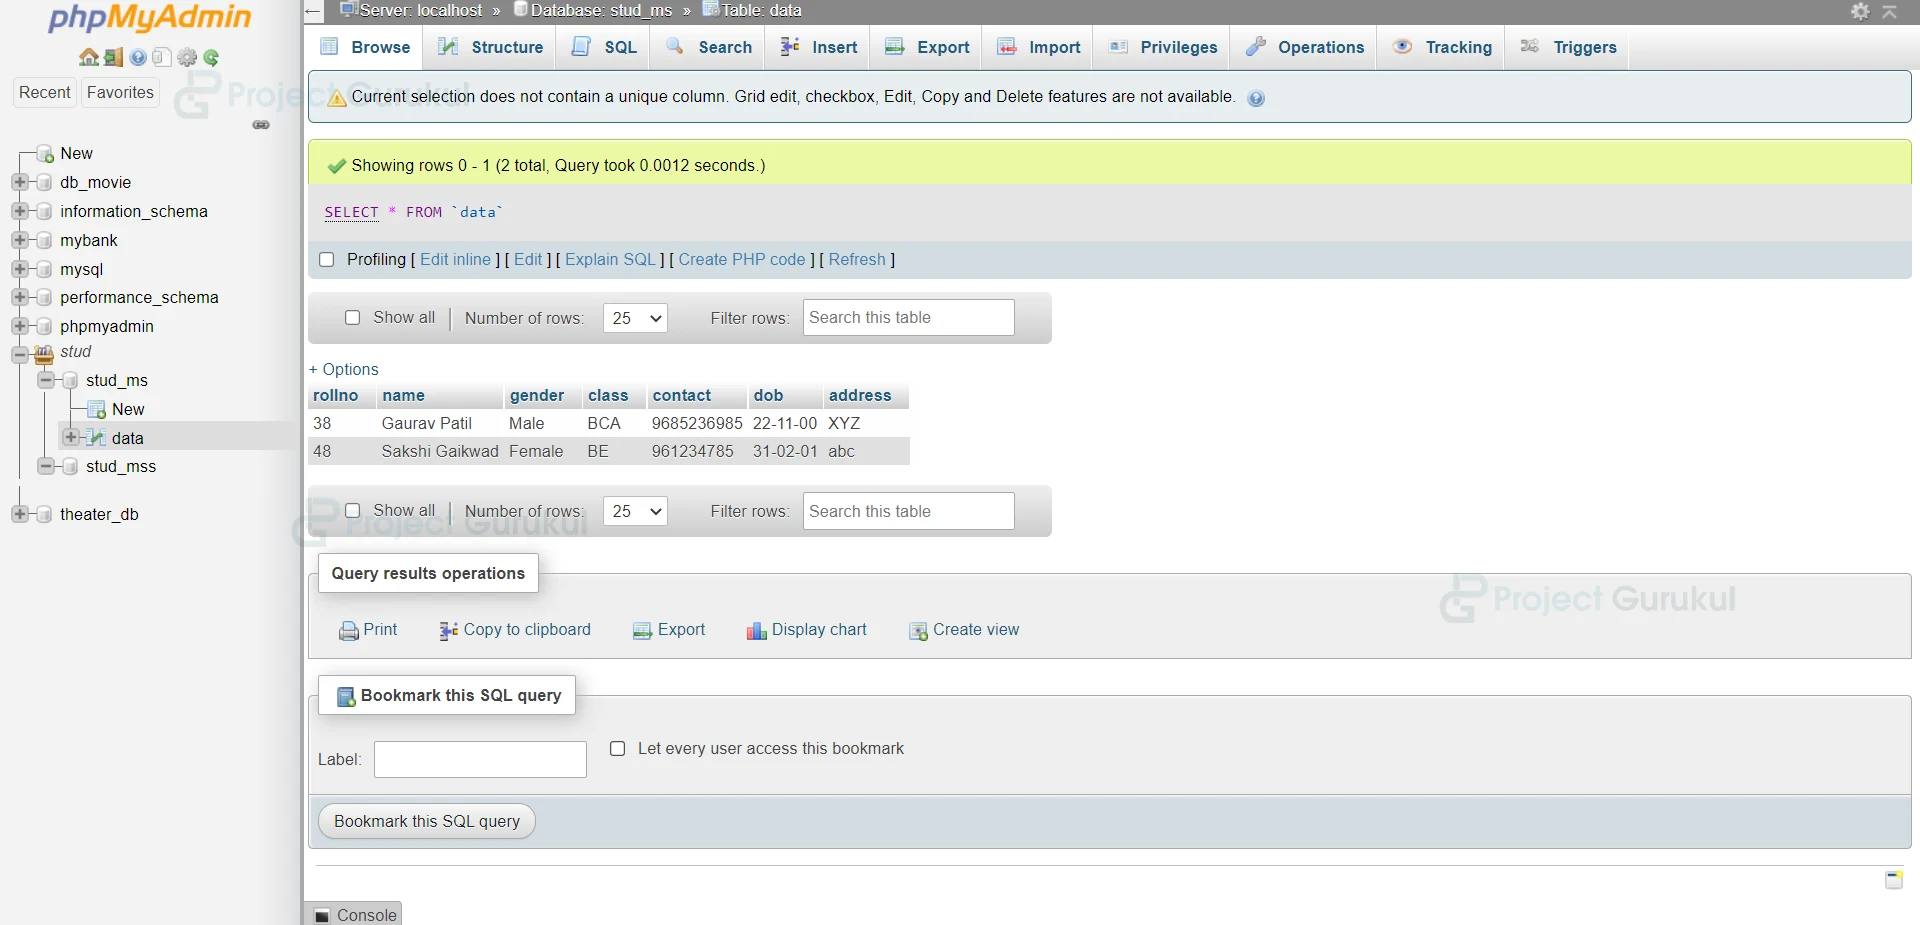
In python school management system project we have to insert a database of the students. For database operations, we will use xampp. We have created a database of name stud_ms and created a table of name data in which we have added all the columns roll no, name, gender, class, contact, dob, address. And insert data in a data table.
1. Start the xampp server, start apache and MySQL
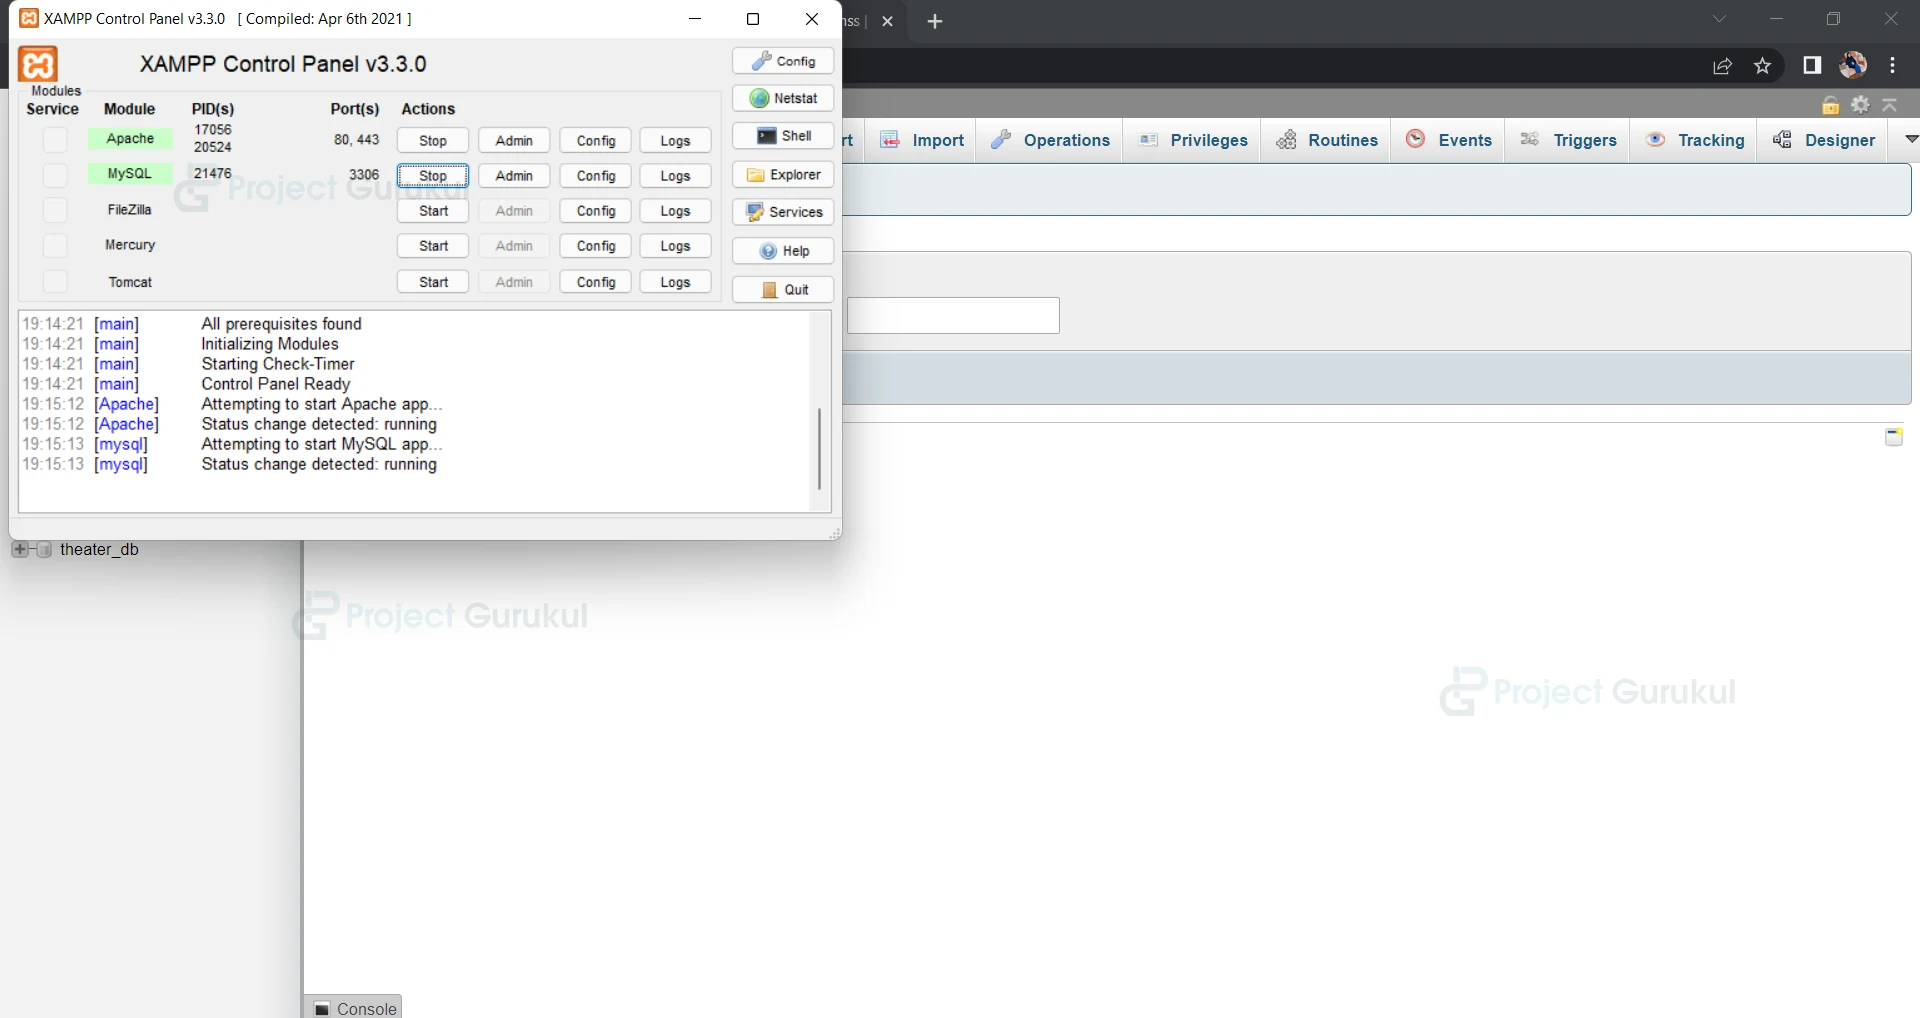
2. Database creation stud_ms

3. Creation of table “data”

4. Creating table elements
5. Inserting student data
Step 2- Importing modules
#ProjectGurukul python School Management System - Import modules
import tkinter as tk
from tkinter import ttk
from tkinter import messagebox
import pymysql
Code Explanation
- Tkinter module – Tkinter is the standard interface in python for creating a GUI that is Graphical User Interface.
- pymysql – This library connects python to the MySQL server.
Step 3- Initializing window frame
#ProjectGurukul- Initializing window frame
window = tk.Tk()
window.geometry("1350x700")
window.title("Student Management System by ProjectGurukul")

Label_Heading = tk.Label(window, text="Student Management System", font=("Times new roman", 35,"bold"),bg="blue",foreground="yellow", border=12, relief=tk.GROOVE)
Label_Heading.pack(side=tk.TOP, fill=tk.X)

Frame_Details =  tk.LabelFrame(window, text="Enter details", font = ("Times new roman", 22,"bold"), bd=12, relief=tk.GROOVE, bg="#e3f4f1")
Frame_Details.place(x=20, y=100, width=400, height=575)

Frame_Data = tk.Frame(window, bd=12, relief=tk.GROOVE, bg="#e3f4f1")
Frame_Data.place(x=440 , y=100, width=890, height=575)
Code Explanation
- Tk – Initializing the window of the school management system.
- .geometry – For setting dimensions of a window in pixels.
- .title – Use to set title to window.
- Label_Heading – Make a heading label for giving heading to the project.
- Make two frames: details and data. set text, font, border width, background color etc. and place the frame with x and y coordinates.
Step 4- Declaring variables and entry widgets
# Variables
rollno = tk.StringVar()
name = tk.StringVar()
email = tk.StringVar()
gender = tk.StringVar()
class_var = tk.StringVar()
contact = tk.StringVar()
dob = tk.StringVar()
address = tk.StringVar()
search_box = tk.StringVar()

# Entry widget
Label_Name = tk.Label(Frame_Details, text="Name", font=("Times new roman", 17), bg="#e3f4f1")
Label_Name.grid(row=0, column=0, padx=2, pady=2)
Entry_Name = tk.Entry(Frame_Details,bd=7, font= ("Times new roman", 17),width=17,textvariable=rollno)
Entry_Name.grid(row=0, column=1, padx=2, pady=2)

Label_RollNo = tk.Label(Frame_Details, text="Roll No", font=("Times new roman", 17), bg="#e3f4f1")
Label_RollNo.grid(row=1, column=0, padx=2, pady=2)
Entry_RollNo = tk.Entry(Frame_Details,bd=7, font= ("Times new roman", 17),width=17, textvariable=name)
Entry_RollNo.grid(row=1, column=1, padx=2, pady=2)

Label_Email = tk.Label(Frame_Details, text="Email", font=("Times new roman", 17), bg="#e3f4f1")
Label_Email.grid(row=2, column=0, padx=2, pady=2)
Entry_Email = tk.Entry(Frame_Details,bd=7, font= ("Times new roman", 17),width=17, textvariable=email)
Entry_Email.grid(row=2, column=1, padx=2, pady=2)

Label_Gender = tk.Label(Frame_Details, text="Gender", font=("Times new roman", 17), bg="#e3f4f1")
Label_Gender.grid(row=3, column=0, padx=2, pady=2)
Entry_Gender = tk.Entry(Frame_Details,bd=7, font= ("Times new roman", 17),width=17, textvariable=gender)
Entry_Gender.grid(row=3, column=1, padx=2, pady=2)

Label_Class = tk.Label(Frame_Details, text="Class", font=("Times new roman", 17), bg="#e3f4f1")
Label_Class.grid(row=4, column=0, padx=2, pady=2)
Entry_Class = tk.Entry(Frame_Details,bd=7, font= ("Times new roman", 17),width=17, textvariable=class_var)
Entry_Class.grid(row=4, column=1, padx=2, pady=2)

Label_Contact_No = tk.Label(Frame_Details, text="Contact No", font=("Times new roman", 17), bg="#e3f4f1")
Label_Contact_No.grid(row=6, column=0, padx=2, pady=2)
Entry_Contact_No = tk.Entry(Frame_Details,bd=7, font= ("Times new roman", 17),width=17,textvariable=contact)
Entry_Contact_No.grid(row=6, column=1, padx=2, pady=2)

Label_DOB = tk.Label(Frame_Details, text="D.O.B", font=("Times new roman", 17), bg="#e3f4f1")
Label_DOB.grid(row=7, column=0, padx=2, pady=2)
Entry_DOB = tk.Entry(Frame_Details,bd=7, font= ("Times new roman", 17),width=17, textvariable=dob)
Entry_DOB.grid(row=7, column=1, padx=2, pady=2)

Label_Address = tk.Label(Frame_Details, text="Address", font=("Times new roman", 17), bg="#e3f4f1")
Label_Address.grid(row=8, column=0, padx=2, pady=2)
Entry_Address = tk.Entry(Frame_Details,bd=7, font= ("Times new roman", 17),width=17, textvariable=address)
Entry_Address.grid(row=8, column=1, padx=2, pady=2)
Code Explanation
- tk.StringVar() – This is tkinter tool used to manage the value of a project such as a label or entry widget.
- Here we are making all entry widgets that we have to add in the entry details.
- Make labels and entry widgets of all entries like roll no, name, image, gender, class, contact, dob, and address and set their text, font, border
- width, background color etc.
- .grid() – this method places the widgets in the proper place.
Step 4- Function for fetching data
def GET_DATA():
             con=pymysql.connect(host='localhost',user='root',password='',database='stud_ms')
    cur=con.cursor()
    cur.execute('SELECT * FROM data')
    rows=cur.fetchall()

    if len(rows)!=0:
         Student_table.delete(*Student_table.get_children())
         for row in rows:
             Student_table.insert('',tk.END,values=row)
         con.commit()
         con.close()
Code Explanation
- GET_DATA() – Function for fetching data.
- Here we have connected our python server to the mysql database connector. Hostname is localhost, username is root and password is none.
- We have created a database named stud_ms.
- cursor() – This is a function from the pymysql library which invokes methods that execute SQL statements and fetch data from sets of the queries.
- .execute() – for the execution of a query.
- fetchall() – This method fetches all rows of the query.
- .commit() – this method is used to confirm all the new changes made by the user.
- .close() – It closes the open file.
Step 5- Function to add, update, delete, clear data
def ADD_DATA():
    if rollno.get()=="" or name.get()=="" or class_var.get =="":
        messagebox.showerror('Error','All Fields required')
    else:
        con=pymysql.connect(host='localhost',user='root',password='',database='stud_ms')
        cur = con.cursor()
        cur.execute("insert into students values(%s,%s,%s,%s,%s,%s,%s,%s)" (rollno.get(), name.get(), gender.get(), class_var.get(), contact.get(), dob.get(), address.get()))
        con.commit()
        con.close()
        GET_DATA()
        CLEAR()
        messagebox.showinfo("Record has been saved successfully")


def UPDATE_DATA():
con=pymysql.connect(host='localhost',user='root',password='',database='stud_ms')
    cur = con.cursor()
    cur.execute("Update dataset name=%s, gender=%s, class_var=%s, contact=%s, dob=%s, address=%s where rollno=%s",(name.get(), gender.get(), class_var.get(), contact.get(), dob.get(), address.get(),rollno.get()))
    con.commit()
    GET_DATA()
    con.close()
    CLEAR()

def CLEAR():
    rollno.set("")
    name.set("")
    gender.set("")
    class_var.set("")
    contact.set("")
    dob.set("")
    address.set("")

def DELETE():
con=pymysql.connect(host='localhost',user='root',password='',database='stud_ms')
    cur=con.cursor()
    cur.execute('delete from data where rollno=%s ',rollno.get())
    con.commit()
    con.close()
    GET_DATA()
    CLEAR()
    messagebox.showinfo('Success','Record has been deleted')
Code Explanation
i. ADD_DATA() – Function for adding data in the student database.
- We have to enter new data in every field and click on the add button to add to the dataset.
- Here we have connected our python server to the mysql database connector. Hostname is localhost, username is root and password is none.
- We have created a database named stud_ms.
- cursor() – This is a function from the pymysql library which invokes methods that execute SQL statements and fetch data from sets of the queries.
- .execute() – for the execution of query.
- .commit() – this method is used to confirm all the new changes made by the user.
- .close() – It closes the open file.
- Call get data and clear function after adding data message will pop that record has been saved successfully.
ii. UPDATE_DATA() – Function for updating data in the student database.
- Here we have connected our python server to the mysql database connector. Hostname is localhost, username is root and password is none.
- We have created a database named stud_ms.
- cursor() – This is a function from the pymysql library which invokes methods that execute SQL statements and fetch data from sets of the queries.
- .execute() – for the execution of a query.
- .commit() – this method is used to confirm all the new changes made by the user.
- .close() – It closes the open file.
iii. CLEAR() – Function for clearing the data entries.
- .set – set function stores multiple elements in the single variable.
iv. DELETE() – Function for deleting selected dataset.
- Here we have connected our python server to the mysql database connector. Hostname is localhost, username is root and password is none.
- We have created a database named stud_ms.
- We have to select a particular contact that we have to delete and then click on the delete button. The contact will get deleted successfully.
- cursor() – This is a function from the pymysql library which invokes methods that execute SQL statements and fetch data from sets of the queries.
- .execute() – for the execution of a query.
- .commit() – this method is used to confirm all the new changes made by the user.
- .close() – It closes the open file.
Step 6- Function for fetching the data from selected row
def FOCUS(e):
    cursor=Student_table.focus()
    content=Student_table.item(cursor)
    row=content['values']
    rollno.set(row[0])
    name.set(row[1])
    gender.set(row[2])
    class_var.set(row[3])
    contact.set(row[4])
    dob.set(row[5])
    address.set(row[6])
Code Explanation
- Focus() – This function will fetch data from the selected row.
- .set – set function stores multiple elements in the single variable.
Step 7- Creating buttons
#buttons
Frame_Btn = tk.Frame(Frame_Details, bg="#e3f4f1", bd=7, relief=tk.GROOVE)
Frame_Btn.place(x=15, y=390, width=348, height=120)

Add_Button = tk.Button(Frame_Btn, bg="#e3f4f1", text="Add", bd=7, font=("Times new roman", 15), width=13, command=ADD_DATA)
Add_Button.grid(row=0, column=0, padx=2, pady=2)

Delete_Button = tk.Button(Frame_Btn, bg="#e3f4f1", text="Delete", bd=7, font=("Times new roman", 15), width=13, command=DELETE)
Delete_Button.grid(row=0, column=1, padx=2, pady=2)

Update_Button = tk.Button(Frame_Btn, bg="#e3f4f1", text="Update", bd=7, font=("Times new roman", 15), width=13, command=UPDATE_DATA)
Update_Button.grid(row=1, column=0, padx=2, pady=2)

Clear_Button = tk.Button(Frame_Btn, bg="#e3f4f1", text="Clear", bd=7, font=("Times new roman", 15), width=13, command=CLEAR)
Clear_Button.grid(row=1, column=1, padx=2, pady=2)
Code Explanation-
- Here we are creating buttons: frame, add, delete, update, clear.
- Create buttons using button widgets and set their background color, text, border width, font, font size, and give commands to the button.
- .grid will place the button at the proper position.
Step 8- Make search frame
# Search Frame

Frame_Search = tk.Frame(Frame_Data, bg="#e3f4f1" , bd=10, relief=tk.GROOVE)
Frame_Search.pack(side=tk.TOP, fill=tk.X)

Label_Search = tk.Label(Frame_Search, text="Search", bg="#e3f4f1", font=("Times new roman", 16))
Label_Search.grid(row=0, column=0, padx=12, pady=2)

Search_Box = ttk.Combobox(Frame_Search, font=("Times new roman", 16), state="readonly", textvariable=search_box)
Search_Box['values'] = ("Name", "Roll No", "Email", "Class", "Contact No", "D.O.B" )
Search_Box.grid(row=0, column=1, padx=12, pady=2)

Search_Button = tk.Button(Frame_Search, bg="#e3f4f1", text="Search", bd=7, font=("Times new roman", 15), width=14)
Search_Button.grid(row=0, column=2, padx=12, pady=2)

Show_Button = tk.Button(Frame_Search, bg="#e3f4f1", text="Show", bd=7, font=("Times new roman", 15), width=14)
Show_Button.grid(row=0, column=3, padx=12, pady=2)
Code Explanation-
- tk.frame – Here we are making a search frame.
- tk. Label – Make a search label in that frame.
- ttk.combobox – Combobox is a combination of Listbox and an entry field. We are making a search box using this so we can search any dataset using this.
- tk.button – Widget for making buttons. Using these button widgets we are making search and show buttons.
Step 9- Create database frame
# Database Frame
Frame_Database = tk.Frame(Frame_Data, bg="#e3f4f1", bd=11, relief=tk.GROOVE)
Frame_Database.pack(fill=tk.BOTH, expand=True)

Scroll_X = tk.Scrollbar(Frame_Database, orient=tk.HORIZONTAL)
Scroll_Y = tk.Scrollbar(Frame_Database, orient=tk.VERTICAL)

Student_table = ttk.Treeview(Frame_Database, columns=("Name", "Roll No", "Gender", "Class","Contact No","D.O.B", "Address"), yscrollcommand= Scroll_Y.set,xscrollcommand= Scroll_X.set)

Scroll_X.config(command=Student_table.xview)
Scroll_X.pack(side=tk.BOTTOM, fill=tk.X)
Scroll_Y.config(command=Student_table.yview)
Scroll_Y.pack(side=tk.RIGHT, fill=tk.Y)

Student_table.heading("Roll No", text="Roll No")
Student_table.heading("Name", text="Name")
Student_table.heading("Gender", text="Gender")
Student_table.heading("Class", text="Class")
Student_table.heading("Contact No", text="Contact No")
Student_table.heading("D.O.B", text="D.O.B")
Student_table.heading("Address", text="Address")

Student_table['show']='headings'
Student_table.column("Roll No",width= 100)
Student_table.column("Name",width= 100)
Student_table.column("Gender",width= 100)
Student_table.column("Class",width= 100)
Student_table.column("Contact No",width= 100)
Student_table.column("D.O.B",width= 100)
Student_table.column("Address",width= 150)

Student_table.pack(fill=tk.BOTH, expand=True)
Code Explanation-
- Create a database frame so you are able to see all the database lists on this frame.
- Scrollbar – The scrollbar controls the up and down movement of the pdf.
- ttk.treeview – ttk. Treeview creates a new item and returns the item identifier of the newly created item.
- .heading – for setting the heading of the student tables.
- Student table creates column wise data and it will show all the dataset entries.
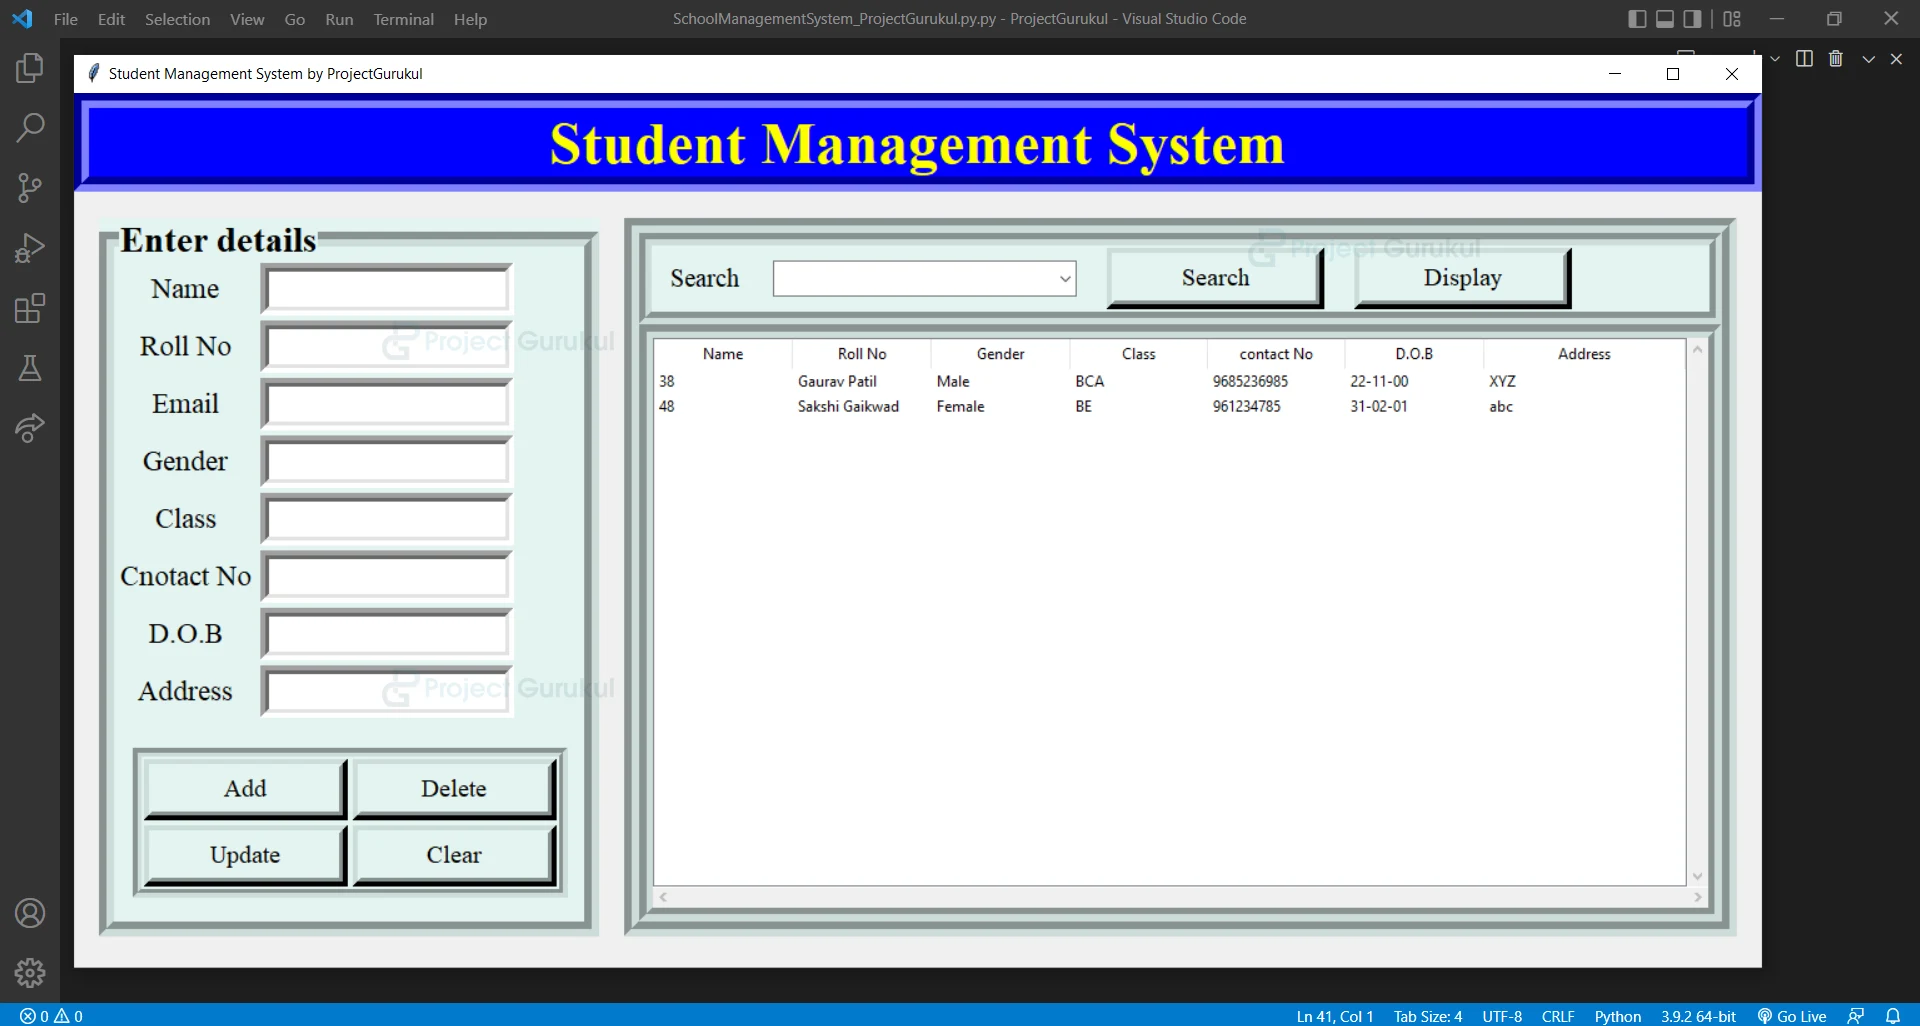
Python School Management System Output
Summary
We have successfully created a python school student management system project using Tkinter, pymysql modules. We’ve also created a graphical user interface GUI. and connect our python server to the localhost MySQL.
Rows was not defined ko kase solve kre
Hii This is Amzad Bhai from karimganj ,
i want to make a school management system project.
help me to do this
جيد جدا