Python Program to Make a Simple Calculator
FREE Online Courses: Elevate Your Skills, Zero Cost Attached - Enroll Now!
Calculators are a part of our day-to-day life. Everybody uses calculators on a daily basis so why not make a calculator of our own using Python. Let’s get started.
What is a Calculator?
A calculator is an application that is used to ease the process of mathematical calculation. It helps the user to do long mathematical calculations in just a few minutes. A calculator performs arithmetic operations like addition, subtraction, multiplication, division, square root, etc on numbers. There are also scientific calculators that can perform many complex operations.
Python Calculator – Project Details
We will be building the GUI of the calculator using the Tkinter module. We will be starting by making an empty window and then will create buttons and pack them in the window. After this, we will add implementations to all the buttons. Finally, we will try on some operations on the calculator to check the working of the calculator
1. Project Prerequisites:
As we will be using the Tkinter module one needs to install the module using the following command-
pip install tk
Download Python Calculator Program
Please download the source code of python calculator from the following link: Python Calculator Project Code
2. Project Steps:
The python calculator project is divided into main three steps
- Importing the packages
- Designing the frame and buttons of the calculator
- Implementing the execution of the buttons
Code Explanation:
a. Importing the packages:
import tkinter as tk
Tkinter is used for GUI creation in python. Import tkinter as tk so that you can use the abbreviation wherever necessary.
b. Designing the Calculator Window and Buttons:
- padx,pady- used for padding
- font – describing the font size, font colour etc.
- bg- defining the background
def __init__(self):
    self.window = tk.Tk()
    self.window.geometry("370x660")
    self.window.resizable(0, 0)
    self.window.title("ProjectGurukul Calculator")

    self.total_expression = ""
    self.current_expression = ""
    self.display_frame = self.create_display_frame()

    self.total_label, self.label = self.create_display_labels()

    self.digits = {
       7: (1, 1), 8: (1, 2), 9: (1, 3),
       4: (2, 1), 5: (2, 2), 6: (2, 3),
       1: (3, 1), 2: (3, 2), 3: (3, 3),
       0: (4, 2), '.': (4, 1)
    }
    self.operations = {"/": "\u00F7", "*": "\u00D7", "-": "-", "+": "+"}
    self.buttons_frame = self.create_buttons_frame()

    self.buttons_frame.rowconfigure(0, weight=1)
    for x in range(1, 5):
    self.buttons_frame.rowconfigure(x, weight=1)
    self.buttons_frame.columnconfigure(x, weight=1)
    self.digit_buttons()
    self.operator_buttons()
    self.special_buttons()
    self.bind_keys()
This function is to create a window with specified dimensions.
- init() method containing all the initializations.
- self.window- to create the calculator window with width, height, title etc for the window.
- self.total_expression – to count the total expressions.
- self.current_expression – to count the current expressions
def create_display_labels(self):
      total_label = tk.Label(self.display_frame, text=self.total_expression, anchor=tk.E, bg="#F5F5F5",
         fg="#25265E", padx=24, font=("Arial", 16))
      total_label.pack(expand=True, fill='both')

      label = tk.Label(self.display_frame, text=self.current_expression, anchor=tk.E, bg="#F5F5F5",
          fg="#25265E", padx=24, font=("Arial", 40, "bold"))
      label.pack(expand=True, fill='both')

      return total_label, label
This function is to create the display labels. Initializing the total_lable.
- Pack – used to pack the labels so that they can be seen in the window.
- label=tk.label() and total_label=tk.label() – these are for creating and initializing the labels.
def digit_buttons(self):
        for digit, grid_value in self.digits.items():
            button = tk.Button(self.buttons_frame, text=str(digit), bg="#FFFFFF", fg="#25265E", font=("Arial", 24, "bold"),
                      borderwidth=0, command=lambda x=digit: self.add_to_expression(x))
            button.grid(row=grid_value[0], column=grid_value[1], sticky=tk.NSEW)
This function is to create the digit buttons on the calculator window. Assigning all the attributes like colour, size, font etc for the same.
def clear_button(self):
    button = tk.Button(self.buttons_frame, text="C", bg="#F8FAFF", fg="#25265E", font=("Arial", 20),
       borderwidth=0, command=self.clear)
    button.grid(row=0, column=1, sticky=tk.NSEW)
It creates the clear button on the calculator window.
def square_button(self):
    button = tk.Button(self.buttons_frame, text="x\u00b2", bg="#F8FAFF", fg="#25265E", font=("Arial", 20),
        borderwidth=0, command=self.square)
    button.grid(row=0, column=2, sticky=tk.NSEW)
This function is to create the square button on the calculator which when clicked performs the square operation.
def sqrt_button(self):
     button = tk.Button(self.buttons_frame, text="\u221ax", bg="#F8FAFF", fg="#25265E", font=("Arial", 20),
           borderwidth=0, command=self.sqrt)
     button.grid(row=0, column=3, sticky=tk.NSEW)
This function is to create the square root button on the calculator which when clicked performs the square root operation.
def equals_button(self):
      button = tk.Button(self.buttons_frame, text="=", bg="#CCEDFF", fg="#25265E", font=("Arial", 20),
           borderwidth=0, command=self.evaluate)
      button.grid(row=4, column=3, columnspan=2, sticky=tk.NSEW)
It creates an equal to button which when clicked performs the evaluate operation.
def create_buttons_frame(self):
      frame = tk.Frame(self.window)
      frame.pack(expand=True, fill="both")
      return frame
It creates a frame for buttons to set in.
- frame.pack() – is to pack the frame.
- return frame – returns the frame.
c. Implementing the buttons:
def run(self):
    self.window.mainloop()
This function is to run the calculator application
def clear(self):
    self.current_expression = ""
    self.total_expression = ""
    self.update_label()
    self.update_total_label()
The clear function is to clear the display screen once the clear button is clicked.
- self.update – updates the value on the label and total_label both.
def square(self):
  self.current_expression = str(eval(f"{self.current_expression}**2"))
  self.update_label()
This function is to implement the square operation when the square button is clicked on the calculator.
def sqrt(self):
  self.current_expression = str(eval(f"{self.current_expression}**0.5"))
  self.update_label()
This function is to implement the square root operation when the square root button is clicked on the calculator.
def evaluate(self):
     self.total_expression += self.current_expression
     self.update_total_label()
     try:
        self.current_expression = str(eval(self.total_expression))
        self.total_expression = ""
    except Exception as e:
        self.current_expression = "Error"
    finally:
        self.update_label()
It is to make the evaluate operation once the equal to button is clicked.
def update_label(self):
    self.label.config(text=self.current_expression[:11])
This function is to update labels whenever the function is called.
Main function:
if __name__ == "__main__":
   calc = Calculator() # calc is the object
   calc.run() # calling function to run
This is the main function
- Creating an object cal of class Calculator()
- Calling the run() function to run the application.
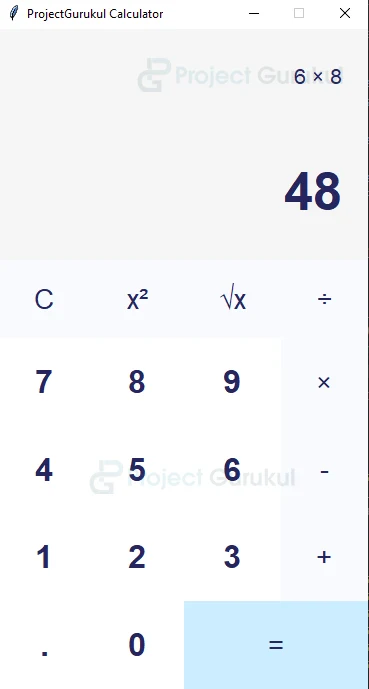
Python Calculator Output
Here is the output of how the python calculator we created will be displayed when we run the program:
Summary:
- We implemented the python calculator very easily and in less than 200 lines of code.
ImportingTkinter Module for creating GUI. - Creating different labels and buttons using the Tkinter module and packing the created labels and buttons in the calculator window.
- Implementing the functionality of all the buttons.
- Creating an object cal of class calculator and calling the run() method using the object.
It better than my phone