Python OpenCV Project – Real-Time Multiple Color Detection
FREE Online Courses: Knowledge Awaits – Click for Free Access!
In the field of computer vision, colour detection plays a crucial role in understanding visual data. Whether it’s tracking objects, analyzing images, or enabling interactive experiences, accurate colour detection is essential.
In this project, we will explore real-time multiple-colour detection using Python and OpenCV. By harnessing the power of these tools, we can create a system that identifies and tracks multiple colours simultaneously, opening up exciting applications in augmented reality, robotics, and image processing.
Understanding the Concept of Color Detection
Color detection is a vital part of computer vision that helps us understand and analyze the colors in images or videos. When it comes to detecting multiple colors in real-time using OpenCV, it’s important to know about color models. One commonly used model is RGB, which represents colors by combining red, green, and blue intensities. However, RGB can be affected by lighting conditions and can be complex.
On the other hand, there’s the HSV color model, which separates colors into three components: hue, saturation, and value. This model is more intuitive and robust. Using HSV, we can easily identify and track specific colors based on their hue, saturation, and value ranges. This simplifies color detection and improves accuracy even when lighting conditions change.
RGB Color Model
The RGB color model combines red, green, and blue to create various colors. It uses intensity values from 0 to 255 for each color channel. However, RGB can be affected by lighting and may not be ideal for color detection. Despite this, it plays a crucial role in computer graphics and image processing.
HSV Color Model
The HSV color model is a better way to represent colours than RGB. It separates colour into hue, saturation, and value, making it easier to work with. We can manipulate and isolate specific colours easily, simplifying colour detection. HSV is particularly useful for real-time multiple-colour detection, allowing us to define colour ranges accurately.
Prerequisites For Python OpenCV Real-Time Multiple Color Detection
A solid understanding of Python programming and the OpenCV library, along with the specified system requirements, is essential.
1. Python 3.7 and above
2. Any Python editor (VS code, Pycharm, etc.)
Download Python OpenCV Real-Time Multiple Color Detection
Please download the source code of Python OpenCV Real-Time Multiple Color Detection Project: Python Opencv Real-Time Multiple Color Detection Project Code.
Installation
Open Windows cmd as administrator
1. To install the opencv library, run the command from the cmd.
pip install opencv-python
Let’s Implement It
To implement it, follow the below step.
1. To begin with, we import the required libraries for the implementation.
import cv2
import numpy as np
2. It is used to open the camera.
cap = cv2.VideoCapture(0)
3. It holds color ranges in HSV format, including their respective color names. Each entry includes a lower and upper HSV value and the color name.
HSV_value_color = [

    ((0, 100, 100), (10, 255, 255), 'Red'),
    ((36, 100, 100), (70, 255, 255), 'Green'),
    ((110, 100, 100), (130, 255, 255), 'Blue')
]
4. Start the while loop.
while True:
5. It captures a frame from the video source stored in the variable cap. The ret variable indicates if the frame was successfully captured, while the frame holds the actual frame data.
ret, frame = cap.read()
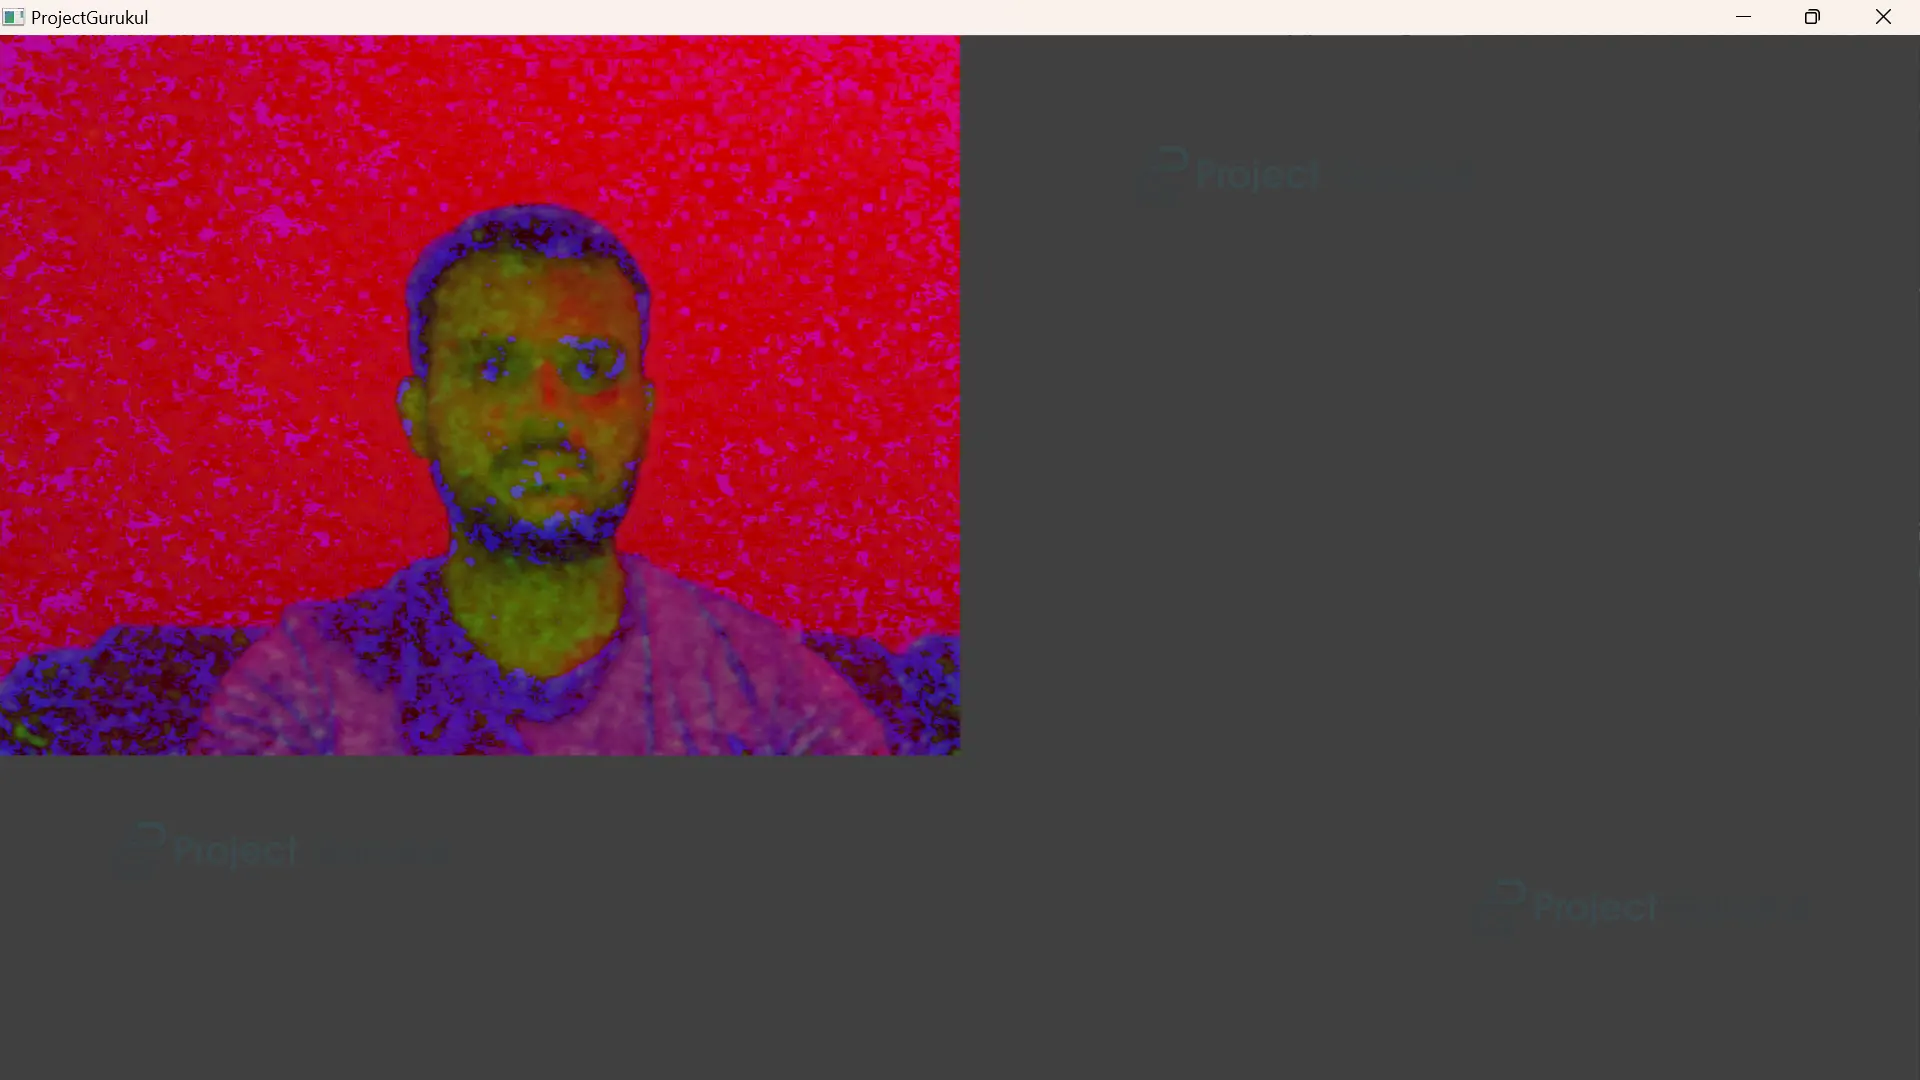
6. It converts the captured frame from the BGR color space to the HSV color space, and the converted image is stored in the variable hsv.
hsv = cv2.cvtColor(frame, cv2.COLOR_BGR2HSV)
The output of this step
7. It extracts the lower and upper color values, as well as the corresponding color name. This enables the processing of each color range and its associated name within the loop.
for (lower, upper, color_name) in HSV_value_color:
8. It creates a mask that highlights pixels within a specific color range in the HSV image and identifies the contours of objects within the mask, providing their boundaries for further analysis or object detection purposes.
mask = cv2.inRange(hsv, np.array(lower), np.array(upper))
 contours, _ = cv2.findContours(mask, cv2.RETR_EXTERNAL, cv2.CHAIN_APPROX_SIMPLE)
The output of this step

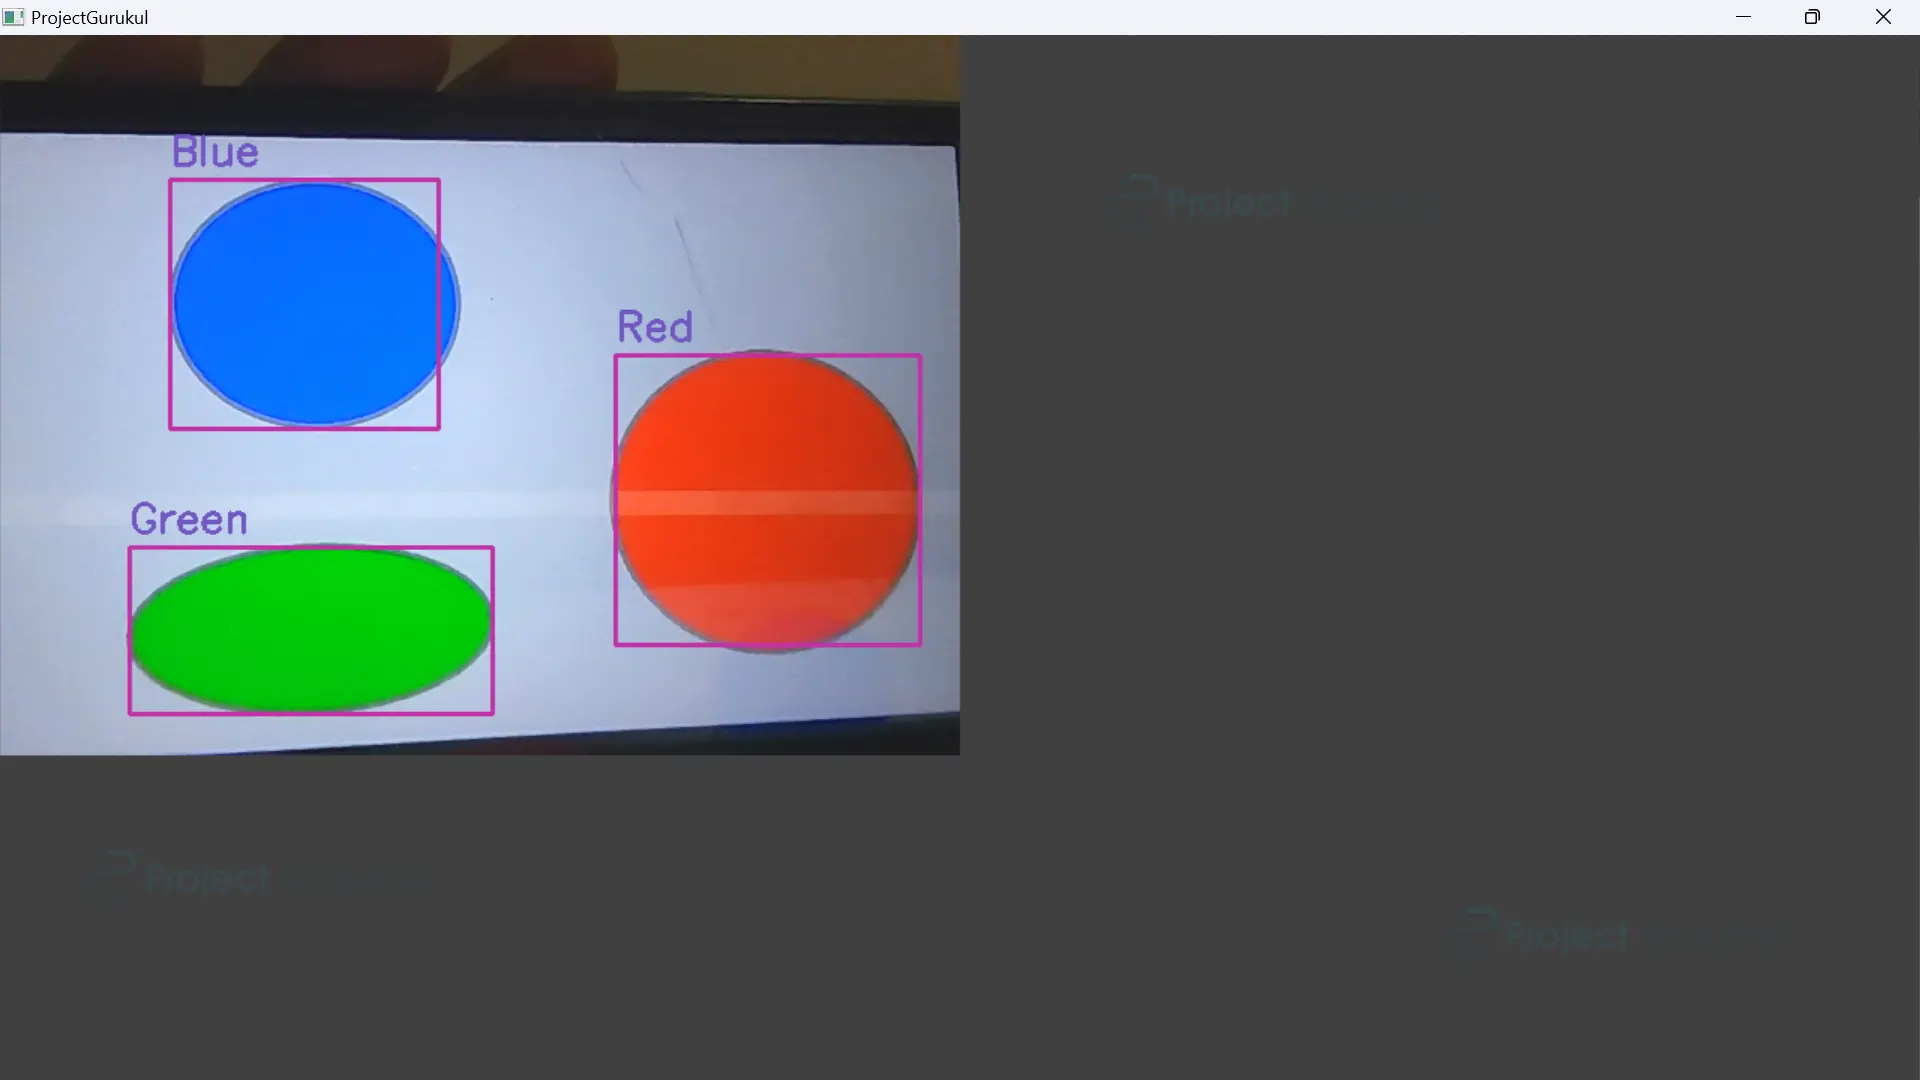
9. In a loop for each contour, the code calculates the area of the contour. If the area is larger than 500, a bounding rectangle is obtained, and it is drawn on the frame image. Additionally, a text label with the color name is added above the rectangle.
for contour in contours:
            area = cv2.contourArea(contour)
            if area > 500:
                x, y, w, h = cv2.boundingRect(contour)
                cv2.rectangle(frame, (x, y), (x + w, y + h), (167, 49, 195), 2)
                cv2.putText(frame, color_name, (x, y - 10), cv2.FONT_HERSHEY_SIMPLEX, 0.9, (195, 86, 114), 2)
Note:- write steps 8 and 9 under the 7th step for the loop.
10. It displays the frame with the window title ‘ProjectGurukul’ and waits for the user to press the ‘q’ key, and if detected, it stops the program and exits the loop.
cv2.imshow('ProjectGurukul', frame)
    if cv2.waitKey(1) & 0xFF == ord('q'):
        break
11. It releases all the resources occupied by the program and closes all the windows.
cap.release()
cv2.destroyAllWindows()
Full Code
import cv2
import numpy as np

cap = cv2.VideoCapture(0)

HSV_value_color = [

    ((0, 100, 100), (10, 255, 255), 'Red'),
    ((36, 100, 100), (70, 255, 255), 'Green'),
    ((110, 100, 100), (130, 255, 255), 'Blue')
]

while True:
    ret, frame = cap.read()

    hsv = cv2.cvtColor(frame, cv2.COLOR_BGR2HSV)

    for (lower, upper, color_name) in HSV_value_color:
        mask = cv2.inRange(hsv, np.array(lower), np.array(upper))
        contours, _ = cv2.findContours(mask, cv2.RETR_EXTERNAL, cv2.CHAIN_APPROX_SIMPLE)

        for contour in contours:
            area = cv2.contourArea(contour)
            if area > 500:
                x, y, w, h = cv2.boundingRect(contour)
                cv2.rectangle(frame, (x, y), (x + w, y + h), (167, 49, 195), 2)
                cv2.putText(frame, color_name, (x, y - 10), cv2.FONT_HERSHEY_SIMPLEX, 0.9, (195, 86, 114), 2)

    cv2.imshow('ProjectGurukul', frame)
    if cv2.waitKey(1) & 0xFF == ord('q'):
        break

cap.release()
cv2.destroyAllWindows()
Output
How to calculate HSV value of color in real-time?
To calculate the HSV value of any color in real-time, you can write the following program in a separate file and execute it. After running the program, you will obtain lower and higher HSV values for that specific color. Then, you can use these values in the above program’s color range section to detect multiple colors in real time.
Let’s Implement It
To implement it, follow the below step.
1. To begin with, we import the required libraries for the implementation.
import cv2
import numpy as np
It updates the lower and upper HSV parameter values based on the positions of trackbars. It uses global variables to store these updated HSV values.
def update_hsv_values(*args):
    global lower_hue, lower_saturation, lower_value, upper_hue, upper_saturation, upper_value
    lower_hue = cv2.getTrackbarPos("Lower Hue", "HSV")
    lower_saturation = cv2.getTrackbarPos("Lower Saturation", "HSV")
    lower_value = cv2.getTrackbarPos("Lower Value", "HSV")
    upper_hue = cv2.getTrackbarPos("Upper Hue", "HSV")
    upper_saturation = cv2.getTrackbarPos("Upper Saturation", "HSV")
    upper_value = cv2.getTrackbarPos("Upper Value", "HSV")
2. It assigns specific values representing the lower and upper thresholds for hue, saturation, and value in the HSV color space.
lower_hue = 0
lower_saturation = 100
lower_value = 100
upper_hue = 10
upper_saturation = 255
upper_value = 255
3. It opens the camera.
cap = cv2.VideoCapture(0)
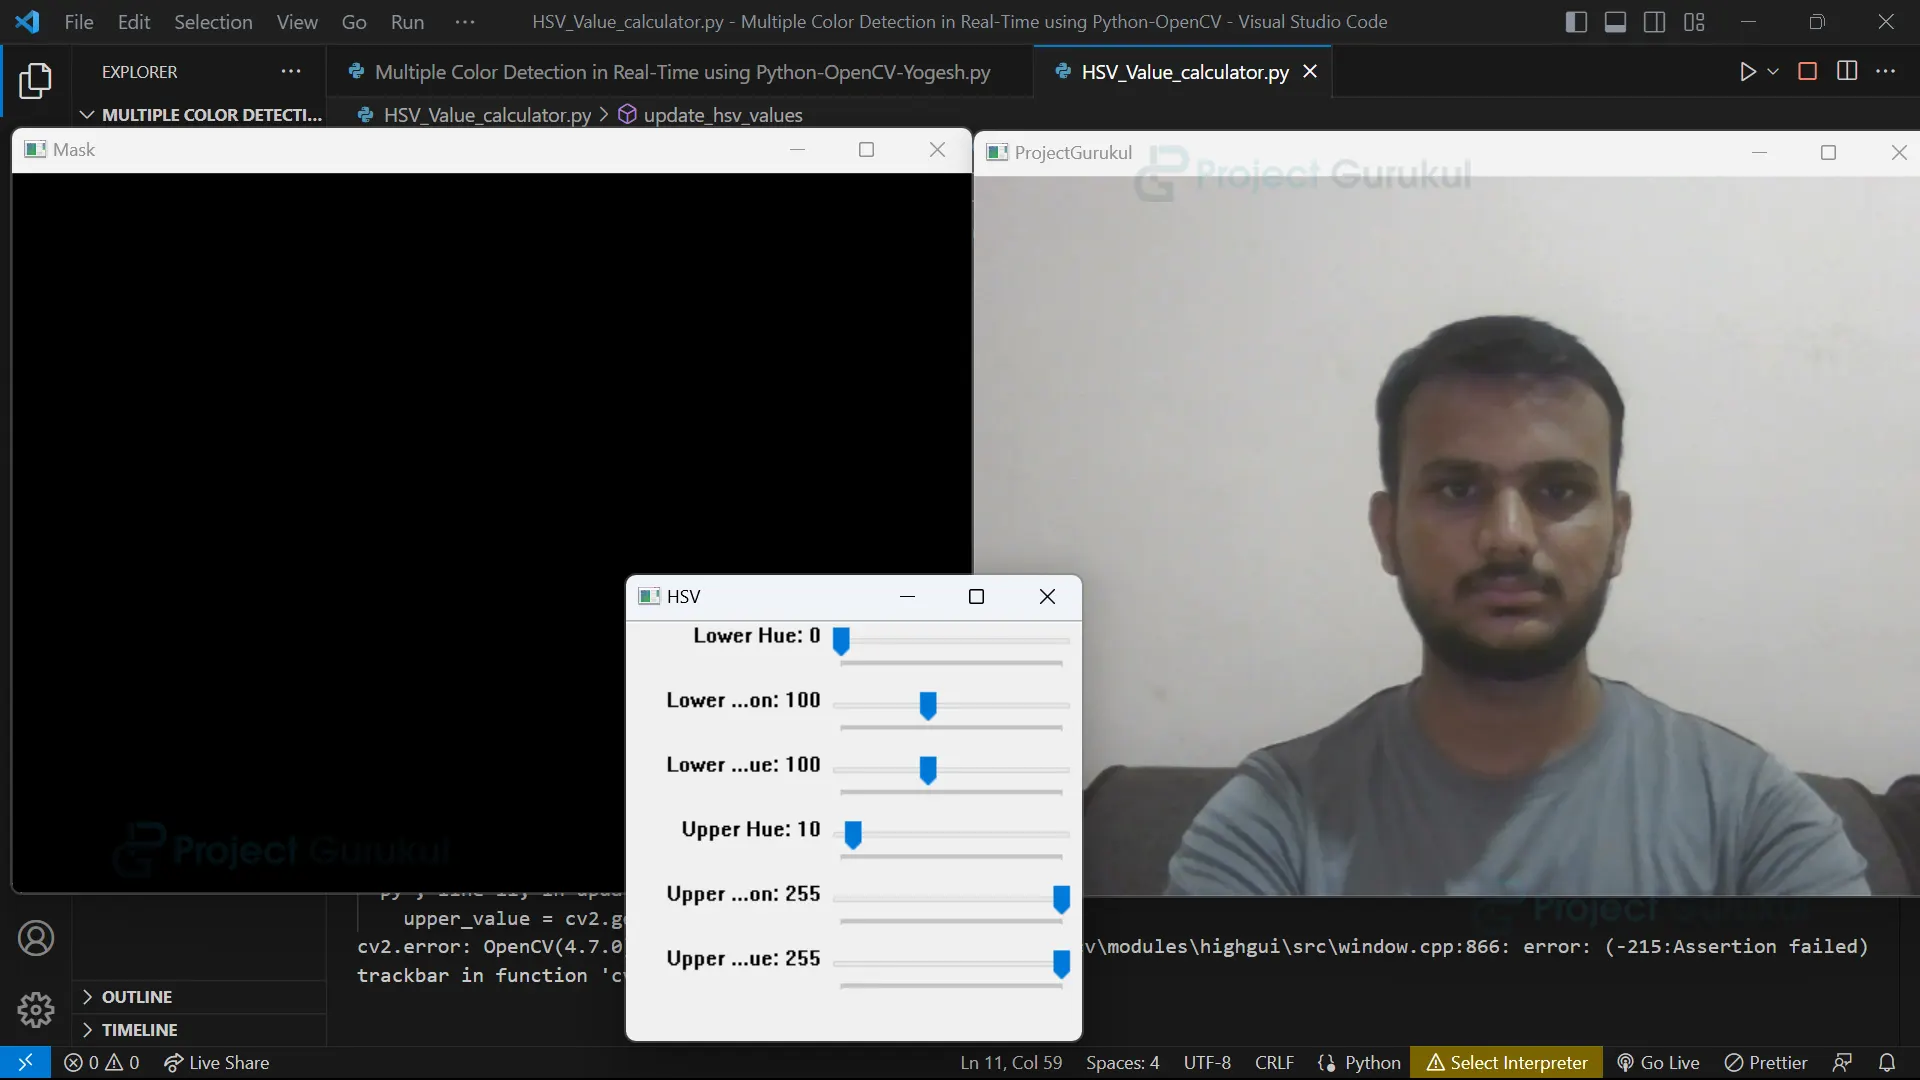
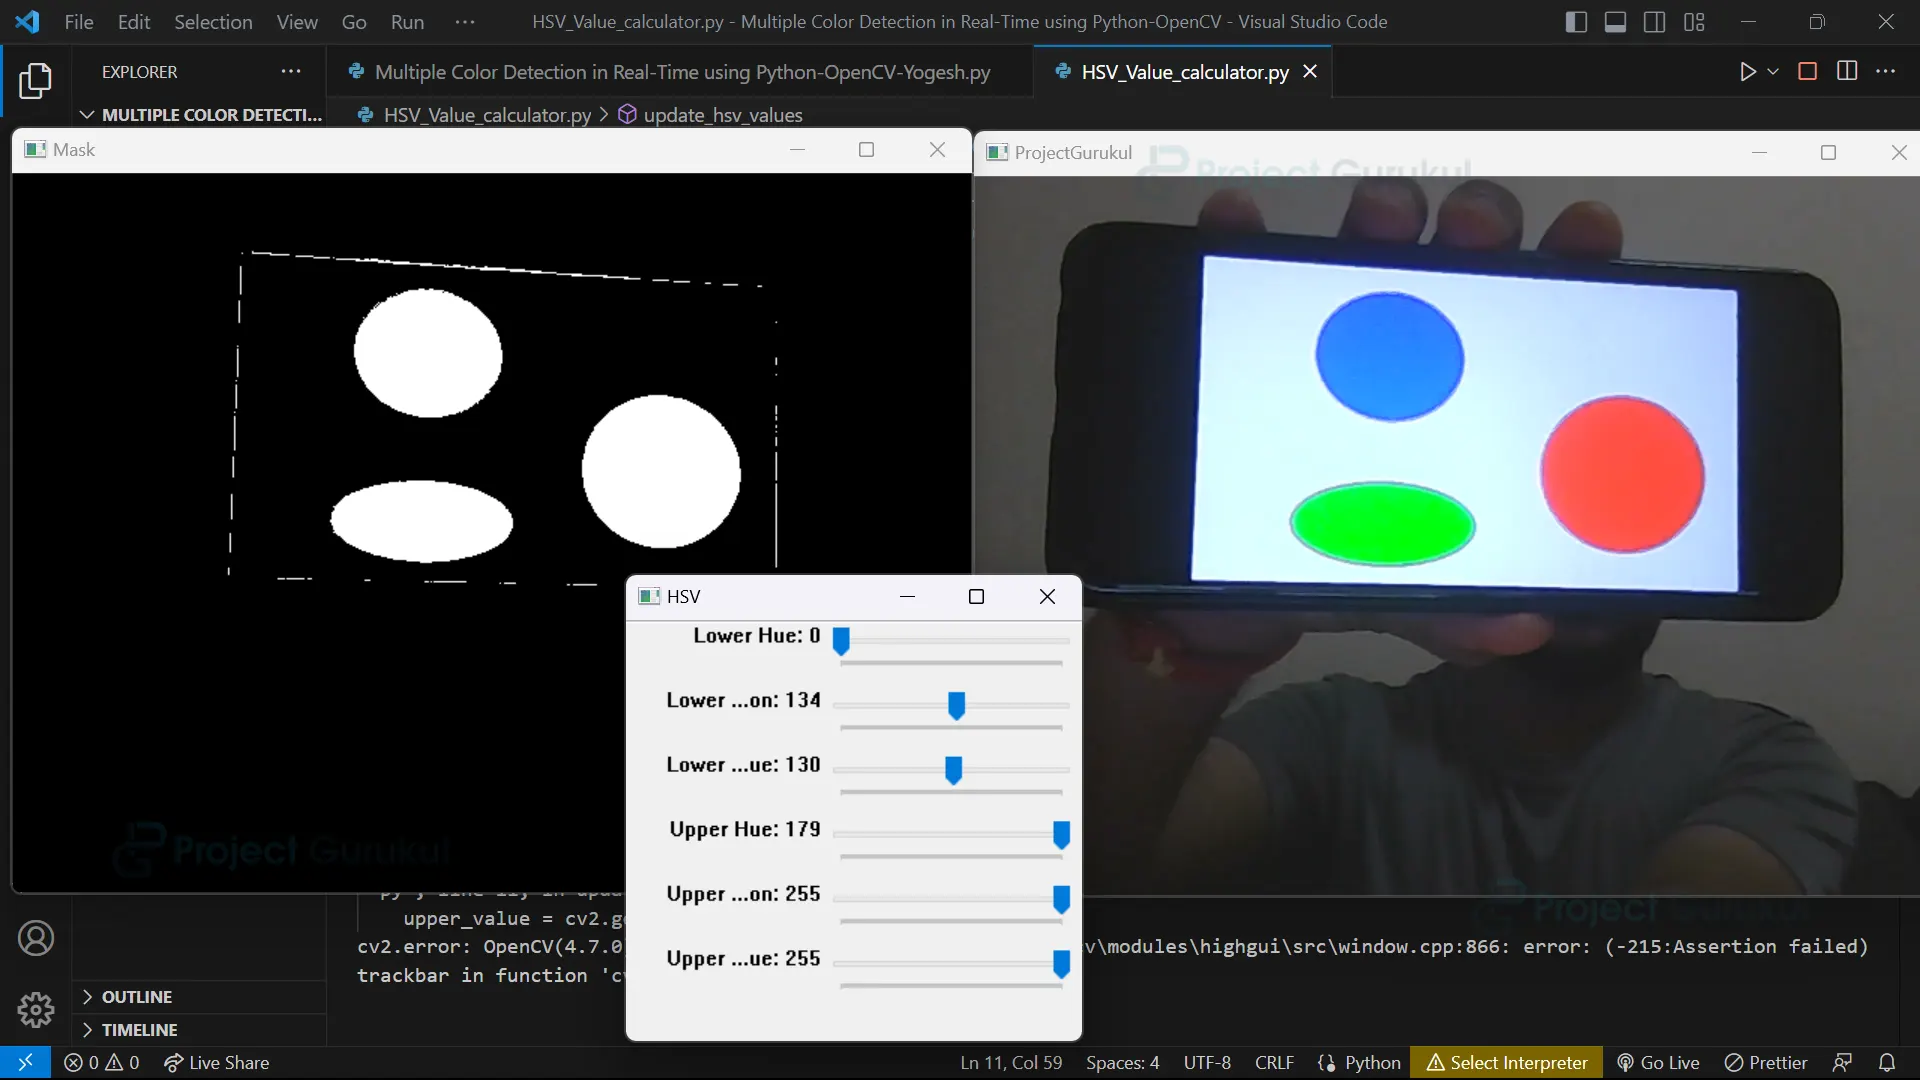
4. The code creates a graphical interface with trackbars for adjusting the HSV color range interactively.
cv2.namedWindow("HSV")
cv2.createTrackbar("Lower Hue", "HSV", lower_hue, 179, update_hsv_values)
cv2.createTrackbar("Lower Saturation", "HSV", lower_saturation, 255, update_hsv_values)
cv2.createTrackbar("Lower Value", "HSV", lower_value, 255, update_hsv_values)
cv2.createTrackbar("Upper Hue", "HSV", upper_hue, 179, update_hsv_values)
cv2.createTrackbar("Upper Saturation", "HSV", upper_saturation, 255, update_hsv_values)
cv2.createTrackbar("Upper Value", "HSV", upper_value, 255, update_hsv_values)
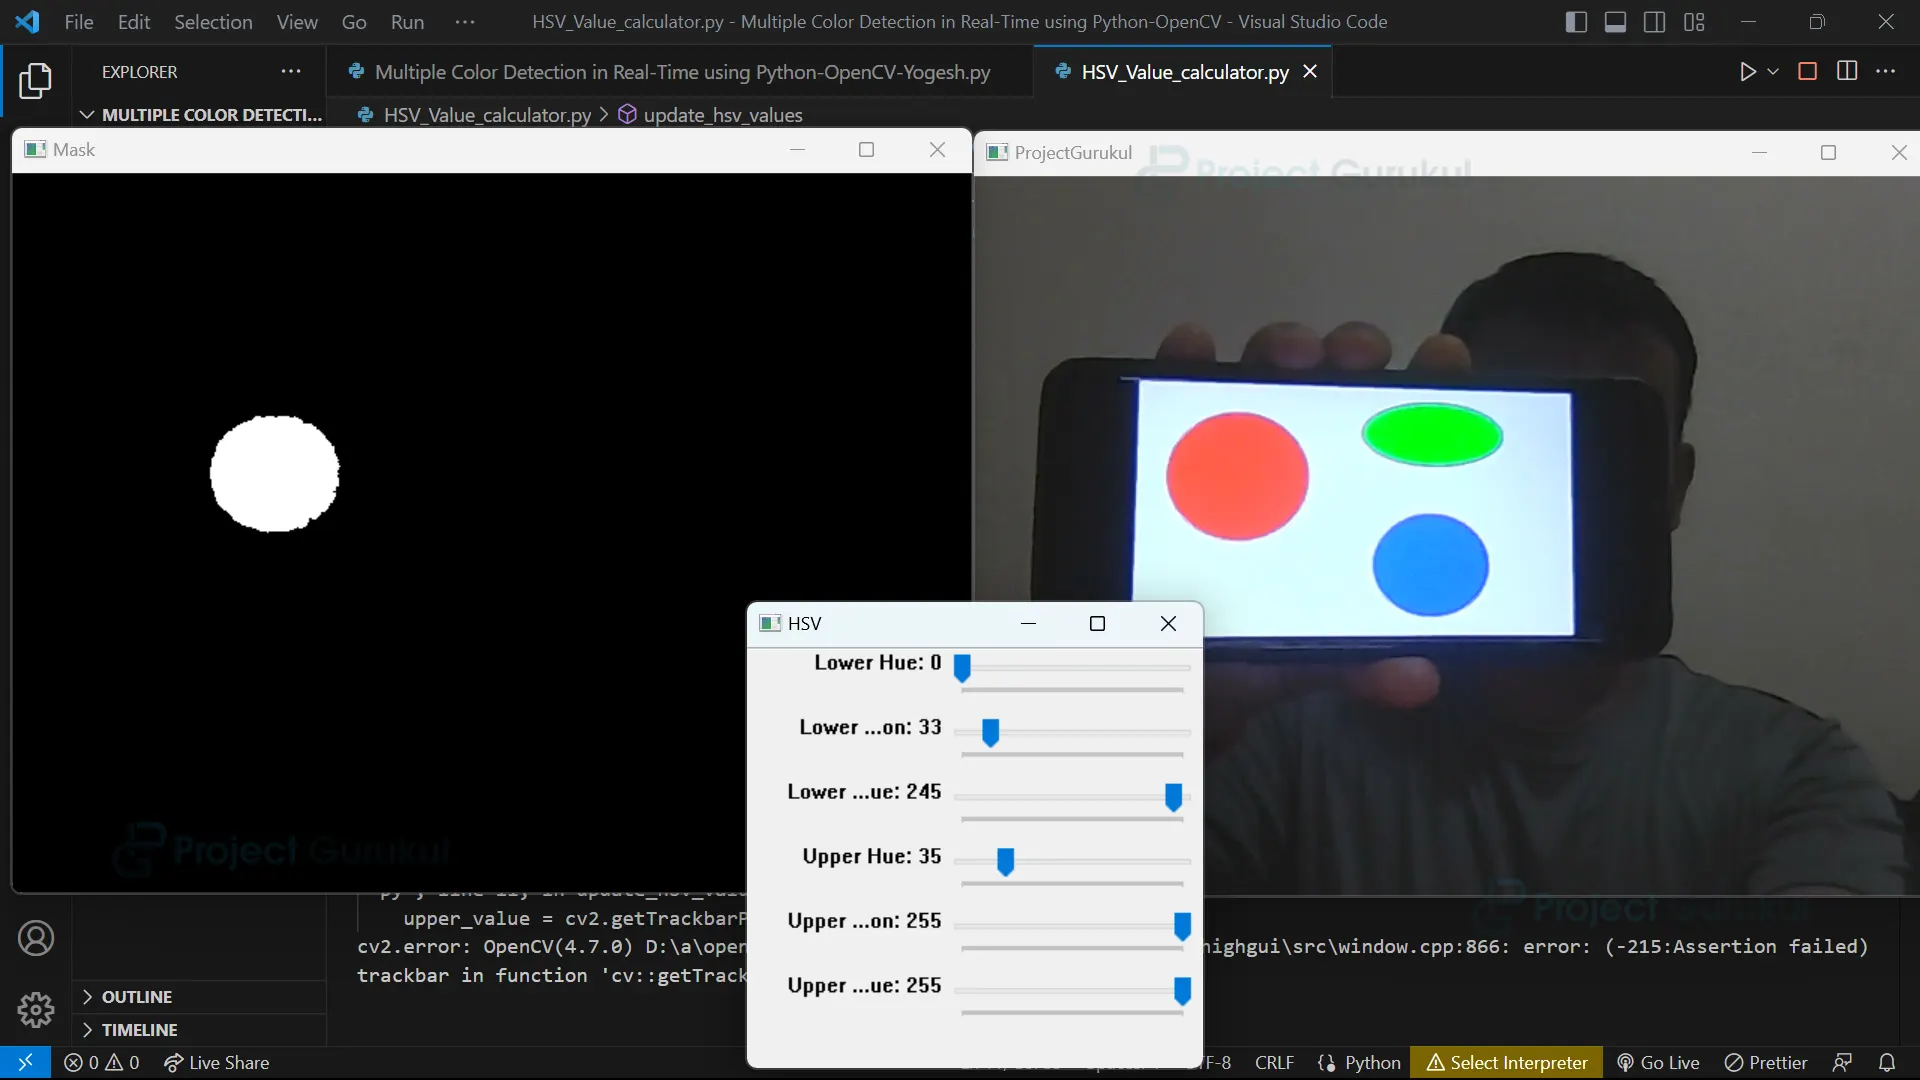
5. The code continuously reads video frames and converts them to the HSV color space. It then creates a mask based on the specified HSV color range using trackbars. The original frame and the mask are displayed. The loop runs until the ‘q’ key is pressed, allowing real-time color detection.
while True:
    ret, frame = cap.read()
    hsv_frame = cv2.cvtColor(frame, cv2.COLOR_BGR2HSV)
    lower_range = np.array([lower_hue, lower_saturation, lower_value])
    upper_range = np.array([upper_hue, upper_saturation, upper_value])
    mask = cv2.inRange(hsv_frame, lower_range, upper_range)
    cv2.imshow("Mask", mask)
    cv2.imshow("ProjectGurukul", frame)
    if cv2.waitKey(1) & 0xFF == ord('q'):
        break
6. It releases all the resources occupied by the program and closes all the windows.
cap.release()
cv2.destroyAllWindows()
Full Code
import cv2
import numpy as np

def update_hsv_values(*args):
    global lower_hue, lower_saturation, lower_value, upper_hue, upper_saturation, upper_value
    lower_hue = cv2.getTrackbarPos("Lower Hue", "HSV")
    lower_saturation = cv2.getTrackbarPos("Lower Saturation", "HSV")
    lower_value = cv2.getTrackbarPos("Lower Value", "HSV")
    upper_hue = cv2.getTrackbarPos("Upper Hue", "HSV")
    upper_saturation = cv2.getTrackbarPos("Upper Saturation", "HSV")
    upper_value = cv2.getTrackbarPos("Upper Value", "HSV")

lower_hue = 0
lower_saturation = 100
lower_value = 100
upper_hue = 10
upper_saturation = 255
upper_value = 255

cap = cv2.VideoCapture(0)

cv2.namedWindow("HSV")

cv2.createTrackbar("Lower Hue", "HSV", lower_hue, 179, update_hsv_values)
cv2.createTrackbar("Lower Saturation", "HSV", lower_saturation, 255, update_hsv_values)
cv2.createTrackbar("Lower Value", "HSV", lower_value, 255, update_hsv_values)
cv2.createTrackbar("Upper Hue", "HSV", upper_hue, 179, update_hsv_values)
cv2.createTrackbar("Upper Saturation", "HSV", upper_saturation, 255, update_hsv_values)
cv2.createTrackbar("Upper Value", "HSV", upper_value, 255, update_hsv_values)

while True:
    ret, frame = cap.read()
    hsv_frame = cv2.cvtColor(frame, cv2.COLOR_BGR2HSV)
    lower_range = np.array([lower_hue, lower_saturation, lower_value])
    upper_range = np.array([upper_hue, upper_saturation, upper_value])
    mask = cv2.inRange(hsv_frame, lower_range, upper_range)
    cv2.imshow("Mask", mask)
    cv2.imshow("ProjectGurukul", frame)
    if cv2.waitKey(1) & 0xFF == ord('q'):
        break
cap.release()
cv2.destroyAllWindows()
Output

Conclusion
In conclusion, real-time color detection using OpenCV and the HSV color model is a powerful and accurate method for identifying specific colors in live video. It simplifies color detection, improves accuracy in different lighting conditions, and enables applications in robotics, image processing, augmented reality, and interactive experiences. With OpenCV’s flexibility, developers can create efficient systems for real-time color detection, unlocking various computer vision possibilities.