Python Message Encryption Decryption Project
FREE Online Courses: Elevate Skills, Zero Cost. Enroll Now!
In this digital era, the need for security is increasing rapidly. Complying with this requirement, the encryption & decryption algorithms were devised.
Now, we will build a project that can encode and decode a message. Let’s start by getting to know more about this project.
Message Encryption Decryption Project in Python
Encoding is the process of converting text into an incognizable language and the reverse process in decoding. In this project, we will be using the Tkinter module and base64 module to do the required operations.
In this,
- The user first enters the message and key
- And choose one of the encode or decode options
- Based on the choice the corresponding operation is done
- It is to be noted that the same key used for encryption needs to be used during the decryption.
Project Prerequisites
To build this project, the developer needs to have good knowledge of the Tkinter module and Python. It is also advised to have some idea on encryption & decryption.
Download Python Message Encryption Decryption Project
Please download the source code for the message encryption decryption python project: Message Encryption Decryption Project
Python Message Encryption Decryption Project File Structure
Steps for building the python message encryption decryption project:
1. Installing the required modules
2. Importing the modules
3. Writing function for encryption
4. Writing function for decryption
5. Creating the window
6. Adding the input and output components
7. Adding the buttons and their functions
1. Installing the required modules
The base64 is available by default. If it is not you can install is using the command
pip install base64
The Tkinter module needs to be installed. You can install this module by using the following command.
pip install tkinter
2. Importing the modules
The first step is to import the required modules. Here we will be using the tkinter module for building the GUI and the base64 module for encryption and decryption purposes.
from tkinter import *
import base64
from tkinter import messagebox
import tkinter.font as font
3. Writing function for encryption
def encode(key, msg):
  enc = []
  for i in range(len(msg)):
    list_key = key[i % len(key)]
    list_enc = chr((ord(msg[i]) +
             ord(list_key)) % 256)
    enc.append(list_enc)
 return base64.urlsafe_b64encode("".join(enc).encode()).decode()
Code Explanation:
a. ord(): This function gives the corresponding ASCII values of a given character.
b. chr(): This function gives the corresponding character to the given ASCII value.
c. append(): Adds the elements to the end of the list
d. ord(msg[i]) + ord(list_key)) % 256 : This gives the remainder of division of addition of ord(message[i]) and ord( key_c) with 256 and passes that remainder to chr() function
e. base64.urlsafe_b64encode(): This helps in encoding the string using url and file system safe alphabets into the binary form.
4. Writing function for decryption
def decode(key, code):
  dec = []
  enc = base64.urlsafe_b64decode(code).decode()
  for i in range(len(enc)):
   list_key = key[i % len(key)]
   list_dec = chr((256 + ord(enc[i]) - ord(list_key)) % 256)

  dec.append(list_dec)
 return "".join(dec)
Code Explanation:
a. base64.urlsafe_b64decode(): This helps in decoding the binary string using url and file system safe alphabets into the normal form of strings.
b. ord(): This function gives the corresponding ASCII values of a given character
c. chr(): This function gives the corresponding character to the given ASCII value
d. 256 + ord(message[i]) – ord(key_c)) % 256 : This gives the remainder of addition of 256 with subtraction of ord(message[i]) – ord( key_c) and then division with 256 and passes that remainder to chr() function
e. append(): Adds the elements to the end of the list
5. Creating the window
wn = Tk()
wn.geometry("500x500")
wn.configure(bg='azure2')
wn.title("Encrypt and Decrypt your Messages with ProjectGurukul")
Code Explanation:
a. geometry(): It sets the length and width of the project window.
b. configure(): It sets the background color of the screen
c. title(): It displays the title on the top of the python message encryption-decryption project window.
6. Adding the input and output components
Message = StringVar()
key = StringVar()
mode = IntVar()
Output = StringVar()

headingFrame1 = Frame(wn,bg="gray91",bd=5)
headingFrame1.place(relx=0.2,rely=0.1,relwidth=0.7,relheight=0.16)

headingLabel = Label(headingFrame1, text=" Welcome to Encryption and \nDecryption with ProjectGurukul", fg='grey19', font=('Courier',15,'bold'))
headingLabel.place(relx=0,rely=0, relwidth=1, relheight=1)


label1 = Label(wn, text='Enter the Message', font=('Courier',10))
label1.place(x=10,y=150)

msg = Entry(wn,textvariable=Message, width=35, font=('calibre',10,'normal'))
msg.place(x=200,y=150)

label2 = Label(wn, text='Enter the key', font=('Courier',10))
label2.place(x=10,y=200)

InpKey = Entry(wn, textvariable=key, width=35,font=('calibre',10,'normal'))
InpKey.place(x=200,y=200)

label3 = Label(wn, text='Check one of encrypt or decrypt', font=('Courier',10))
label3.place(x=10,y=250)

Radiobutton(wn, text='Encrypt', variable=mode, value=1).place(x=100,y=300)
Radiobutton(wn, text='Decrypt', variable=mode, value=2).place(x=200,y=300)

label3 = Label(wn, text='Result', font=('Courier',10))
label3.place(x=10,y=350)

res = Entry(wn,textvariable=Output, width=35, font=('calibre',10,'normal'))
res.place(x=200,y=350)
Code Explanation:
a. The message and key hold the values in the entries that hold the input message key. And mode checks which radio button is pressed for encryption/decryption. Output values hold the value shown in the Result entry after doing the operation.
b. Frame(): It creates a rectangular object that holds various widgets on the screen
c. place(): This is used to place the widgets in a specified location based on coordinates or relative to the parent component
d. Label(): This creates a label that can be used to show information
e. Entry(): This widget is used to take input from the user
f. Radiobutton(): These help in choosing one of the given options
7. Adding the buttons and their functions
#Function that executes on clicking Show Message function in python message encryption decryption project
def Result():
  msg = Message.get()
  k= key.get()
  i = mode.get()
  if (i==1):
    Output.set(encode(k, msg))
  elif(i==2):
    Output.set(decode(k, msg))
  else:
    messagebox.showinfo('ProjectGurukul', 'Please Choose one of Encryption or Decryption. Try again.')

#Function that executes on clicking Reset function
def Reset():
  Message.set("")
  key.set("")
  mode.set(0)
  Output.set("")


ShowBtn = Button(wn,text="Show Message",bg='lavender blush2', fg='black',width=15,height=1,command=Result)
ShowBtn['font'] = font.Font( size=12)
ShowBtn.place(x=180,y=400)

ResetBtn = Button(wn, text='Reset', bg='honeydew2', fg='black', width=15,height=1,command=Reset)
ResetBtn['font'] = font.Font( size=12)
ResetBtn.place(x=15,y=400)

QuitBtn = Button(wn, text='Exit', bg='old lace', fg='black',width=15,height=1, command=wn.destroy)
QuitBtn['font'] = font.Font( size=12)
QuitBtn.place(x=345,y=400)


wn.mainloop()
Code Explanation:
a. The result() function
i. it takes the message, key, and the mode that are inputted by the user
ii. Then based on the mode, calls one of the encryption() or decryption() functions
iii. Shows the output in the Result field
iv. If no mode is selected, shows the message to select one of the either
b. Button(): This creates a button with mentioned color, text, etc. and the command parameter represents the function that is to be executed on clicking the button
c. place(): This is used to place the widgets in a specified location based on coordinates or relative to the parent component
d. mainloop(): This makes sure the screen runs in a loop till it is manually closed by the user
The Output of Python Message Encryption Decryption Project
Fig1. The image of output of python encryption
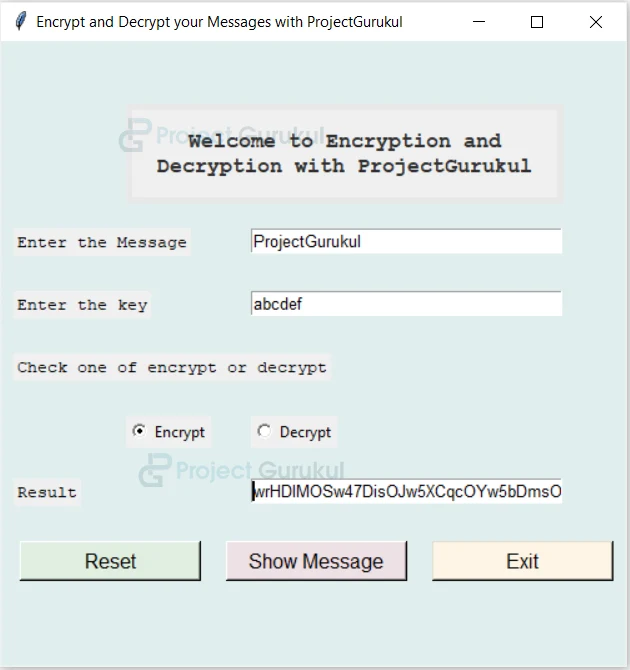
Fig2. The image of output of python decryption
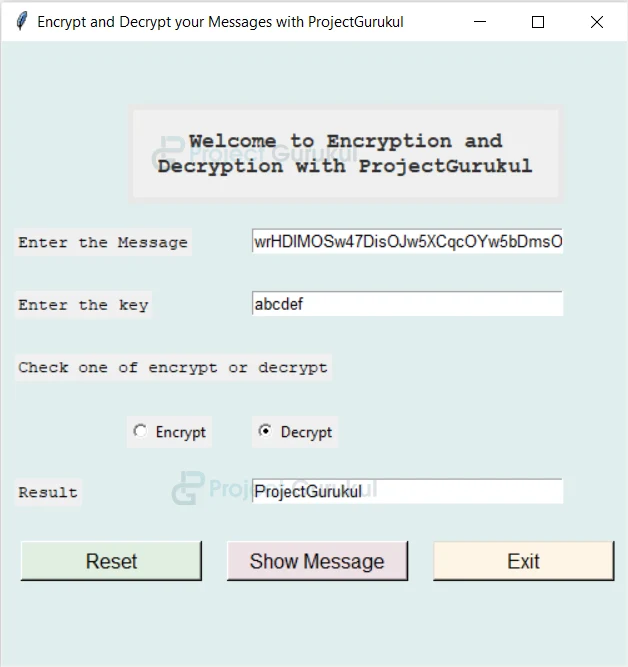
It can be observed that when the output of encryption of ProjectGurukul is given as input to decryption, the output is ProjectGurukul.
Summary
In this project, we successfully built the python message encryption decryption system using the Tkinter and base4 modules.
Respected sir or madam
I need the report and ppt of this project how can I get it?
I need full project documentation…how can I get it sir?
which Algorithm use in this project ? like RES ,DES ,AES
ANBARASAN
These is a very good Project
which python version is suitable for doing this project?
How message is encrypted
respected sir/mam
i need project documentation .. how can i get?
Respected sir/mam,
I need full project documentation which include ( module description,data flow diagram, Design implementation)etc…how can I get ?