Create Python Mad Libs Generator Game
We offer you a brighter future with FREE online courses - Start Now!!
In this python project, we will learn how to make a gui based mad libs generator with tkinter in python.
For this, you will need to have an intermediate understanding of python concepts, and a basic understanding of the Tk toolkit. It is a basic GUI project and you will learn to make a fun game while learning new concepts in Python. Have fun!
Mad Libs Generator Game:
Remember the days when multiple players were required to play the Mad Libs in the parties/school. Well, that time is gone; because parties have become obsolete in this COVID-19 era, so we bring to you an easy-to-code, single-player, virtual mad libs generator gamethat you can play alone. Get a list of words to substitute for blanks in a story before reading aloud, have fun and learn about Tkinter library as well.
About Python Mad Libs Game:
The object of our project is to create a GUI Mad Libs generator. Only the knowledge of the basics of the Tkinter library is enough to build this project.
Project Prerequisites:
To create this GUI project, you will only need the Tkinter library (to create the GUI), which comes pre-installed with Python.
Download Mad Libs Generator Python Code
Please download the source code of python mad libs generator: Mad Libs Generator Python Code
Mad Libs Generator Project File Structure:
The following are the steps to create this project:
- Importing all the classic widgets from the Tkinter library.
- Creating a master GUI window and placing the heading Labels in it.
- Creating buttons to add to the root window and creating empty functions (for now) to assign to the buttons.
- Create a Toplevel widget for the master window for the first mad-libs game and place all the components in it, along with a ‘Submit’ button for the first mad libs game (The Gold) and a function that builds the story.
- Copy the settings of the first mad libs and tweak the settings according to the second and the third python mad libs games.
Let us take a closer and deeper look into the steps now:
1. Importing all the classic widgets from the Tkinter library:
# Importing all modules
from tkinter import *
Tkinter – We will use this library to create the GUI window and all the child widgets.
2. Creating a master GUI window for mad libs:
# Creating a GUI master window and placing all its components
root = Tk()

root.title("ProjectGurukul Mad Libs Generator")
root.geometry('360x300')
root.background='Gainsboro'
root.resizable(False, False)

Label(root, font=("Comic Sans MS", 16), text='Project Gurukul Mad Libs Generator').place(x=0, y=0)
Label(root, font=("Comic Sans MS", 16), text='Have fun!').place(x=130, y=35)

root.update()
root.mainloop()
Explanation:
While setting a master GUI window, it is essential to use:
- title() method: This method assigns a title to the window it is applied to.
- geometry() method: This method sets the initial dimensions to the python mad libs window.
- resizable() method: The arguments given to this method decide whether the user can resize the window it is applied on or not. It’s arguments are provided in the form (height, width) and the defaults are True for both attributes. You can revert it to False or 0 if you want to negate this functionality.
- Label widget: This widget is used to print a message on the window in the form of static text.
- place() method: This method, one of the 3 Tkinter geometry manager methods sets the starting position of a widget on a Cartesian Plane’s IV Quadrant (y is in absolute form). It takes the following options:
- anchor: to change the position of the widget from the default (0,0) coordinate to any other coordinates on the window.
- x, y: horizontal and vertical offsets of the window in pixels.
- height, width: height and width of the window in pixels.
3. Create buttons and functions for all python mad libs in your game:
Functions:
def first_madlib(win):
    pass


def second_madlib(win):
    pass


def third_madlib(win):
    pass
Buttons:
ml1 = Button(root, text='The Gold', font=("Comic Sans MS", 16), command=lambda: first_madlib(root), bg='LightSkyBlue')
ml1.place(x=125, y=90)

ml2 = Button(root, text='One Dark, Stormy Night', font=("Comic Sans MS", 16), command=lambda: second_madlib(root) , bg='LightSkyBlue')
ml2.place(x=50, y=150)

ml3 = Button(root, text='The Ring', font=("Comic Sans MS", 16), command=lambda: third_madlib(root), bg='LightSkyBlue')
ml3.place(x=125, y=210)
Explanation:
Button widget: Used to add a button that performs a function when the button is pressed. It takes the following parameters:
- master: The master window.
- options: (These are the ones discussed above)
- text: text on the button
- font: font and the other effects to apply to the text. Its form is, (‘{family}’, size, ‘bold'(optional), ‘italic'(optional))
- bg/background: color to be set to the button.
- command: command to be performed when the button is pressed. The command is generally a function without parameters, but if your function takes parameters, you will need to use the lambda keyword for it.
4. Create first mad libs game
Create a Toplevel widget for the master window for the first mad libs game and place all the components in it, along with a ‘Submit’ button for the first mad libs game (The Gold) and a function that builds the story:
# First Mad Lib - titled "The Gold"
def first_madlib(win):
  def finish_madlib(tl: Toplevel, animal, parent, month, path, movement, num):

    text = f'''
There was once a {animal}. He was always getting told off. One day while his {parent} was sitting in the garden in {month}, he sneaked out. He did not mean to go far but he saw a glittery thing on the {path} and {movement} over to it. He found out it was gold and became rich because he had {num} pieces of gold.'''

    tl.geometry(newGeometry='375x550')

    Label(tl, text='Your Story:', font=("Times", 13, 'bold'), background='Gold', wraplength=tl.winfo_width()).place(x=130, y=310)
    Label(tl, text=text, font=("Times", 13), background='Gold', wraplength=tl.winfo_width()).place(x=0, y=330)

  # Creating the top level widget for the first mad lib game
  ml1_wn = Toplevel(win, bg='Gold')
  ml1_wn.title("The Gold")
  ml1_wn.geometry('375x500')
  ml1_wn.resizable(False, False)

  # Creating the labels that will display the text on the screen, with background as "Gold" and font as 20-point Helvetica
  Label(ml1_wn, text='The Gold - Mad Libs', font=("Helvetica", 20, 'bold'), bg='Gold').place(x=60, y=0)

  Label(ml1_wn, text='An animal:', font=("Times", 15), bg='Gold').place(x=0, y=35)
  Label(ml1_wn, text='Choose a parent:', font=("Times", 15), bg='Gold').place(x=0, y=70)
  Label(ml1_wn, text='Choose a month:', font=("Times", 15), bg='Gold').place(x=0, y=110)
  Label(ml1_wn, text='Choose a path:', font=("Times", 15), bg='Gold').place(x=0, y=150)
  Label(ml1_wn, text='Choose a movement type:', font=("Times", 15), bg='Gold').place(x=0, y=190)
  Label(ml1_wn, text='A number:', font=("Times", 15), bg='Gold').place(x=0, y=230)

  #Creating the text input boxes to enter the data in for the user
  animal_entry = Entry(ml1_wn, width=17)
  animal_entry.place(x=250, y=35)
  num_entry = Entry(ml1_wn, width=17)
  num_entry.place(x=250, y=230)

  # Creating an option menu that lists all the days for our user to choose from
  parents = ['Mum', "Dad"]
  months = ['January', 'February', 'March', 'April', 'May', 'June',
            'July', 'August', 'September', 'October', 'November', 'December']
  movements = ['walked', 'ran']
  paths = ['grass', 'concrete']

  # Variable name was 'strvar' because it is a contraction of "StringVar"
  parent_opt = StringVar(ml1_wn)
  parent_opt.set(parents[0])
  OptionMenu(ml1_wn, parent_opt, *parents).place(x=270, y=70)

  month_opt = StringVar(ml1_wn)
  month_opt.set(months[0])
  OptionMenu(ml1_wn, month_opt, *months).place(x=255, y=110)

  path_opt = StringVar(ml1_wn)
  path_opt.set(paths[0])
  OptionMenu(ml1_wn, path_opt, *paths).place(x=270, y=150)

  movement_opt = StringVar(ml1_wn)
  movement_opt.set(movements[0])
  OptionMenu(ml1_wn, movement_opt, *movements).place(x=265, y=190)

  # Creating a 'Submit' button to add all the inputs to the final story
  submit_btn = Button(ml1_wn, text="Submit", background="SteelBlue", font=('Times', 12), command=lambda:finish_madlib(ml1_wn, animal_entry.get(), parent_opt.get(), month_opt.get(), path_opt.get(), movement_opt.get(), num_entry.get()))
  submit_btn.place(x=150, y=270)

  ml1_wn.mainloop()
Explanation:
StringVar: This class helps you manage the data of a Label, or an Entry widget, more effectively. It is a string variable for GUI in python. It takes 2 optional arguments:
- master – The master window.
- value – The initial value of the object. (To be able to use this argument, you will have to use .set() method of this class)
To get the value of the StringVar object, you will need to use the .get() method available to an object of this class.
OptionMenu: This widget refers to a dropdown menu that has many values to choose from, at the click of a button. Its arguments are:
- master – The master window.
- variable – The default value of this being “”, the variable attribute refers to the first value that is displayed on the OptionMenu widget.
- *values – The list of values to choose from.
newGeometry attribute of Tk.geometry(): This attribute is used to define a new geometry to a window after an event takes place and the height/width has to be increased or decreased. It takes the two arguments in the following format: window.geometry(newGeometry=f‘{width}x{height}’)
5. Create more mad libs generators
Copy the settings of the first mad libs and tweak the settings according to the second and the third mad libs generator games:
Second python mad libs generator game (One Dark, Stormy Night):
# Second Mad Lib - titled "One Dark, Stormy Night"
def second_madlib(win):
  def finish_madlib(tl: Toplevel, boy, cloth_article, creature, adj, village, exclamation, fav_thing):
    text = f'''
On one dark, stormy night, {boy} came along. He was wearing nothing but a {cloth_article}. He went into the woods and there he found a {creature}! It was {adj}. In fright he ran into a nearby village called {village} screaming, "{exclamation}!" The footsteps of the {creature} behind him became louder and louder. The villagers screamed, "It's a {adj} {creature}!"
Taking no prisoners the {creature} demolished the entire village leaving only the trace of someone's {fav_thing}.
Then it went back into the woods and waited for its next victim to emerge.'''

    tl.geometry(newGeometry='375x700')

    Label(tl, text='Your Story:', font=("Times", 13, "bold"), wraplength=tl.winfo_width(), bg='RoyalBlue2').place(x=130, y=335)
    Label(tl, text=text, font=("Times", 13), wraplength=tl.winfo_width(), bg='RoyalBlue2').place(x=0, y=360)

  # Creating the top level widget for the second mad lib game
  ml2_wn = Toplevel(win, bg='RoyalBlue2')
  ml2_wn.title("One Dark, Stormy Night")
  ml2_wn.geometry('375x600')
  ml2_wn.resizable(False, False)

  # Creating the labels that will display the text on the screen, with background as "Pink" and font as 20-point Times
  Label(ml2_wn, text='One Dark, Stormy Night - Mad Libs', font=("Times", 17, 'bold'), bg='RoyalBlue2').place(
    x=10, y=0)

  Label(ml2_wn, text='A boy\'s name:', font=("Times", 15), bg='RoyalBlue2').place(x=0, y=35)
  Label(ml2_wn, text='An article of clothing:', font=("Times", 15), bg='RoyalBlue2').place(x=0, y=70)
  Label(ml2_wn, text='A creature:', font=("Times", 15), bg='RoyalBlue2').place(x=0, y=110)
  Label(ml2_wn, text='An adjective:', font=("Times", 15), bg='RoyalBlue2').place(x=0, y=150)
  Label(ml2_wn, text='A village name:', font=("Times", 15), bg='RoyalBlue2').place(x=0, y=190)
  Label(ml2_wn, text='An exclamation:', font=("Times", 15), bg='RoyalBlue2').place(x=0, y=230)
  Label(ml2_wn, text='A favorite thing for yours:', font=("Times", 15), bg='RoyalBlue2').place(x=0, y=270)

  # Creating the text input boxes to enter the data in for the user
  boy_name_entry = Entry(ml2_wn, width=19)
  boy_name_entry.place(x=255, y=35)

  cloth_entry = Entry(ml2_wn, width=19)
  cloth_entry.place(x=255, y=70)

  creature_entry = Entry(ml2_wn, width=19)
  creature_entry.place(x=255, y=110)

  adj_entry = Entry(ml2_wn, width=19)
  adj_entry.place(x=255, y=150)

  village_entry = Entry(ml2_wn, width=19)
  village_entry.place(x=255, y=190)

  exclamation_entry = Entry(ml2_wn, width=19)
  exclamation_entry.place(x=255, y=230)

  fav_thing_entry = Entry(ml2_wn, width=19)
  fav_thing_entry.place(x=255, y=270)

  # Creating a 'Submit' button to add all the inputs to the final story
  submit_btn = Button(ml2_wn, text="Submit", background="SteelBlue", font=('Times', 12), command=lambda: finish_madlib(ml2_wn, boy_name_entry.get(), cloth_entry.get(), creature_entry.get(), adj_entry.get(), village_entry.get(), exclamation_entry.get(), fav_thing_entry.get()))
  submit_btn.place(x=150, y=300)

  ml2_wn.mainloop()
Third python mad lib generator game (The Ring):
# Third Mad Lib - titled "Cliff Hanger"
def third_madlib(win):
  def finish_madlib(tl: Toplevel, boy1, boy2, girl1, girl2, animal, exclamation):
    text = f'''
Once upon a time, two people, {girl1} and {boy1} were walking in the park. They were talking about his {animal}. Then
{boy1} exclaimed, "{exclamation}!" "What is it, {boy1}?" cried {girl1}. "I just remembered something, I have this
ring in my pocket." said {boy1}. "Why would you have that?" asked {girl1}. "Will you marry me?" {boy1} asked.
{girl1} replied, "Ummmmmmm... Yes, I Love You, {boy1}!" So they left on {boy1}'s {animal} to their kingdom and had 2
children named {girl2} and {boy2} and they lived happily ever after as every story should end!'''

    tl.geometry(newGeometry='375x700')

    Label(tl, text='Your Story:', font=("Times", 13, "bold"), wraplength=tl.winfo_width(), bg='DarkOrange').place(
      x=130, y=305)
    Label(tl, text=text, font=("Times", 13), wraplength=tl.winfo_width(), bg='DarkOrange').place(x=0, y=330)

  # Creating the top level widget for the second mad lib game
  ml3_wn = Toplevel(win, bg='DarkOrange')
  ml3_wn.title("The Ring")
  ml3_wn.geometry('375x550')
  ml3_wn.resizable(False, False)

  # Creating the labels that will display the text on the screen, with background as "Pink" and font as 20-point Times
  Label(ml3_wn, text='The Ring - Mad Libs', font=("Times", 17, 'bold'), bg='DarkOrange').place(
    x=85, y=0)

  Label(ml3_wn, text='A boy\'s name:', font=("Times", 15), bg='DarkOrange').place(x=0, y=35)
  Label(ml3_wn, text='Another boy\'s name:', font=("Times", 15), bg='DarkOrange').place(x=0, y=70)
  Label(ml3_wn, text='A girl\'s name:', font=("Times", 15), bg='DarkOrange').place(x=0, y=110)
  Label(ml3_wn, text='Another girl\'s name:', font=("Times", 15), bg='DarkOrange').place(x=0, y=150)
  Label(ml3_wn, text='An animal:', font=("Times", 15), bg='DarkOrange').place(x=0, y=190)
  Label(ml3_wn, text='An exclamation:', font=("Times", 15), bg='DarkOrange').place(x=0, y=230)

  # Creating the text input boxes to enter the data in for the user
  boy1_name_entry = Entry(ml3_wn, width=19)
  boy1_name_entry.place(x=255, y=35)

  boy2_name_entry = Entry(ml3_wn, width=19)
  boy2_name_entry.place(x=255, y=70)

  girl1_name_entry = Entry(ml3_wn, width=19)
  girl1_name_entry.place(x=255, y=110)

  girl2_name_entry = Entry(ml3_wn, width=19)
  girl2_name_entry.place(x=255, y=150)

  animal_entry = Entry(ml3_wn, width=19)
  animal_entry.place(x=255, y=190)

  exclamation_entry = Entry(ml3_wn, width=19)
  exclamation_entry.place(x=255, y=230)

  # Creating a 'Submit' button to add all the inputs to the final story
  submit_btn = Button(ml3_wn, text="Submit", background="SteelBlue", font=('Times', 12), command=lambda: finish_madlib(ml3_wn, boy1_name_entry.get(), boy2_name_entry.get(), girl1_name_entry.get(), girl2_name_entry.get(), animal_entry.get(), exclamation_entry.get()))
  submit_btn.place(x=150, y=270)

  ml3_wn.mainloop()
Explanation:
For this final step, you can copy the code from the first mad libs game, and rename some of the elements, duplicate or remove some elements, and adjust it according to your new python mad libs generator and its requirements. Similarly, you can also add 2 new buttons to correspond to the mad libs generator game.
You can also use this step to create more new mad libs and create corresponding buttons for it.
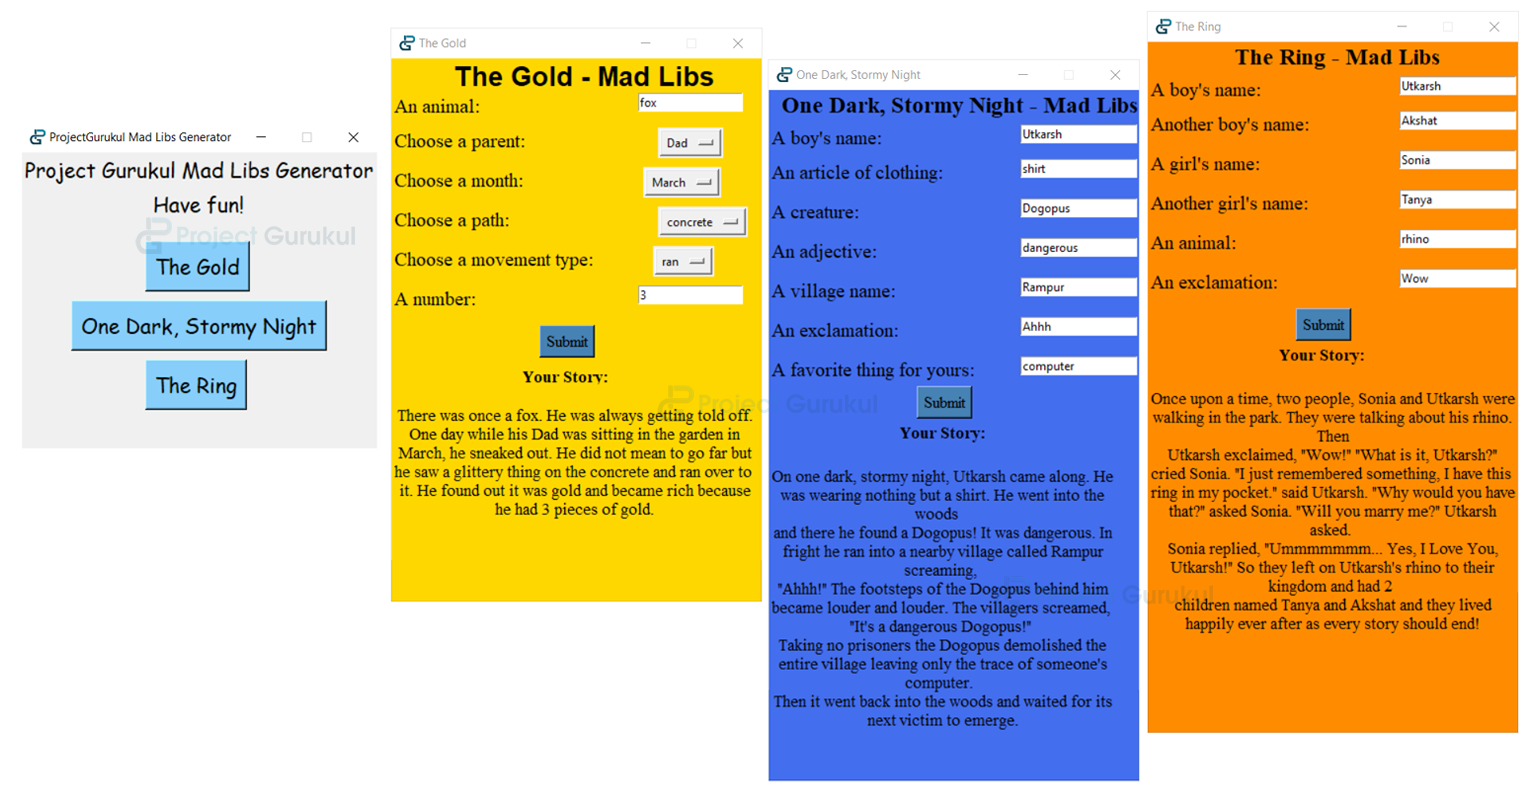
Python Mad Libs Generator Output
Conclusion
We have successfully created a gui based python mad libs generator game. We used the popular Tk framework in python to create the GUI for this project, you could create your own Mad libs and add them to the project.
Have fun! ??