Python Image Steganography Project with Source Code
FREE Online Courses: Enroll Now, Thank us Later!
In this Python project, we will build a GUI-based Image Steganography using the Tkinter and PIL modules. It is an intermediate-level project, and you will be able to do spycraft with covert messaging using images and apply the concepts discussed in this project in real life. Let’s get started!
About Steganography:
Steganography generally refers to encoding and decoding messages text-based data into non-text files such as audio files, image and video files. In this project, we will only encode and decode data into images only.
About the Image Steganography Project in Python:
The objective of this project is to create a GUI-based Python Image Steganography project. To build this, you will need an intermediate understanding of Tkinter and a basic understanding of the PIL library.
Project Prerequisites:
To build this Python Image Steganography project, we will need the following libraries:
1. Tkinter – To create the GUI
2. PIL – Python Image Manipulation library. It is used to perform operations on images in python.
While the Tkinter library comes pre-installed with Python, the PIL library does not, so you will have to run the following command to install it.
python -m pip install pillow
Download Python Image Steganography Project
Download source code of python Image Steganography: Image Steganography Project Source Code
Project File Structure:
Here are the steps you will need to execute to build this Image Steganography project in Python:
1. Initializing the root window and placing all components in it
2. Defining all the backend encryption and decryption functions
3. Defining the GUI functions of decoding and encoding
Let’s take a closer look at these steps:
1. Initializing the root window and placing all components in it:
# Initializing the window of Python Image Steganography Project
root = Tk()
root.title('ProjectGurukul Image Steganography')
root.geometry('300x200')
root.resizable(0, 0)
root.config(bg='NavajoWhite')

Label(root, text='ProjectGurukul Image Steganography', font=('Comic Sans MS', 15), bg='NavajoWhite',
      wraplength=300).place(x=40, y=0)

Button(root, text='Encode', width=25, font=('Times New Roman', 13), bg='SteelBlue', command=encode_image).place(
    x=30, y=80)

Button(root, text='Decode', width=25, font=('Times New Roman', 13), bg='SteelBlue', command=decode_image).place(
    x=30, y=130)

# Finalizing the window
root.update()
root.mainloop()
Explanation:
We will assign the Tk() class to the root variable to initialize the window. The methods and attributes that need to be set during initializing are:
- The .title() method is used to give a title to the window.
- The .geometry() method is used to define the initial dimensions of the window in pixels.
- The .resizable() method specifies whether the user will be allowed to resize the window or not. It takes only truth and falsy values in the form of (width, height).
- The .config() method is used to configure other attributes of the window, such as the bg attribute which denotes the colour of the background of the window.
- The .update() and .mainloop() methods put the window in a loop to prevent it from closing until told otherwise.
- Note:
These two lines will be the last lines in a GUI script that the Python interpreter will run in it.
The Label class is used to create a Label on the window that displays static text on the window. Its parameters that need to be set during assignment are:
- The master parameter, the positional argument root here, is the parent widget this widget is associated with.
- The text parameter refers to the text that will be displayed on the label.
- The font parameter defines the font family, size and effects that will be applied to the text displayed on the label.
- The wraplength parameter specifies the number of pixels after which the text has to be moved to the next line.
The Button class is used to add a button to the window that runs a function when it is pressed. Its parameters are:
- The command parameter is used to define the function that will run when the button is pressed. You will not need the lambda keyword if the function to run does not need any arguments.
The .place() method is used to place a widget on its parent widget as though the parent is a Cartesian Plane, with the Northwest corner being the origin of that plane.
- The x,y parameters define the horizontal and vertical offsets of the widget, respectively.
- The relx,rely parameters define the horizontal and vertical offsets as a decimal number between 0.0 and 1.0
2. Defining all the backend encryption and decryption functions:
# Creating the basic Image Steganography functions using python
def generate_data(pixels, data):
    # This function will convert the incoming data to 8-bit binary format using its ASCII values and return them
    data_in_binary = []

    for i in data:
        binary_data = format(ord(i), '08b')
        data_in_binary.append(binary_data)

    length_of_data = len(data_in_binary)
    image_data = iter(pixels)

    for a in range(length_of_data):
        pixels = [val for val in image_data.__next__()[:3] + image_data.__next__()[:3] + image_data.__next__()[:3]]

        for b in range(8):
            if (data_in_binary[a][b] == '1') and (pixels[b] % 2 != 0):
                pixels[b] -= 1
            elif (data_in_binary[a][b] == '0') and (pixels[b] % 2 == 0):
                if pixels[b] == 0:
                    pixels[b] += 1
                pixels[b] -= 1

        if (length_of_data-1) == a:
            if pixels[-1] % 2 == 0:
                if pixels[-1] == 0:
                    pixels[-1] += 1
                else:
                    pixels[-1] -= 1

        pixels = tuple(pixels)

        yield pixels[:3]
        yield pixels[3:6]
        yield pixels[6:9]


def encryption(img, data):
    # This method will encode data to the new image that will be created
    size = img.size[0]
    (x, y) = (0, 0)

    for pixel in generate_data(img.getdata(), data):
        img.putpixel((x, y), pixel)
        if size-1 == x:
            x = 0; y += 1
        else:
            x += 1


def main_encryption(img, text, new_image_name):
    # This function will take the arguments, create a new image, encode it and save it to the same directory
    image = Image.open(img, 'r')

    if (len(text) == 0) or (len(img) == 0) or (len(new_image_name) == 0):
        mb.showerror("Error", 'You have not put a value! Please put all values before pressing the button')

    new_image = image.copy()
    encryption(new_image, text)

    new_image_name += '.png'

    new_image.save(new_image_name, 'png')


def main_decryption(img, strvar):
    # This function will decode the image given to it and extract the hidden message from it
    image = Image.open(img, 'r')

    data = ''
    image_data = iter(image.getdata())

    decoding = True

    while decoding:
        pixels = [value for value in image_data.__next__()[:3] + image_data.__next__()[:3] + image_data.__next__()[:3]]

        # string of binary data
        binary_string = ''

        for i in pixels[:8]:
            if i % 2 == 0:
                binary_string += '0'
            else:
                binary_string += '1'

        data += chr(int(binary_string, 2))
        if pixels[-1] % 2 != 0:
            strvar.set(data)
Explanation:
1. In these functions, we will get the pixel data from the images, and then alter that data to keep the appearance of the image the same but encode the text that we want to hide in the data.
2. Image class is used to make an image file get recognized by Python. Its methods are:
- The .open() method is used to open an Image file in a flag mode.
- The .getdata() method is used to get the pixel data from the image.
- The .copy() method is used to copy an image and assign it to another variable.
- The .save(<filename>, <filetype>) is used to save a file with the file name ‘filename’ and type ‘filetype’.
3. Presence of the yield keyword tells us that the generate_data() function is a generator.
4. The yield keyword is used to return values from the generator without destroying the local variables or by ending the generator.
5. iter() function is used to return the values provided to it as arguments in the form of an iterable data type.
6. __next__() function is used to get the next values from the iterator it is applied to.
3. Defining the GUI functions of encoding and decoding:
# Creating the button functions
def encode_image():
encode_wn = Toplevel(root)
encode_wn.title("Encode an Image")
encode_wn.geometry('600x220')
encode_wn.resizable(0, 0)
encode_wn.config(bg='AntiqueWhite')
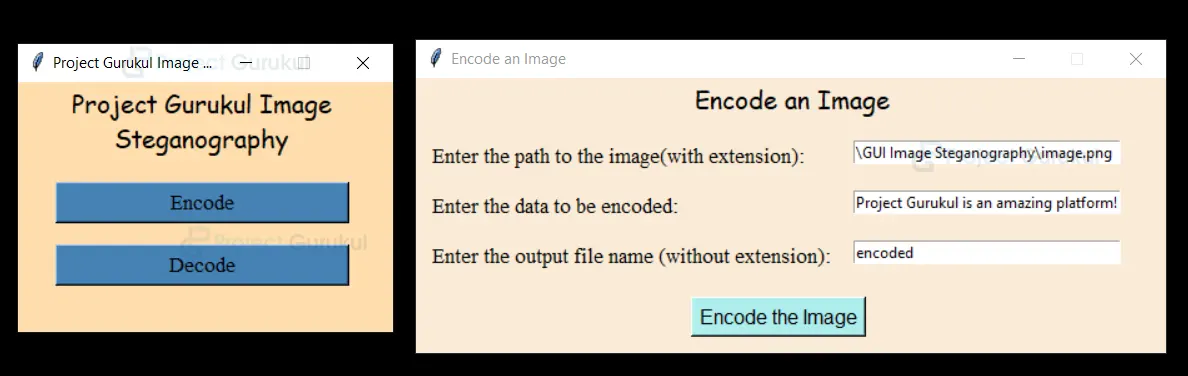
Label(encode_wn, text='Encode an Image', font=("Comic Sans MS", 15), bg='AntiqueWhite').place(x=220, rely=0)
Label(encode_wn, text='Enter the path to the image(with extension):', font=("Times New Roman", 13),
bg='AntiqueWhite').place(x=10, y=50)
Label(encode_wn, text='Enter the data to be encoded:', font=("Times New Roman", 13), bg='AntiqueWhite').place(
x=10, y=90)
Label(encode_wn, text='Enter the output file name (without extension):', font=("Times New Roman", 13),
bg='AntiqueWhite').place(x=10, y=130)
img_path = Entry(encode_wn, width=35)
img_path.place(x=350, y=50)
text_to_be_encoded = Entry(encode_wn, width=35)
text_to_be_encoded.place(x=350, y=90)
after_save_path = Entry(encode_wn, width=35)
after_save_path.place(x=350, y=130)
Button(encode_wn, text='Encode the Image', font=('Helvetica', 12), bg='PaleTurquoise', command=lambda:
main_encryption(img_path.get(), text_to_be_encoded.get(), after_save_path.get())).place(x=220, y=175)
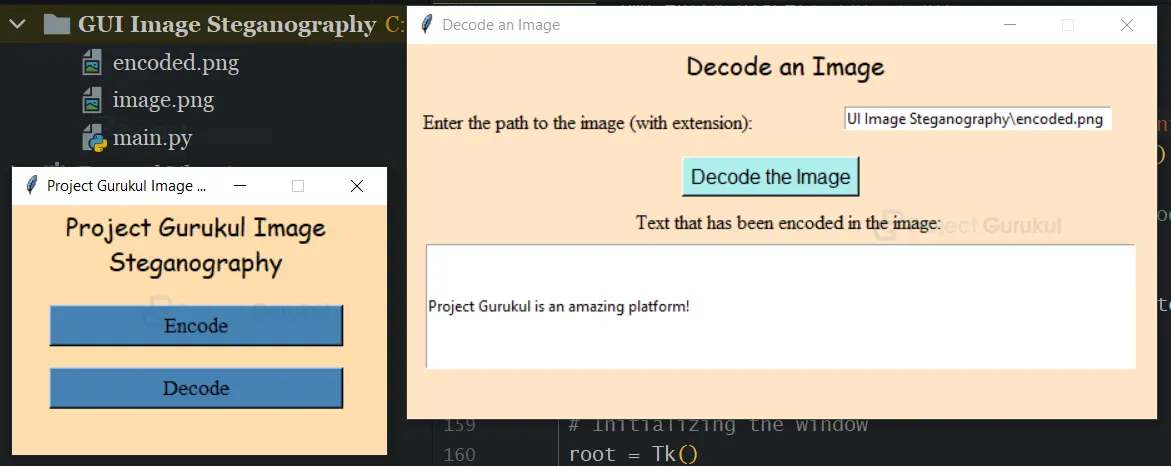
def decode_image():
decode_wn = Toplevel(root)
decode_wn.title("Decode an Image")
decode_wn.geometry('600x300')
decode_wn.resizable(0, 0)
decode_wn.config(bg='Bisque')
Label(decode_wn, text='Decode an Image', font=("Comic Sans MS", 15), bg='Bisque').place(x=220, rely=0)
Label(decode_wn, text='Enter the path to the image (with extension):', font=("Times New Roman", 12),
bg='Bisque').place(x=10, y=50)
img_entry = Entry(decode_wn, width=35)
img_entry.place(x=350, y=50)
text_strvar = StringVar()
Button(decode_wn, text='Decode the Image', font=('Helvetica', 12), bg='PaleTurquoise', command=lambda:
main_decryption(img_entry.get(), text_strvar)).place(x=220, y=90)
Label(decode_wn, text='Text that has been encoded in the image:', font=("Times New Roman", 12), bg='Bisque').place(
x=180, y=130)
text_entry = Entry(decode_wn, width=94, text=text_strvar, state='disabled')
text_entry.place(x=15, y=160, height=100)
Explanation:
1. The Toplevel class is useful to create a toplevel widget, or a child window associated with the root window.
- You need to set the same attributes and methods to this class as is done during the creation of the root window.
2. The Entry class is to create an entry field to the window where the user can input data. The parameters and methods of this class that are undiscussed are:
- The state parameter is to define the actions that the user can do inside the Entry widget.
-
- The default, normal, allows the user to enter data as well.
- The readonly state only allows the user to read and copy the data.
- The disabled state only allows the user to read the data only.
-
- The text parameter is for setting the variable that will manipulate the data in the widget or to the initial text inside the widget.
- The .get() method of this class is to get the value inside the widget that this class creates.
The StringVar class is for manipulating the text inside the Label, Entry and many other widgets.
- The .set() method of this class changes the value of this widget to the argument it is provided.
The final code:
# Importing the necessary modules
from tkinter import *
from tkinter import messagebox as mb
from PIL import Image

# Creating the basic Python Image Steganography functions
def generate_data(pixels, data):
    # This function will convert the incoming data to 8-bit binary format using its ASCII values and return them
    data_in_binary = []

    for i in data:
        binary_data = format(ord(i), '08b')
        data_in_binary.append(binary_data)

    length_of_data = len(data_in_binary)
    image_data = iter(pixels)

    for a in range(length_of_data):
        pixels = [val for val in image_data.__next__()[:3] + image_data.__next__()[:3] + image_data.__next__()[:3]]

        for b in range(8):
            if (data_in_binary[a][b] == '1') and (pixels[b] % 2 != 0):
                pixels[b] -= 1
            elif (data_in_binary[a][b] == '0') and (pixels[b] % 2 == 0):
                if pixels[b] == 0:
                    pixels[b] += 1
                pixels[b] -= 1

        if (length_of_data-1) == a:
            if pixels[-1] % 2 == 0:
                if pixels[-1] == 0:
                    pixels[-1] += 1
                else:
                    pixels[-1] -= 1

        pixels = tuple(pixels)

        yield pixels[:3]
        yield pixels[3:6]
        yield pixels[6:9]


def encryption(img, data):
    # This method will encode data to the new image that will be created
    size = img.size[0]
    (x, y) = (0, 0)

    for pixel in generate_data(img.getdata(), data):
        img.putpixel((x, y), pixel)
        if size-1 == x:
            x = 0; y += 1
        else:
            x += 1


def main_encryption(img, text, new_image_name):
    # This function will take the arguments, create a new image, encode it and save it to the same directory
    image = Image.open(img, 'r')

    if (len(text) == 0) or (len(img) == 0) or (len(new_image_name) == 0):
        mb.showerror("Error", 'You have not put a value! Please put all values before pressing the button')

    new_image = image.copy()
    encryption(new_image, text)

    new_image_name += '.png'

    new_image.save(new_image_name, 'png')


def main_decryption(img, strvar):
    # This function will decode the image given to it and extract the hidden message from it
    image = Image.open(img, 'r')

    data = ''
    image_data = iter(image.getdata())

    decoding = True

    while decoding:
        pixels = [value for value in image_data.__next__()[:3] + image_data.__next__()[:3] + image_data.__next__()[:3]]

        # string of binary data
        binary_string = ''

        for i in pixels[:8]:
            if i % 2 == 0:
                binary_string += '0'
            else:
                binary_string += '1'

        data += chr(int(binary_string, 2))
        if pixels[-1] % 2 != 0:
            strvar.set(data)


# Creating the button functions
def encode_image():
    encode_wn = Toplevel(root)
    encode_wn.title("Encode an Image")
    encode_wn.geometry('600x220')
    encode_wn.resizable(0, 0)
    encode_wn.config(bg='AntiqueWhite')
    Label(encode_wn, text='Encode an Image', font=("Comic Sans MS", 15), bg='AntiqueWhite').place(x=220, rely=0)

    Label(encode_wn, text='Enter the path to the image(with extension):', font=("Times New Roman", 13),
          bg='AntiqueWhite').place(x=10, y=50)
    Label(encode_wn, text='Enter the data to be encoded:', font=("Times New Roman", 13), bg='AntiqueWhite').place(
        x=10, y=90)
    Label(encode_wn, text='Enter the output file name (without extension):', font=("Times New Roman", 13),
          bg='AntiqueWhite').place(x=10, y=130)

    img_path = Entry(encode_wn, width=35)
    img_path.place(x=350, y=50)

    text_to_be_encoded = Entry(encode_wn, width=35)
    text_to_be_encoded.place(x=350, y=90)

    after_save_path = Entry(encode_wn, width=35)
    after_save_path.place(x=350, y=130)

    Button(encode_wn, text='Encode the Image', font=('Helvetica', 12), bg='PaleTurquoise', command=lambda:
    main_encryption(img_path.get(), text_to_be_encoded.get(), after_save_path.get())).place(x=220, y=175)


def decode_image():
    decode_wn = Toplevel(root)
    decode_wn.title("Decode an Image")
    decode_wn.geometry('600x300')
    decode_wn.resizable(0, 0)
    decode_wn.config(bg='Bisque')

    Label(decode_wn, text='Decode an Image', font=("Comic Sans MS", 15), bg='Bisque').place(x=220, rely=0)

    Label(decode_wn, text='Enter the path to the image (with extension):', font=("Times New Roman", 12),
          bg='Bisque').place(x=10, y=50)

    img_entry = Entry(decode_wn, width=35)
    img_entry.place(x=350, y=50)

    text_strvar = StringVar()

    Button(decode_wn, text='Decode the Image', font=('Helvetica', 12), bg='PaleTurquoise', command=lambda:
    main_decryption(img_entry.get(), text_strvar)).place(x=220, y=90)

    Label(decode_wn, text='Text that has been encoded in the image:', font=("Times New Roman", 12), bg='Bisque').place(
        x=180, y=130)

    text_entry = Entry(decode_wn, width=94, text=text_strvar, state='disabled')
    text_entry.place(x=15, y=160, height=100)


# Initializing the window
root = Tk()
root.title('ProjectGurukul Image Steganography')
root.geometry('300x200')
root.resizable(0, 0)
root.config(bg='NavajoWhite')

Label(root, text='ProjectGurukul Image Steganography', font=('Comic Sans MS', 15), bg='NavajoWhite',
      wraplength=300).place(x=40, y=0)

Button(root, text='Encode', width=25, font=('Times New Roman', 13), bg='SteelBlue', command=encode_image).place(
    x=30, y=80)

Button(root, text='Decode', width=25, font=('Times New Roman', 13), bg='SteelBlue', command=decode_image).place(
    x=30, y=130)

# Finalizing the window
root.update()
root.mainloop()
Python Image Steganography Output
Summary
Congratulations! You have now created your own GUI-based Image Steganography project using the Tkinter and PIL modules. Using covert messages encrypted in images, you can now communicate with your friends. You can add many more functionalities to it, and make it more useful.
Have fun with it!?
dear Sir/Mam
Which encryption algorithm has been used in this project?
please reply with patiently
not save for encode file problem
IF WE PRESS ENCODE THE IMAGE WHY SHE WAS NOT SHOW THW MSSEGE IMAGE WAS ENCODE D
it works when I resize encided image?
can you please help me with source code
Plz..time complexity to this code
Solution:
Inside ”decode_image()” function make ”text_entry” a global variable like this (global text_entry), then remove the ”text_strvar” from decode_image() function and also remove from decode button, after making a global variable go inside a ”main_decryptio()” function remove the ”strvar” parameter, and instead of ”strvar.set(data)” write ”text_entry.insert(END, data)”.
can you please provide the source code , I need it asap
still have the same time complexity problem
Plz explain the…test stegenograpy using space method.
I executed the code but decode window doesn’t respond..can you help me with it?
I have executed the code but while running the decoding window doesn’t respond
can you help me out?