Create an Audiobook with Python
FREE Online Courses: Click for Success, Learn for Free - Start Now!
Have you ever felt the urge to convert a text file into an audio file? If yes, we are going to create a similar project here. In this project, we are going to build the code to create an Audiobook using Python.
What is an Audiobook?
An audiobook is an audio file that is like a book. In simpler words, we can say that an audiobook is the audio version of a book.
An audiobook application takes in a book text file or pdf and converts it into an audiofile and saves it in your system.
Project Details
Here we are going to create an audiobook in this project. This application will take in a pdf file and convert it into an audio file and finally save an audio file.
There is going to be a GUI window which will have a browse function where we can browse a pdf file. Then we will have a button to convert it into an audio file and save it after conversion.
Project Prerequisites
A little knowledge about Python is required to build this project. Following are the modules and their commands to install. Install these modules to start building the project.
Tkinter Module –
pip install tk
PyPDF2 Module –
pip install PyPDF2
Pyttsx3 Module –
pip install pyttsx3
Download the Python AudioBook Code
Please download the python audio book source code from the following link: Create an Audiobook using Python Project
Steps to Build Python AudioBook Project
Following are the steps to build the project –
- Install the Required Modules
- Importing the installed Modules
- Function to Browse a file
- Function to convert into audio file
- Creating GUI Window
- Adding Buttons, Labels and CheckButton
1. Install the Required Modules:
- Look at the prerequisites and use the commands given to download the Tkinter Module, Py2PDF Module and Pyttsx Module.
2. Import the Installed Modules:
import tkinter as tk
from tkinter import *
import PyPDF2
import pyttsx3
from tkinter import filedialog
We are importing the following modules –
- Tkinter Module – to build the GUI of our project.
- PyPDF2 Module – to perform operations on PDF.
- Pyttsx3 Module – to convert text into speech.
3. Function to Browse a File:
def browse():
    global pdfReader
    file= filedialog.askopenfilename(title="Select a PDF", filetype=(("PDF    Files","*.pdf"),("All Files","*.*")))
    pdfReader = PyPDF2.PdfFileReader(open(file, 'rb'))
    pathlabel.config(text=file)#configuring the pathlabel Label
- We have created this function to enable browsing a file from a GUI window.
- We have created a global variable pdfReader.
- askopenfilename() – is used to open a pdf file. Here the file type is restricted to pdf.
- open() – is used to open the selected file. It is opened in rb which means opening a binary file in reading mode.
- config() – using this we configure the pathlabel (The label is created in the GUI section) and display the selected file’s path as text.
4. Function to Convert into Audio File:
def save():
    global speaker
    speaker = pyttsx3.init()

    for page_num in range(pdfReader.numPages):
        text =  pdfReader.getPage(page_num).extractText()
        speaker.say(text)
        speaker.runAndWait()
    speaker.stop()

    voices = speaker.getProperty('voices')
    if m.get() == 0:
        speaker.setProperty('voice', voices[0].id)
    elif f.get() == 1:
        speaker.setProperty('voice', voices[1].id)

    speaker.save_to_file(text,'audio.mp3')
    speaker.runAndWait()
    Label(root,text="The Audio File is Saved").pack()
- We create a global variable speaker.
- init() – Using the init() method, we initialize the speaker variable.
- After this, we make a loop to extract the text in the pdf file.
- getpage() – gets the page number in the pdf file.
- extractText() – extracts the text from the pdf file.
- say() – converts the text into audio.
- getProperty() – gets the voice property set in the speaker variable using the setProperty() method.
- save_to_file() – finally saves the audio file in our system.
- Label() – Creates a label widget to display the message that the audio file is saved successfully.
5. Create GUI Window:
root = Tk()#creating GUI window
root.geometry('400x350')#geometry of window
root.title("ProjectGurukul")#title of window
- geometry() – it specifies the size of the GUI Window.
- title() – It defines the title of the GUI Window.
6. Adding Buttons, Labels and CheckButtons:
Label(root, text="AUDIOBOOK",font="Arial 15",bg='green').pack()
pathlabel = Label(root)
pathlabel.pack()
- Label() – creates a widget to display text.
Button(root,text="Browse a File",command=browse).pack()
Button(root,text="Create and Save the Audio File ",command=save).pack()
- Button() – creates buttons to be displayed on the GUI Window.
- We are creating two buttons – one to browse files and second to create and save the audio file.
Checkbutton(root,text="Male Voice",onvalue=0,offvalue=10,variable=m).pack()
Checkbutton(root,text="Female Voice",onvalue=1,offvalue=10,variable=f).pack()
- Checkbutton() – creates checkbutton on the GUI Window.
- We are creating checkboxes for Male and Female voices.
root.mainloop()
- mainloop() – to keep the code in loop and display all the widgets on the window.
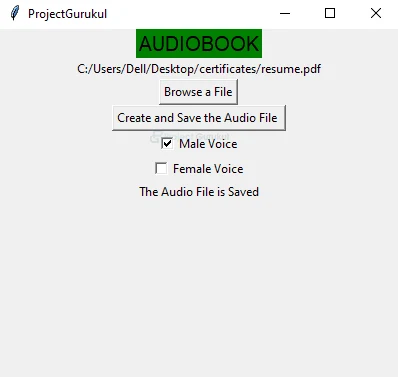
Python AudioBook Output
The figure below shows the output of the Audiobook Project-
The audio file gets saved near the code.
Summary
In this project, we have successfully built an Audiobook using Python. We have used the Tkinter Module, Py2PDF Module and Pyttsx3 Module in the project.
you can’t run it online platforms like google Colab or binder. it works on hard installed python
Hi,
Where the output is expected to be saved? I am not able to find it in the same folder as we have browsed the PDF from
How to solve a error at root=Tk()
TclError: no display name and no $DISPLAY environment variable