Java Calculator – Exploring the Beauty of Math through Code
FREE Online Courses: Enroll Now, Thank us Later!
In this project, we will be creating a simple calculator using Java and the Swing library. The java calculator will have basic mathematical functions such as addition, subtraction, multiplication, and division.
The user interface of the calculator will be created using the Swing library, which provides a rich set of GUI components for building graphical user interfaces in Java.
About Java Calculator
The objective of java calculator project is to demonstrate how to create a simple calculator using Java and the Swing library. By the end of java calculator project, you will have a solid understanding of how to create a basic calculator and have hands-on experience using the Swing library.
Prerequisites for Calculator using Java
To complete java calculator project, you should have a –
- Basic understanding of Java and programming concepts.
- Familiarity with object-oriented programming and the Java Swing library.
Download Java Calculator Project
Please download the source code of Java Calculator Project from the following link: Java Calculator Project Code
Steps to Create Calculator using Java
Following are the steps for developing the java calculator project:
Step 1: Importing Required Libraries
The first step in creating our calculator is to import the required libraries. The libraries that we will be using are javax.swing, java.awt, and java.awt.event. To import these libraries, we will use the following code:
package org.projectGurukul;
import javax.swing.*;
import java.awt.*;
import java.awt.event.*;
Step 2: Creating the Main Class
Next, we will create the main class that will represent our calculator. The class will implement the ActionListener interface, which will allow us to handle button clicks. We will also declare the necessary variables and objects that we will use in our calculator. The ActionListener interface allows us to detect when the buttons are clicked.
public class Calculator implements ActionListener{
  JFrame frame;
  JTextField displayTextField;
  JButton[] numberButtons = new JButton[10];
  JButton[] functionButtons = new JButton[9];
  JButton addButton,subButton,mulButton,divButton;
  JButton decButton, equButton, delButton, clrButton, negButton;
  JPanel buttonPanel;

  Font font = new Font("Jua",Font.BOLD,30);
  double no1=0,no2=0,result=0;
  char operator;

  Calculator(){
In this step, we declare all the components that will be used in our calculator GUI. The frame is the main frame of the calculator, displayTextField is the text field that displays the results, numberButtons is an array of 10 buttons for numbers 0-9, and functionButtons is an array of 9 buttons for operations such as addition, subtraction, etc. We also declare a few variables such as no1, no2, result, and operator which will be used to perform arithmetic operations.
Note: Only the fonts available on your system can be used so use the font accordingly.
Step 3: Creating the Frame
In this step, we will create the frame that will serve as the main window for our calculator. We will set the background color, size, and layout for the frame. We will also set the default close operation to exit the application when the user closes the window.
frame = new JFrame("Calculator by ProjectGurukul");
    frame.getContentPane().setBackground(new Color(54, 70, 82));
    frame.setDefaultCloseOperation(JFrame.EXIT_ON_CLOSE);
    frame.setSize(350, 550);
    frame.getContentPane().setLayout(null);
Step 4: Creating the Display Text Field
In this step, we will create the display text field that will show the results of our calculations. We will set its alignment, size, font, and editability.
displayTextField = new JTextField();
  displayTextField.setHorizontalAlignment(SwingConstants.RIGHT);
  displayTextField.setBounds(26, 25, 300, 50);
  displayTextField.setFont(font);
  displayTextField.setEditable(false);
Step 5: Creating all the function buttons and adding them to the array
addButton = new JButton("+");
  subButton = new JButton("-");
  mulButton = new JButton("*");
  divButton = new JButton("/");
  decButton = new JButton(".");
  equButton = new JButton("=");
  delButton = new JButton("Del");
  clrButton = new JButton("Clr");
  negButton = new JButton("(-X)");

  functionButtons[0] = addButton;
  functionButtons[1] = subButton;
  functionButtons[2] = mulButton;
  functionButtons[3] = divButton;
  functionButtons[4] = decButton;
  functionButtons[5] = equButton;
  functionButtons[6] = delButton;
  functionButtons[7] = clrButton;
  functionButtons[8] = negButton;
In this step, we create all the buttons and add them to the functionButtons array
Step 6: Looping through all the buttons and setting their properties
for(int i =0;i<9;i++) {
      functionButtons[i].addActionListener(this);
      functionButtons[i].setFont(font);
      functionButtons[i].setFocusable(false);
      functionButtons[i].setBackground(new Color(200, 226, 228));
    }

    for(int i =0;i<10;i++) {
      numberButtons[i] = new JButton(String.valueOf(i));
      numberButtons[i].addActionListener(this);
      numberButtons[i].setFont(font);
      numberButtons[i].setFocusable(false);
      numberButtons[i].setBackground(new Color(200, 226, 228));
    }
In this Step, we create an array of JButtons called functionButtons and numberButtons. The for loop is used to initialize each button in each array and add an action listener to each button to handle user events.
For each button, the following actions are performed:
- The addActionListener method is used to register the action listener to listen for user events.
- The setFont method is used to set the font of the text on the button.
- The setFocusable method is used to set the focus of the button to false, so that the button does not take focus when the user clicks on it.
- The setBackground method is used to set the background color of the button to a specific RGB color value.
Note that the buttons in the functionButtons array have a for loop that runs 9 times, while the numberButtons array has a for loop that runs 10 times.
Step 7:Final Layout setup
negButton.setBounds(26,430,100,50);
  delButton.setBounds(120,430,100,50);
  clrButton.setBounds(216,430,100,50);

  buttonPanel = new JPanel();
  buttonPanel.setBackground(new Color(54, 70, 82));
  buttonPanel.setBounds(26, 87, 300, 300);
  buttonPanel.setLayout(new GridLayout(4,4,15,15));

  buttonPanel.add(numberButtons[1]);
  buttonPanel.add(numberButtons[2]);
  buttonPanel.add(numberButtons[3]);
  buttonPanel.add(addButton);
  buttonPanel.add(numberButtons[4]);
  buttonPanel.add(numberButtons[5]);
  buttonPanel.add(numberButtons[6]);
  buttonPanel.add(subButton);
  buttonPanel.add(numberButtons[7]);
  buttonPanel.add(numberButtons[8]);
  buttonPanel.add(numberButtons[9]);
  buttonPanel.add(mulButton);
  buttonPanel.add(decButton);
  buttonPanel.add(numberButtons[0]);
  buttonPanel.add(equButton);
  buttonPanel.add(divButton);

  frame.getContentPane().add(buttonPanel);
  frame.getContentPane().add(negButton);
  frame.getContentPane().add(delButton);
  frame.getContentPane().add(clrButton);
  frame.getContentPane().add(displayTextField);
  frame.setVisible(true);
}
Here’s what’s happening in this step:
- The setBounds method is used to set the size and position of each button on the screen.
- A JPanel named buttonPanel is created and its background color and size are set using the setBackground and setBounds methods.
- The setLayout method is used to set the layout of the buttonPanel to a 4×4 grid layout with a 15 pixel horizontal and vertical gap between the buttons.
- The buttons are added to the buttonPanel using the add method, in a specific order to form a calculator layout.
- The negButton, delButton, clrButton, and displayTextField are added to the content pane of the frame.
- Finally, the frame is set to be visible using the setVisible method.
Step 8:Implementing the Action Listener for the Calculator Buttons
@Override
  public void actionPerformed(ActionEvent e) {
    for(int i=0;i<10;i++) {
      if(e.getSource() == numberButtons[i]) {
        displayTextField.setText(displayTextField.getText().concat(String.valueOf(i)));
      }
    }
    if(e.getSource()==decButton) {
      displayTextField.setText(displayTextField.getText().concat("."));
    }
    if(e.getSource()==addButton) {
      no1 = Double.parseDouble(displayTextField.getText());
      operator ='+';
      displayTextField.setText("");
    }
    if(e.getSource()==subButton) {
      no1 = Double.parseDouble(displayTextField.getText());
      operator ='-';
      displayTextField.setText("");
    }
    if(e.getSource()==mulButton) {
      no1 = Double.parseDouble(displayTextField.getText());
      operator ='*';
      displayTextField.setText("");
    }
    if(e.getSource()==divButton) {
      no1 = Double.parseDouble(displayTextField.getText());
      operator ='/';
      displayTextField.setText("");
    }
    if(e.getSource()==equButton) {
      no2=Double.parseDouble(displayTextField.getText());

      switch(operator) {
      case'+':
        result=no1+no2;
        break;
      case'-':
        result=no1-no2;
        break;
      case'*':
        result=no1*no2;
        break;
      case'/':
        result=no1/no2;
        break;
      }
      displayTextField.setText(String.valueOf(result));
      no1=result;
    }
    if(e.getSource()==clrButton) {
      displayTextField.setText("");
      no1 = 0;
    }
    if(e.getSource()==delButton) {
      String string = displayTextField.getText();
      displayTextField.setText(string.substring(0, string.length()-1));
    }
    if(e.getSource()==negButton) {
      double temp = Double.parseDouble(displayTextField.getText());
      temp*=-1;
      displayTextField.setText(String.valueOf(temp));
    }
  }
1. This code implements the actionPerformed method which listens to the events fired by the buttons of the calculator when they are clicked.
2. For loop with the i variable running from 0 to 9:
a. If the source of the event (i.e. the button that was clicked) is any of the number buttons, the text in the displayTextField is updated by concatenating the string representation of the number i to the existing text.
3. If the source of the event is the decimal button, the text in the displayTextField is updated by concatenating a dot (.) to the existing text.
4. If the source of the event is the add button, the text in the displayTextField is parsed to a double and stored in the no1 variable. The operator variable is set to ‘+’. The text in the displayTextField is then set to an empty string.
5. If the source of the event is the subtract button, the text in the displayTextField is parsed to a double and stored in the no1 variable. The operator variable is set to ‘-‘. The text in the displayTextField is then set to an empty string.
6. If the source of the event is the multiply button, the text in the displayTextField is parsed to a double and stored in the no1 variable. The operator variable is set to ‘*’. The text in the displayTextField is then set to an empty string.
7. If the source of the event is the divide button, the text in the displayTextField is parsed to a double and stored in the no1 variable. The operator variable is set to ‘/’. The text in the displayTextField is then set to an empty string.
8. If the source of the event is the equals button, the text in the displayTextField is parsed to a double and stored in the no2 variable. A switch statement is then used to perform the calculation based on the operator stored in the operator variable. The result of the calculation is stored in the result variable. The text in the displayTextField is then set to the string representation of the result. The no1 variable is then set to the result.
9. If the source of the event is the clear button, the text in the displayTextField is set to an empty string and the no1 variable is set to 0.
10. If the source of the event is the delete button, the string representation of the text in the displayTextField is retrieved and the last character is removed using the substring method. The text in the displayTextField is then updated to the new string.
11. If the source of the event is the negative button, the text in the displayTextField is parsed to a double, multiplied by -1, and then converted back to a string. The text in the displayTextField is then updated with the new string.
Step 9:Final Step of Implementing the Main method
public static void main(String[] args) {
    Calculator calculator = new Calculator();
  }
}
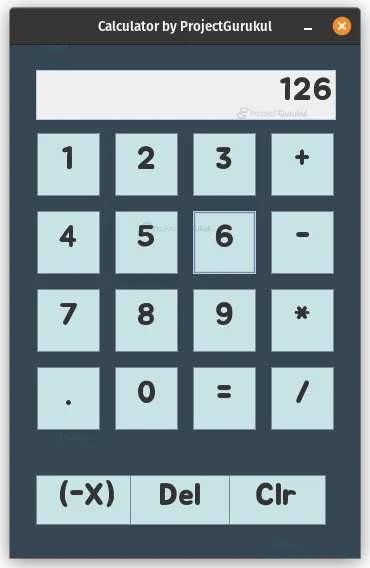
Java Calculator Output
Summary
The code is a Java implementation of a basic calculator. The user interface is designed using Java Swing libraries. The calculator has a display text field and multiple buttons including number buttons (0-9), function buttons (add, subtract, multiply, divide, decimal, equal, delete, clear and negative), and a panel to arrange the buttons.
The calculator also has basic arithmetic functions such as addition, subtraction, multiplication, and division. The user can perform operations by clicking on the appropriate button and the result is displayed in the text field. The code uses the ActionListener interface to listen for button clicks and perform the corresponding operations.
I am so happy to have known your site, helpful for my learning and practicing of the Java codes.
I again thank you so much, and may the Almighty GOD bless you all