Handwritten Character Recognition – Machine Learning Project
FREE Online Courses: Knowledge Awaits – Click for Free Access!
As the name suggests, the handwritten Character recognition is the ability of computers to recognize human handwritten characters. Or in easy words we can say that it is the ability of computers to detect the character present in a particular image and recognize that character.
About Handwritten Character Recognition Project:
This is Deep learning project, or we say Machine learning project in which we will create a Convolutional neural network(CNN) model with the help of tensorflow and keras which will recognise Handwritten characters, i.e English alphabets from A-Z. The dataset on which we will train our model contains a large number of images of English alphabets.
For image recognition and processing, there is a very popular artificial neural network used that is Convolutional neural network (CNN) that is specifically designed to process pixel data. And that’s why we are going to build a CNN model to recognise character.
I hope you understand what we are going to build and what the project is all about. Without wasting any time further let’s directly dive into the implementation of this Handwritten Character Recognition using Tensorflow Project by ProjectGurukul.
Requirements to create this Machine Learning Projects:
These are the libraries/frameworks which should be installed in your system:
- You should have Python (latest version) installed.
- You should have Jupyter notebook (as I have worked on that IDE)
Libraries:
- Numpy (pip install numpy)
- OpenCV (pip install cv2)
- Keras (pip install keras)
- Tensorflow (As we know that keras uses Tensorflow as backend) (pip install tensorflow)
- Matplotlib (To visualize our Data) (pip install matplotlib)
- Pandas (pip install pandas)
You can install all these libraries using pip. Just open your system cmd and type pip install numpy, pip install cv2, etc as written in brackets.
Dataset:
We will be using a Dataset given by sachin patel. The name of this dataset is A-Z Handwritten Alphabets in.csv file. This dataset is basically a csv file which contains 372450 images of alphabets of 28×28 size. You can download the dataset by going to the following link: Handwritten character recognition project dataset
Download Handwritten Character Recognition Project Code
Please download the source code of handwritten character recognition with deep learning: Handwritten Character Recognition Project Code
Now let’s start implementing our Project Handwritten Character Recognition using Tensorflow:
1.) First step will be to import Required libraries:
We will import libraries that we have installed in our system, whenever we require them.
So firstly we are only importing numpy, pandas and matplotlib to preprocess our data and to visualize that data.
import numpy as np
import pandas as pd
import matplotlib.pyplot as plt
2.) Read Dataset:
Now we will read our dataset that is a csv file using the pandas read_csv() method. We will read the data as data type float32 as the csv file is very large and it will be better to read it as float:
data = pd.read_csv('A_Z Handwritten Data.csv').astype('float32')
data.head(10)

3.) Splitting of Data:
We split the data into X and y. In which X will contain a character image and y will contain a label of that image.
X = data.drop('0',axis = 1)
y = data['0']
4.) Performing Split Using Sklearn:
Let’s perform train_test_split on X and y, to get training (x_train,y_train) and testing (x_test,y_test) data.
from sklearn.model_selection import train_test_split
from sklearn.utils import shuffle

x_train, x_test, y_train, y_test = train_test_split(X, y, test_size = 0.2)
5.) Reshaping the Training and Testing data:
In this we reshaped our training and testing image data using numpy, so that we can display it in the form of image, as initially in the csv file they are present in 784 columns of pixel data. So we convert them to 28×28 pixels.
x_train = np.reshape(x_train.values, (x_train.shape[0], 28,28))
x_test = np.reshape(x_test.values, (x_test.shape[0], 28,28))

print("Shape of Training data: ", x_train.shape)
print("Shape of Testing data: ", x_test.shape)
6.) Shuffle the training data:
After reshaping the data, now let’s shuffle our data, so that we can see training on shuffled characters.
shuffle_data = shuffle(x_train)
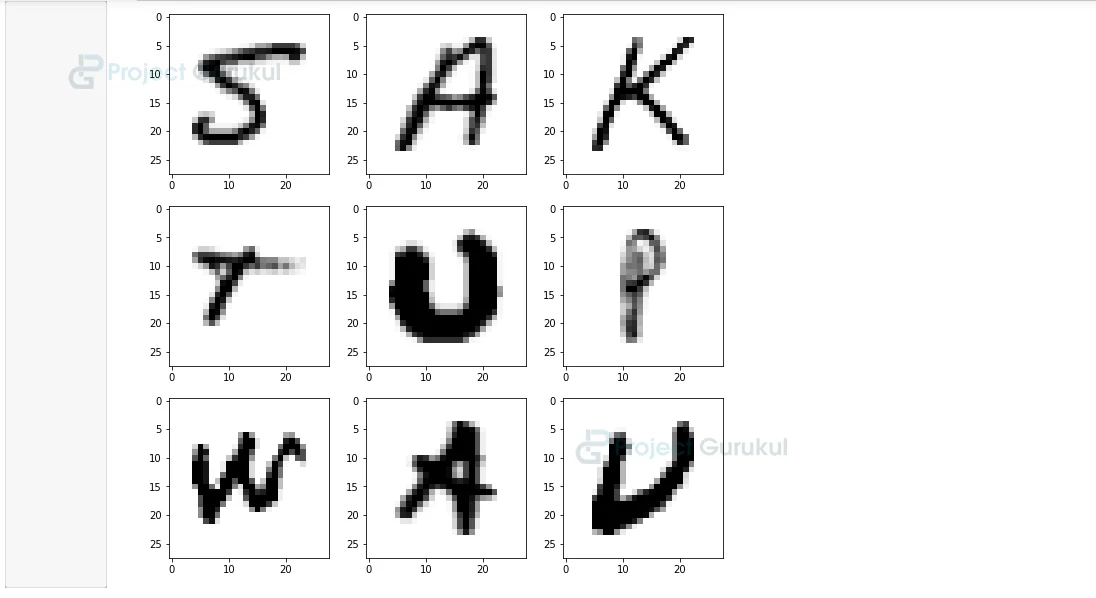
7.) Visualize our training data:
Now let’s visualize our training data, and let’s check that we have successfully converted them to view in image form.
import cv2
  fig, axes = plt.subplots(3,3, figsize = (10,10))
axes = axes.flatten()
for i in range(9):
    _, shu = cv2.threshold(shuffle_data[i], 30, 200, cv2.THRESH_BINARY)
    axes[i].imshow(np.reshape(shuffle_data[i], (28,28)), cmap="Greys")
plt.show()
8.) Again Reshaping Data:
In this we have reshaped our image data, so that we can use this data for training of our model.
training of our model.
x_train = x_train.reshape(x_train.shape[0],x_train.shape[1],x_train.shape[2],1)
x_test = x_test.reshape(x_test.shape[0], x_test.shape[1], x_test.shape[2],1)
print("New shape of training data: ", x_train.shape)
print("New shape of testing data: ", x_test.shape)
9.) Converting to_categorical:
Now we have to convert our single float values to categorical values using to_categorical method given by tensorflow, keras:
import tensorflow
from tensorflow.keras.utils import to_categorical
y_training = to_categorical(y_train, num_classes = 26, dtype='int')
y_testing = to_categorical(y_test, num_classes = 26, dtype='int')
10.) Model Creation:
We will be creating a Convolutional Neural Networks (CNN) model which is very popular while classifying images as it extracts the features of images using several hidden layers or we say several layers of filters.
from tensorflow.keras.models import Sequential
from tensorflow.keras.layers import Dense, Flatten, Conv2D, MaxPool2D, Dropout
from tensorflow.keras.optimizers import SGD, Adam
from tensorflow.keras.callbacks import ReduceLROnPlateau, EarlyStopping
The model we have created consist of :
- 3 convolutional layers(Conv2D) of 64,64,64 layers each, followed by MaxPool layers that are used to reduce the number of features extracted.
- And after flatten the layers, we created two fully connected layers (Dense layer) of 128,265 layers respectively,
- and at last we have created our output layer that is also a fully connected layer with softmax as an activation function.
model = Sequential()

model.add(Conv2D(64 , (3, 3), activation='relu', input_shape=(28,28,1)))
model.add(MaxPool2D(2, 2))

model.add(Conv2D(64, (3, 3), activation='relu'))
model.add(MaxPool2D(2, 2))

model.add(Conv2D(64, (3, 3), activation='relu'))
model.add(MaxPool2D(2,2))

model.add(Flatten())

model.add(Dense(128,activation ="relu"))
model.add(Dense(256,activation ="relu"))
model.add(Dense(26,activation ="softmax"))
11.) Model Summary:
model.summary()

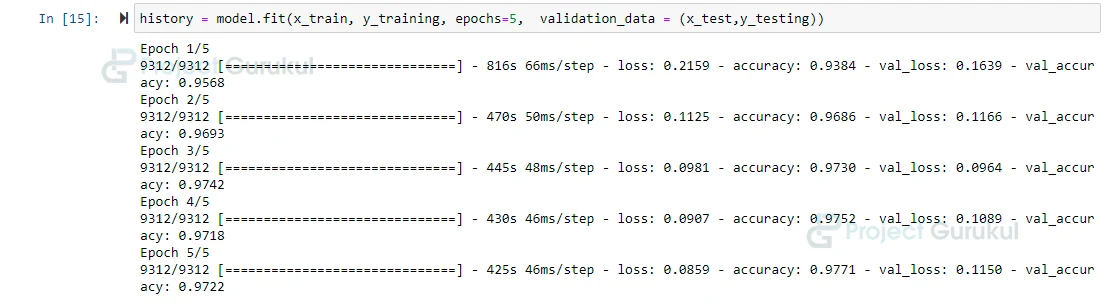
12.) Compile and Fit our model:
For training on our image and checking accuracy that it is classifying images to its correct alphabet or not.
model.compile(optimizer = Adam(learning_rate=0.001), loss='categorical_crossentropy', metrics=['accuracy'])
history = model.fit(x_train, y_training, epochs=5,  validation_data = (x_test,y_testing))
13.) Save the model:
Now the model is created and we have also trained our model. The next step is to save the model, so in this we are saving our model using model.save().
model.save(r'handwritten_character_recog_model.h5')
14.) Creating Words Dictionary:
This word dictionary corresponding key to its values .
words = {0:'A',1:'B',2:'C',3:'D',4:'E',5:'F',6:'G',7:'H',8:'I',9:'J',10:'K',11:'L',12:'M',13:'N',14:'O',15:'P',16:'Q',17:'R',18:'S',19:'T',20:'U',21:'V',22:'W',23:'X', 24:'Y',25:'Z'}
15.) Prediction Process:
Lets see how our model works by predicting alphabets present in an image.
fig, axes = plt.subplots(3,3, figsize=(8,9))
axes = axes.flatten()
for i,ax in enumerate(axes):
    image = np.reshape(x_test[i], (28,28))
    ax.imshow(image, cmap="Greys")
    pred = words[np.argmax(y_testing[i])]
    ax.set_title("Prediction: "+pred)
    ax.grid()

This shows that our model is working accurately and efficiently as it is predicting alphabets present in an image correctly.
16.) To visualize our model on Customize image:
Lets visualize our model on a custom image that is able to predict the alphabet present in that image correctly or not.
This is the code in which you can also see the prediction just by setting the path of your image.
import cv2
import tensorflow as tf
import matplotlib.pyplot as plt
import numpy as np

from keras.models import load_model
model = load_model('handwritten_character_recog_model.h5')

words = {0:'A',1:'B',2:'C',3:'D',4:'E',5:'F',6:'G',7:'H',8:'I',9:'J',10:'K',11:'L',12:'M',13:'N',14:'O',15:'P',16:'Q',17:'R',18:'S',19:'T',20:'U',21:'V',22:'W',23:'X', 24:'Y',25:'Z'}

image = cv2.imread('G.png')
image_copy = image.copy()
image = cv2.cvtColor(image, cv2.COLOR_BGR2RGB)
image = cv2.resize(image, (400,440))

image_copy = cv2.GaussianBlur(image_copy, (7,7), 0)
gray_image = cv2.cvtColor(image_copy, cv2.COLOR_BGR2GRAY)
_, img_thresh = cv2.threshold(gray_image, 100, 255, cv2.THRESH_BINARY_INV)

final_image = cv2.resize(img_thresh, (28,28))
final_image =np.reshape(final_image, (1,28,28,1))

prediction = words[np.argmax(model.predict(final_image))]

cv2.putText(image, "Prediction: " + prediction, (20,410), cv2.FONT_HERSHEY_DUPLEX, 1.3, color = (0,255,0))
cv2.imshow('ProjectGurukul handwritten character recognition ', image)

while (1):
    k = cv2.waitKey(1) & 0xFF
    if k == 27:
        break
cv2.destroyAllWindows()
Summary
We have successfully developed our Machine learning project that is Handwritten character recognition (Alphabet Recognition). In this, we have created a CNN model which is working very accurately and efficiently in recognising the alphabet present in a particular image.
In this, we learned to create a Convolutional Neural Network model using Tensorflow, keras and learned how to use various other Machine Learning Libraries.
I also getting same prediction as A
Please let me know how fix, I get wrong prediction every time I run my code even if I have followed every step veery carefully and every thing is correct, even so during prediction process I dot no error every prediction is correct but when I try to predict for image of my handwriting character it always predict wrong alphabet, please help me ASAP!
Thank you very much for the good project .
sir please give the explanation for the dataset we used,and also give some research paper for handwritten character recognition project.
Good work for the software advancement in technology.
I would like to join