Flutter Project – BMI Calculator
FREE Online Courses: Click, Learn, Succeed, Start Now!
In today’s time, it is important to track one’s health. One such metric which tells about the fitness of a person is the BMI. Our BMI app not only helps you calculate BMI but also interprets the result and shows if the person is healthy, underweight, etc.
Here, we will be using Flutter because it helps deliver a seamless and consistent experience. Flutter offers a wide variety of widgets to help customize the app. Additionally, with its hot reload feature, we can iterate faster and refine the user interface effortlessly.
About Flutter BMI Calculator Project
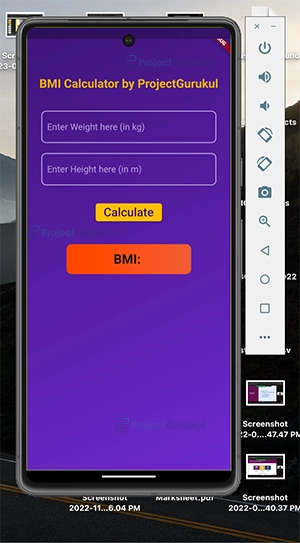
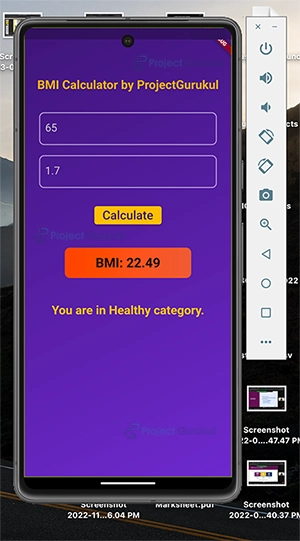
In this project, we will be creating a BMI calculator which takes Weight (in kg) and Height (in m) as input from the user and calculates BMI with the help of Flutter. It also shows which category the user falls into based on the BMI, such as Healthy, Obese, etc. By knowing these specifications, we understand that our app will include TextFields for taking user input, a button to calculate BMI, and an area to display the category under which the user falls.
Prerequisites For Flutter BMI Calculator
Before starting the project, you should have the following installed on your computer:
(i) Flutter – Refer to the link for installing Flutter, depending on your operating system.
(ii) Android Studio – This is necessary as it will run the app in the Android emulator.
(iii) Visual Studio Code – Although this is not necessary, as you can also build apps in android studio. But in our case, we have used VS code as it is a good code editor.
Now that the setup is ready let’s get started!
Download Flutter BMI Calculator Project
Please download the source code of Flutter BMI Calculator Project: Flutter BMI Calculator Project Code.
Creating Flutter BMI Calculator Project
First, let’s create a new project for the App.
Go to the directory on your terminal/command-line where you want to store the project and enter the command $flutter create “Project-Name”.
Here, as you can see from the below image, I am using the project name as a bmi_app.

Steps to Create Flutter BMI Calculator
1. Editing the main.dart file and Setting the Appearance of the App
As in any Flutter app, let’s start with the main—dart file. Here we have used a Scaffold widget to set up the material design layout structure for the screen. We have used the Center widget to align all the child widgets to the center of the screen. After that, we could directly return the BMIScreen, a custom widget we will create in the following steps; however, instead of that, we have used a Container widget. This is because we could use the decoration property of ot to set up the gradient for the screen.
import 'package:flutter/material.dart';

import 'bmi_screen.dart';

void main() {
  return runApp(MaterialApp(
    home: Scaffold(
      body: Center(
        child: Container(
          width: double.infinity,
          decoration: const BoxDecoration(
            gradient: LinearGradient(colors: [
              Color.fromARGB(255, 57, 23, 116),
              Color.fromARGB(255, 101, 45, 198)
            ], begin: Alignment.topLeft, end: Alignment.bottomRight),
          ),
          child: const BMIScreen(),
        ),
      ),
    ),
  ));
}
2. Creating Custom TextField for User Input
Before diving into creating the components of the BMI calculator, let’s first create a custom widget which will be used to take the input from the user for weight and height. This will be a Stateless Widget as there’s no need to change any data/state after generating this widget. We are using the TextField widget to get the input. Here we are passing a TextEditingController and a String that serves as the hintText in the constructor function. In the TextField, we used the keyboardType property so that only the numerical keyboard pops when the user clicks that field. We have used decoration to set up the styling for when the field is enabled or focused for which we have used the OutlineInputBorder widget.
One thing to notice is that we are using a function for the onTapOutside property which will make the keyboard disappear when the user clicks anywhere else on the screen.
import 'package:flutter/material.dart';

class CustomTextfield extends StatelessWidget {
  const CustomTextfield(
      {required this.controller, required this.hintText, super.key});

  final String hintText;
  final TextEditingController controller;
  @override
  Widget build(BuildContext context) {
    return Padding(
      padding: const EdgeInsets.symmetric(horizontal: 30),
      child: TextField(
        keyboardType: const TextInputType.numberWithOptions(),
        decoration: InputDecoration(
          enabledBorder: const OutlineInputBorder(
            borderSide: BorderSide(
              width: 2.0,
              color: Color.fromARGB(166, 227, 223, 240),
            ),
            borderRadius: BorderRadius.all(
              Radius.circular(10),
            ),
          ),
          focusedBorder: const OutlineInputBorder(
            borderSide: BorderSide(
              width: 2.0,
              color: Color.fromARGB(255, 246, 245, 251),
            ),
            borderRadius: BorderRadius.all(
              Radius.circular(10),
            ),
          ),
          border: const OutlineInputBorder(),
          hintText: hintText,
          hintStyle: const TextStyle(
              color: Color.fromARGB(166, 227, 223, 240), fontSize: 18),
        ),
        style: const TextStyle(
            color: Color.fromARGB(255, 196, 195, 195), fontSize: 21),
        controller: controller,
        onTapOutside: (PointerDownEvent pointerDownEvent) {
          FocusScope.of(context).unfocus();
        },
      ),
    );
  }
}
3. Creating a Layout for BMI Calculator
Now, let’s start building the main layout of the BMI calculator. For this, we have created a new stateful widget as the UI needs to be rendered again when the user enters the weight and height and clicks on the calculate button. We are importing the custom_textfield widget that we created in the previous step.
We have initialized two TextEditingController for weight and height, and also two string variables to store the bmi(bmi variable) and the category(bmiResult variable).
import 'package:flutter/material.dart';

import './custom_textfield.dart';

class BMIScreen extends StatefulWidget {
  const BMIScreen({super.key});

  @override
  State<BMIScreen> createState() {
    return _BMIScreenState();
  }
}

class _BMIScreenState extends State<BMIScreen> {
  TextEditingController weightController = TextEditingController();
  TextEditingController heightController = TextEditingController();
  var bmiResult = '';
  String bmi = '';
Here, we are using the Column widget as the children widgets, which includes the custom Textfield, the button and the category display message needs to be arranged vertically. Here, we are using a SizedBox widget to add spacing b/w different elements. For taking the weight and height information from the user, we are using the CustomTextfield widget which we created in the previous step. For the calculate button, we have used the ElevatedButton and given it the styling.
In this step, we pass the function calculateBMI, which gets called when the user presses the button. The function used here is created in the next step. After that, the Text widget is used inside a container to display the BMI value. At the end of the screen, a Text widget is shown only when the user calculates, which shows which category (healthy, obese) does user bmi falls into.
@override
  Widget build(BuildContext context) {
    return Column(
      mainAxisAlignment: MainAxisAlignment.start,
      children: [
        const SizedBox(
          height: 100,
        ),
        const Text(
          'BMI Calculator',
          style: TextStyle(
              color: Color.fromARGB(226, 252, 194, 34),
              fontSize: 28,
              fontWeight: FontWeight.bold),
        ),
        const SizedBox(
          height: 40,
        ),
        CustomTextfield(
            controller: weightController,
            hintText: 'Enter Weight here (in kg)'),
        const SizedBox(
          height: 20,
        ),
        CustomTextfield(
            controller: heightController, hintText: 'Enter Height here (in m)'),
        const SizedBox(
          height: 30,
        ),
        ElevatedButton(
          onPressed: () {
            calculateBMI(weightController.text, heightController.text);
          },
          style: ElevatedButton.styleFrom(
            backgroundColor: const Color.fromARGB(255, 252, 194, 34),
            shape: RoundedRectangleBorder(
              borderRadius: BorderRadius.circular(5),
            ),
          ),
          child: const Text(
            "Calculate",
            style: TextStyle(
                color: Color.fromARGB(255, 57, 23, 116), fontSize: 24),
          ),
        ),
        const SizedBox(
          height: 40,
        ),
        Container(
          width: 250,
          height: 60,
          decoration: BoxDecoration(
              gradient: const LinearGradient(colors: [
                Colors.deepOrange,
                Color.fromARGB(255, 221, 101, 65)
              ]),
              borderRadius: BorderRadius.circular(10)),
          alignment: Alignment.center,
          child: Text(
            'BMI: $bmi',
            style: const TextStyle(fontSize: 26, fontWeight: FontWeight.bold),
          ),
        ),
        const SizedBox(
          height: 50,
        ),
        Text(
          bmiResult,
          style: const TextStyle(
              color: Color.fromARGB(255, 252, 194, 34),
              fontSize: 24,
              fontWeight: FontWeight.bold),
        ),
      ],
    );
  }
}
4. Function to Calculate BMI
The below function is called when the user presses the calculate button to get the BMI value. It is good to notice that the BMI is calculated inside the setState() function so that whenever this value changes, the UI will get updated accordingly. Here we have used the formula for bmi, which is (weight in kg)/(height in m)^2. In this, the getCategory function is also called, which we will see in the next step. It calculates the category in which the user falls based on the bmi value.
void calculateBMI(String weight, String height) {
    var weightDouble = double.parse(weight);
    var heightDouble = double.parse(height);
    setState(() {
      bmi = (weightDouble / (heightDouble * heightDouble)).toStringAsFixed(2);
      var bmiCategory = getCategory(bmi);
      bmiResult = "You are in $bmiCategory category.";
    });
  }
5. Function to Calculate Category
This function determines the category into which the user falls based on the BMI value, which we pass as an argument to the function. The categories in which we have divided users are Underweight, Healthy, Overweight and Obese. This we have set using a bunch of if-else statements. This function is then called in the calculateBMI function.
String getCategory(String BMI) {
    var bmiDouble = double.parse(bmi);
    // ignore: unused_local_variable
    var category = '';
    if (bmiDouble < 18.5) {
      category = 'Underweight';
    } else if (18.5 <= bmiDouble && bmiDouble < 24.9) {
      category = 'Healthy';
    } else if (bmiDouble > 25 && bmiDouble <= 29) {
      category = 'Overweight';
    } else {
      category = 'Obese';
    }
    return category;
  }
Flutter BMI Calculator Output
Conclusion
I hope you can now build a BMI calculator and track your fitness journey. Through this project, we got to know how to build custom TextField and the various styling we can do in it. We have also learned how to display a Text field only when the user clicks the calculate button with the help of a stateful widget and the setState function.
I hope you enjoyed working on this project!
Thank you for reading! Keep Learning Flutter!