Flower Recognition using CNN
FREE Online Courses: Knowledge Awaits – Click for Free Access!
In this Machine Learning project, we will build a flower recognition system. It will take an input image and will tell the name of the flower. We will build this model using CNN because CNN outperforms every other Algorithm when it comes to playing with pictures/images.
So let’s build this model.
Flower Recognition System
A flower recognition system is a type of system which takes an input image of a flower and will tell the name of the flower. This aim is to automatically identify the image of the flower and will tell the name of the flower. You can such type of system implemented in a lot of places. One best place is Google Lens. You can use google lens to predict the flower by pointing your phone camera at the flower.
We are gonna build this model using CNN.
CNN (Convolutional Neural Networks)
We have used CNN for this project because only CNN is an algorithm that seems to outperform all other algorithms when it comes to object detection in images. It requires very low processing as compared to other algorithms. To understand CNN, one can think of neurons in the brain. CNN model is trained and built in the same way our brain is trained over years. We feed information into the brain and our brain tries to find important features of the information and it trains itself using neurons. In the same way, the CNN algorithm trains its neurons.
Convolutional Neural Network is a Machine Learning algorithm that will take an image and will predict the object in the image based on how it is trained.
Let’s talk about the working of CNN
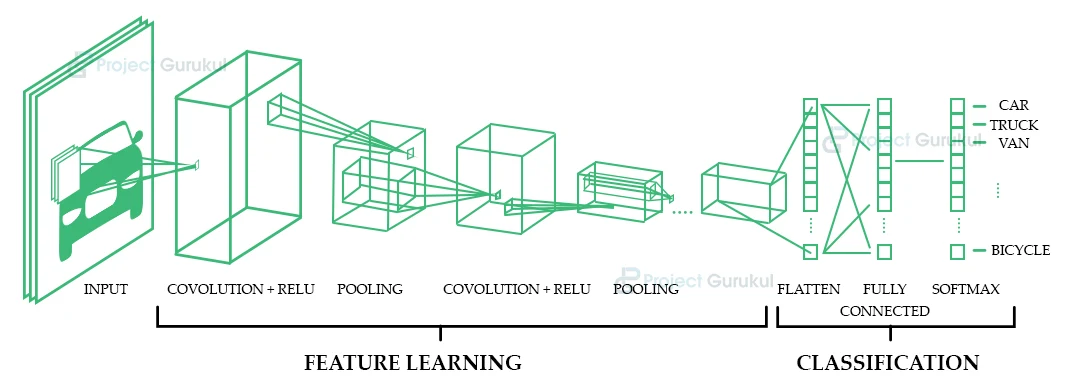
CNN is created using four layers. The first layer is the input layer. The second layer is the Convolution layer. The third layer is the Pool layer.
1. Input layer: This layer just contains a 2D image. This image is seen as a matrix of pixels by the computer. Because the computer sees an image as a group of pixels.
2. Convolutional layer: This layer consist of a set of filters.
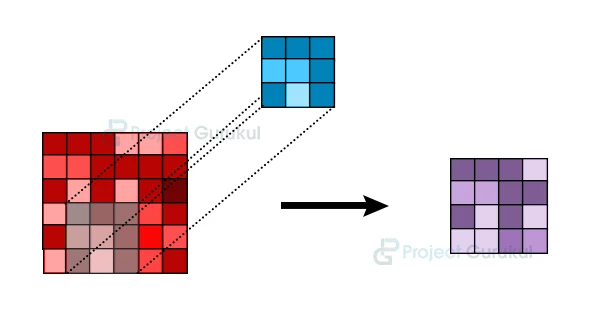
As you can see in the above image. There is a 6×6 matrix M1. There is a 3×3 matrix M2 which is called the filter. We will slide the M2 matrix over the M1 matrix until every pixel is scanned at least once. As we slide the M2 over M1, we will have a 3X3 scanned matrix M3 which is just a patch of M1. Now from this M3 matrix, our convolutional layer will find important features from the M3 matrix in numeric form. It is calculated by multiplying the weight of the filter with the M3 matrix. The result is stored in matrix M4 as seen in the picture.
This is how the Convolutional layer works.
3. Pooling layer: The pooling layer is used to downsample the matrix of the data. It is used to reduce the number of parameters in the matrix. It is done to save memory and computation power and also to prevent overfitting.
Pooling is done in the same way as convolution is done. The only difference is here we will either take the maximum value in the patch or we will take the average value of the patch. Based on this, there are two types of pooling –
- MAX_POOLING – In this, we take the maximum value of the patch matrix.
- AVERAGE_POOLING – In this, we take the average value of the patch matrix.
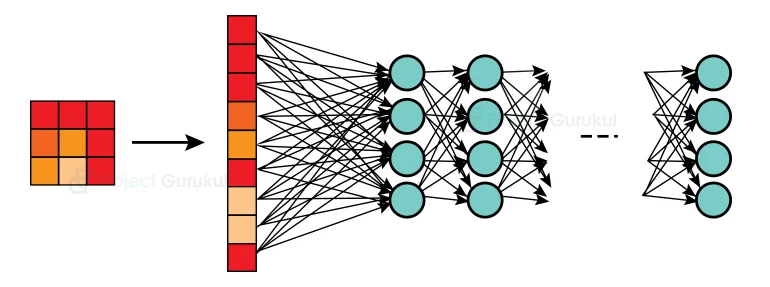
4. Fully Connected layer: This layer flattens the matrix obtained in the pooling layer and obtains the class score. This flattened matrix is a m x 1 matrix that is passed through hidden layers of the neural network and finally, the result is predicted.
Model Architecture
Our model is a type of neural network. Convolutional just means that we are doing some preprocessing before actually sending our input to the neural network. Convolutional is just a layer added to neural networks. But this seems to outperform our traditional neural networks. We are using the Keras library in this because it has prebuilt CNN which is highly optimized.
We will feed our training dataset into this CNN. This will first convert our images into the matrix of pixels. Because computers only recognize pixels. This matrix will be then passed to the convolutional layer and then it will be passed to the Pooling layer where the important features are extracted from it. The resultant matrix is flattened and is passed to our neural network.
This neural network consists of hidden layers. These hidden layers contain some weights on which our activation function performs some calculations. Then the result is predicted. If the predicted result is correct, then it’s okay. Otherwise, it calculates error and will backtrack and will update the weights of filters of hidden layers accordingly. This process is repeated until our error gets so minimum that it can be ignored i.e. our model starts predicting the correct results.
After that, we pass our test dataset and check if our model is predicting correct results by checking errors.
At last, for testing our model, we pass a random image to our neural network and see if it is predicting it correctly or not.
Project Prerequisites
The prerequisites for this project are – Python and jupyter notebook to be installed on your PC.
The other libraries that we will use are-
- Numpy – pip install numpy
- Keras – pip install keras
- Tensorflow – pip install tensorflow
Make sure that these libraries are installed in your system.
Flower Recognition using Machine Learning Project
For your convenience, we will provide the dataset to you. We split the dataset into training, testing, and Prediction folders. This dataset is divided into three parts. The first folder contains training images. These images will be passed during training. The second folder contains test images that will be passed during testing. The third folder is the prediction folder. The images in these folders will be used for final testing.
Please download the machine learning flower recognition project & dataset from the following link: Flower Recognition Project
Steps to Implement:
Below are the steps to implement flower recognition project using machine learning:
1. Import all the libraries
import numpy as np
import tensorflow as tf

from keras.preprocessing.image import ImageDataGenerator
2. Here we are loading our datasets. We are using the flow_from_directory function of keras which loads the dataset from the folder and will also categorize it into respective categories.
## Data preprocessing
## Training Image Preprocessing

train_datagen = ImageDataGenerator(
    rescale=1./255,
    shear_range = 0.2,
    zoom_range = 0.2,
    horizontal_flip=True)

training_set = train_datagen.flow_from_directory('Training_set',target_size=(64,64),batch_size=32,class_mode='categorical')
3. Here we are doing the same thing for our test dataset.
test_datagen = ImageDataGenerator(rescale=1./255)

test_set = test_datagen.flow_from_directory(
        'test_set',
        target_size=(64, 64),
        batch_size=32,
        class_mode='categorical')
4. In this, we are creating our cnn variable which is also our CNN model. This is the first step of building it and here we are defining it that we are using a sequential model of Keras.
cnn = tf.keras.models.Sequential()
5. Here we are doing the first step of our four steps discussed above. The first step is to pass our images through the convolutional layer. After that, it passes to the pooling layer. Here we are using Max_pool.
cnn.add(tf.keras.layers.Conv2D(filters=64, kernel_size=3, activation='relu', input_shape=[64,64,3]))

cnn.add(tf.keras.layers.MaxPool2D(pool_size=2,strides=2))
6. Here we are doing the same thing as above. This is done because there is a possibility that some important features might be left in the first iteration. So, we are performing it twice to get good results.
cnn.add(tf.keras.layers.Conv2D(filters=64 , kernel_size=3 , activation='relu' ))
cnn.add(tf.keras.layers.MaxPool2D(pool_size=2 , strides=2))
7. Here are dropping out some units in our network. We are using the dropout layer for that purpose. This layer is an important step for building our neural network because it prevents overfitting by dropping some of the units.
cnn.add(tf.keras.layers.Dropout(0.5))
8. After pooling and dropping, the next step is to flatten the matrix obtained. This step is already explained above. Here we are using Flatten function in Keras for flattening.
cnn.add(tf.keras.layers.Flatten())
9. Here we are making our hidden layer. As explained above, our flattened neuron layer has to pass through hidden layers where some computations occur which ultimately produces results.
cnn.add(tf.keras.layers.Dense(units=128, activation='relu'))
10. Here we are using again the same action but with a different activation function. Here we changed the activation function because different activation function gives different results. You can try using different functions and see which one gives the best result. In our case, the ‘softmax’ function gives the best result.
cnn.add(tf.keras.layers.Dense(units=5 , activation='softmax'))
11. Here are compiling our final results. For this, we have to pass an optimizer. There are a lot of optimizers. You can try them out.
cnn.compile(optimizer = 'rmsprop' , loss = 'categorical_crossentropy' , metrics = ['accuracy'])
12. After performing all the steps, we have finally built our Neural Network. Now we have to provide training and test datasets to train into this neural network and we are done.
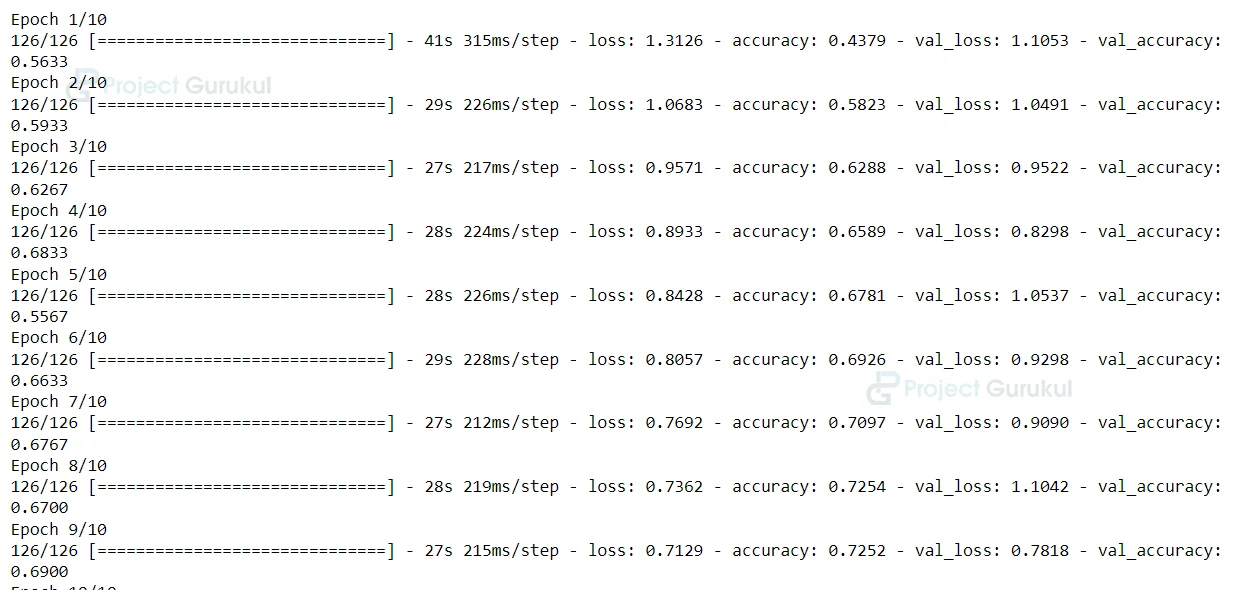
cnn.fit(x = training_set , validation_data = test_set , epochs = 30)
13. Here we are providing an image to our neural network to predict the output to check if it is working correctly. So, we provide an image from the prediction folder. For testing, we provided an image of a daisy flower.
from keras.preprocessing import image

test_image = image.load_img('Prediction/daisy.jpg',target_size=(64,64))
test_image = image.img_to_array(test_image)
test_image = np.expand_dims(test_image,axis=0)

result = cnn.predict(test_image)
training_set.class_indices
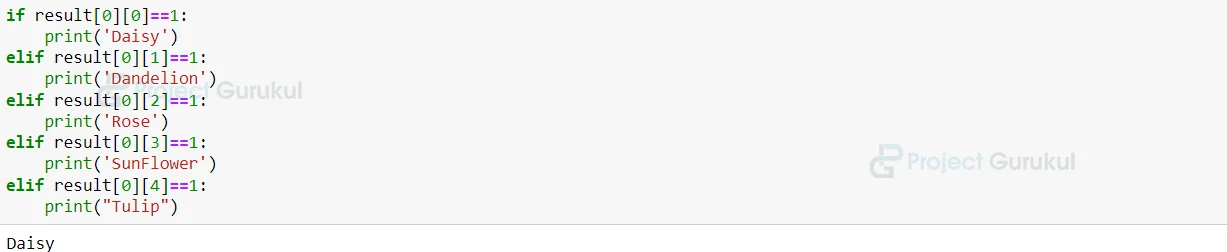
14. This code is to classify the image as to whether the flower daisy or rose or dandelion or sunflower or tulip. Because we are gonna get our answer in form of 1, 2, 3, 4, 5.
if result[0][0]==1:
    print('Daisy')
elif result[0][1]==1:
    print('Dandelion')
elif result[0][2]==1:
    print('Rose')
elif result[0][3]==1:
    print('SunFlower')
elif result[0][4]==1:
    print("Tulip")
15. Here we are just printing the result.
print(result)

Summary
So, in this project, you learned how to build a flower recognition system using a convolutional neural network. There are many detection systems that can be built using CNN. Keep practicing, and we hope you have learned something from this.