Real-time Face Mask Detection with OpenCV
FREE Online Courses: Your Passport to Excellence - Start Now
In this pandemic situation, we all should take some safety precautions. Wearing a mask is one of them. But many people don’t want to wear a mask. So today we are going to build a face mask detection project that tells if a person is wearing a mask or not. Using Opencv python and Deep learning we can build a face mask detector.
What is OpenCV?
OpenCV is an Open-source computer vision library that is built upon C/C++, but we can also use it in python. OpenCV contains more than 2500 image processing algorithms built-in.
What is Deep Learning?
Deep learning is a type of machine learning and a subset of artificial neural networks. Deep learning is inspired by the human brain, and it learns from a large amount of data. It is used to solve complex problems that are very hard to solve by using typical machine learning algorithms.
What is an Artificial Neural Network?
Artificial Neural Network is the heart of deep learning algorithms. It mimics the way of sending signals to one another of biological neurons. Neural networks are a set of layers, with an input layer, one or more hidden layers, and an output layer.
Here we’ll work with images, so we have to use a Convolutional neural network.
What is a Convolutional Neural Network?
In deep learning, a convolutional neural network or CNN is a type of neural network that is commonly used for image processing tasks. It is specifically designed to process images. CNN takes some input arrays, then applies some filters, and gives an output array. The filters help to extract features from the images.

Prerequisites
1. Python 3.x (We used python 3.8.8 for this project).
2. OpenCV – 4.4.0
3. Numpy – 1.19.3
4. Tensorflow – 2.5.0
5. Scikit-learn – 0.24.2
6. MediaPipe – 0.8.5
7. Tqdm – 4.60.0
Download Face Mask Detection Project Code
Please download the source code of face mask detection with opencv: Face Mask Detection Project Code
We’ll do this project in three parts.
1. Data Collection
2. Model training
3. Model Testing
So let’s start with part 1
In this part, we’ll collect data for model training. Our model will be trained on with two classes, with a mask, and without a mask. So first, we’ll collect some face images wearing a mask and then without a mask. For that, we need to detect faces first.
What is face detection?
Face detection means finding faces in a digital image and localizing them. Generally, a bounding box is placed around the faces to determine where the face locates in that image.
Methods of face detection:-
Feature-based face detection- Every object has its unique features and our face has it too. By extracting those unique features from an image we can detect different objects and their location. Our face has two eyes, two eyebrows above each eye, a nose under the eyes, etc. using these features we can determine whether it is a face or not.
Machine learning-based face detection:- In this method, some Face images are required to train a machine learning model to detect faces in an image. This method requires lots of data and preprocessing to build a face detector but it gives better results than a feature-based face detector.
In this face mask detection project, we’ll use a deep learning approach to detect faces. We’ll use the mediaPipe framework to detect a face.
What is MediaPipe?
MediaPipe is a machine learning solution framework that has several pre-trained models inbuilt. It is a very fast and lightweight multi-platform framework. MediaPipe is developed by Google’s brain team.
Steps :
- Import necessary packages.
- Create the Face detector function.
- Data collection.
Step 1 – Import necessary packages:
# ProjectGurukul Face mask Detector

  #Import necessary packages
import cv2
import uuid
import mediapipe as mp
- We’ll need OpenCV for all the image handling tasks, uuid for generating random filenames for each collected data, and mediapipe for face detection.
Step 2 – Create the Face detector function:
# Define mediapipe Face detector
face_detection = mp.solutions.face_detection.FaceDetection()
- In this line, we defined the face detector object from the MediaPipe.
# Detection function for Face Mask Detection
def get_detection(frame):

height, width, channel = frame.shape

  # Convert frame BGR to RGB colorspace
  imgRGB = cv2.cvtColor(frame, cv2.COLOR_BGR2RGB)
  # Detect results from the frame
  result = face_detection.process(imgRGB)

  # Extract data from result
  try:
    	for count, detection in enumerate(result.detections):
        	# print(detection)
   	# Extract bounding box information
        	box = detection.location_data.relative_bounding_box
        	x, y, w, h = int(box.xmin*width), int(box.ymin * height),
 	int(box.width*width), int(box.height*height)

  # If detection is not available then pass
  except:
    		pass

  return x, y, w, h
- Then we create a function called get_detection. The function will take an image or frame as input and return bounding box information.
- Mediapipe works with RGB images and OpenCV reads images in BGR format, so we convert the image to RGB format using the cv2.cvtCOLOR() function.
- face_detection.process() detects faces in an image.
- Then we extract all the data from the result.
- Detection.location_data.relative_bounding_box gives bounding box information.
- The box information is normalized, meaning all the values are between 0 and 1. So we multiplied the original image height and width with corresponding box information.
Step 3 – Data collection :
First, create a folder inside your project directory and name it Data. Inside the Data directory create two more folders, mask and no_mask.
cap = cv2.VideoCapture(0)
- Create a video capture object with cv2.VideoCapture() module. This video object will capture images with a webcam.
count = 0
class_path = 'mask'
while True:
  _, frame = cap.read()
  img = frame.copy()
  try:
    	# Make detection
    	x, y, w, h = get_detection(frame)
    	cv2.rectangle(frame, (x, y), (x+w, y+h), (0, 0, 255), 2)

    	# Crop only the face part from the frame
    	crop_img = img[y:y+h, x:x+w]
    	filename = "Data/"+class_path+"/"+str(uuid.uuid4())+".jpg"

    	# Save the image to the destination path
    	cv2.imwrite(filename, crop_img)
    	cv2.imshow("frame", crop_img)
    	count+=1
  except:
    		pass
  if cv2.waitKey(1) == ord('q') or count>=500:
    		break

cap.release()
cv2.destroyAllWindows()
- First, we’ll capture images for the mask class, so we defined the class_path as a mask. We’ll wear a mask during collecting the data.
- cap.read() reads each frame from the capture object.
- Then we detect our face by calling the get_detection(frame) function.
- After that, we draw a rectangle using cv2.rectangle().
- Next, we cropped only the face portion from the image using img[y:y+h, x:x+w]
- And then we save the face image using cv2.imwrite() function.
- Here we make a condition “count >= 500”. So whenever 500 images will be collected, the program will break automatically.
After collecting with the mask we’ll collect some data without wearing a mask. So we change the class_path to ‘no_mask’ (class_path = ‘no_mask’) and run the program again.
Part 2 – Model training :
In this part, we’ll train our model using TensorFlow. Tensorflow is an Open source deep learning library developed by Google.
Steps:
- Import necessary packages.
- Data preprocessing.
- Create our model architecture.
- Train the model.
- Evaluate the model.
Step 1 – Import necessary packages :
# import necessary packages
import os
import cv2
import time
from tqdm import tqdm
import numpy as np
import tensorflow as tf
from sklearn.model_selection import train_test_split
from tensorflow.keras.models import Sequential, load_model
from tensorflow.keras.layers import Conv2D, Dense, MaxPooling2D, Flatten,
Activation, Dropout
- From TensorFlow, we’ve imported some layers modules that we’ll be using to build our model architecture.
Dense: Dense is a fully connected neural network layer. A Dense layer takes all outputs from the previous layer to its all neurons, and then each neuron provides one output to the next layer.
MaxPooling2D: MaxPooling2D is useful to Downsamples the input by taking the maximum value over an input window for each channel of the input.

Flatten: Flatten layer is useful to reshape multi-dimensional data to one-dimensional. For example, a layer having an input shape as (batch_size, 100,100,3), if flatten is applied then the output shape will be (batch_size, 30000). We’ll use flatten to reshape the convolution layer output for the input of a Dense layer.
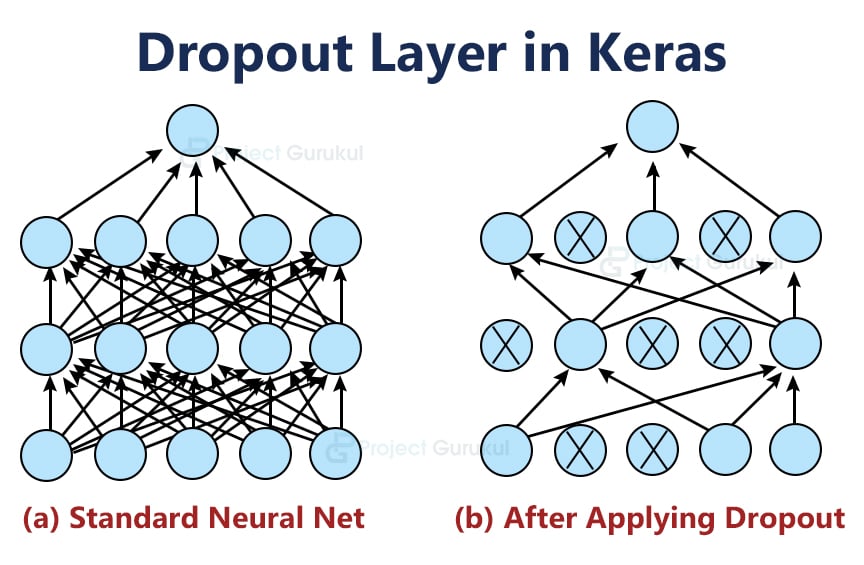
Dropout: Dropout is used to Prevent Neural Networks from Overfitting by randomly ignoring neurons during the training phase.
Step 2 – Data preprocessing :
img_size = 100
datadir = r'Data'	# root data directory
CATEGORIES = os.listdir(datadir)
print(CATEGORIES)
- os.listdir() returns a list of all files and directories in the specific given path.
Output:-['no_mask', 'mask'] # Define two empty list to contain image data x, y = [], [] def PreProcess(): for category in CATEGORIES: path = os.path.join(datadir, category) classIndex = CATEGORIES.index(category) print(path) for imgs in tqdm(os.listdir(path)): img_arr = cv2.imread(os.path.join(path, imgs)) # resize the image resized_array = cv2.resize(img_arr, (img_size, img_size)) cv2.imshow("images", resized_array) cv2.waitKey(1) resized_array = resized_array/255.0 x.append(resized_array) y.append(classIndex) PreProcess() cv2.destroyAllWindows() - Here we collect all the images from both directories and then store all image data and class indexes in the x and y list respectively.
- Tqdm helps to visualize the for loop progress.
- For this project, we’ll use a 100×100 image size. So using cv2.resize() function we can resize the image.
- Deep Learning works best with float32 data type. So we divide the resized image array by 255. Because an 8-bit image contains values between 0 and 255.
# Split data for training and testing
X_train, X_test, y_train, y_test = train_test_split(x, y, test_size=0.20,
 										random_state=42)

  # Convert and resize the data to a numpy array
X_train = np.array(X_train).reshape(-1, img_size, img_size, 3)
y_train = np.array(y_train)
X_test = np.array(X_test).reshape(-1, img_size, img_size, 3)
y_test = np.array(y_test)
- We have all the data in the x and y list. But we also need some data for evaluating the model. So using train_test_split we split the data to train and test set.
- After that, we convert all the lists to a numpy array.
- It is necessary to reshape the array. Because we’ll feed the model multiple images at the same time. Generally, this is known as a batch.
Step 3 – Create our model architecture:
# Create the model architecture
model = Sequential()
model.add(Conv2D(64,(3, 3), input_shape=(img_size, img_size, 3)))
model.add(Activation('relu'))
model.add(MaxPooling2D(pool_size = (2, 2)))
model.add(Conv2D(256, (3, 3)))
model.add(Activation('relu'))
model.add(MaxPooling2D(pool_size = (2, 2)))
model.add(Conv2D(128, (3, 3)))
model.add(Activation('relu'))
model.add(Dropout(0.25))
model.add(Conv2D(32, (3, 3)))
model.add(Activation('relu'))
model.add(MaxPooling2D(pool_size = (2, 2)))
model.add(Dropout(0.25))
model.add(Flatten())
model.add(Dense(100, activation='relu'))
model.add(Dense(16, activation='relu'))
model.add(Dense(len(CATEGORIES)))
model.add(Activation('softmax'))
# compile the model
model.compile(optimizer='adam', loss = 'sparse_categorical_crossentropy',
metrics=['accuracy'])
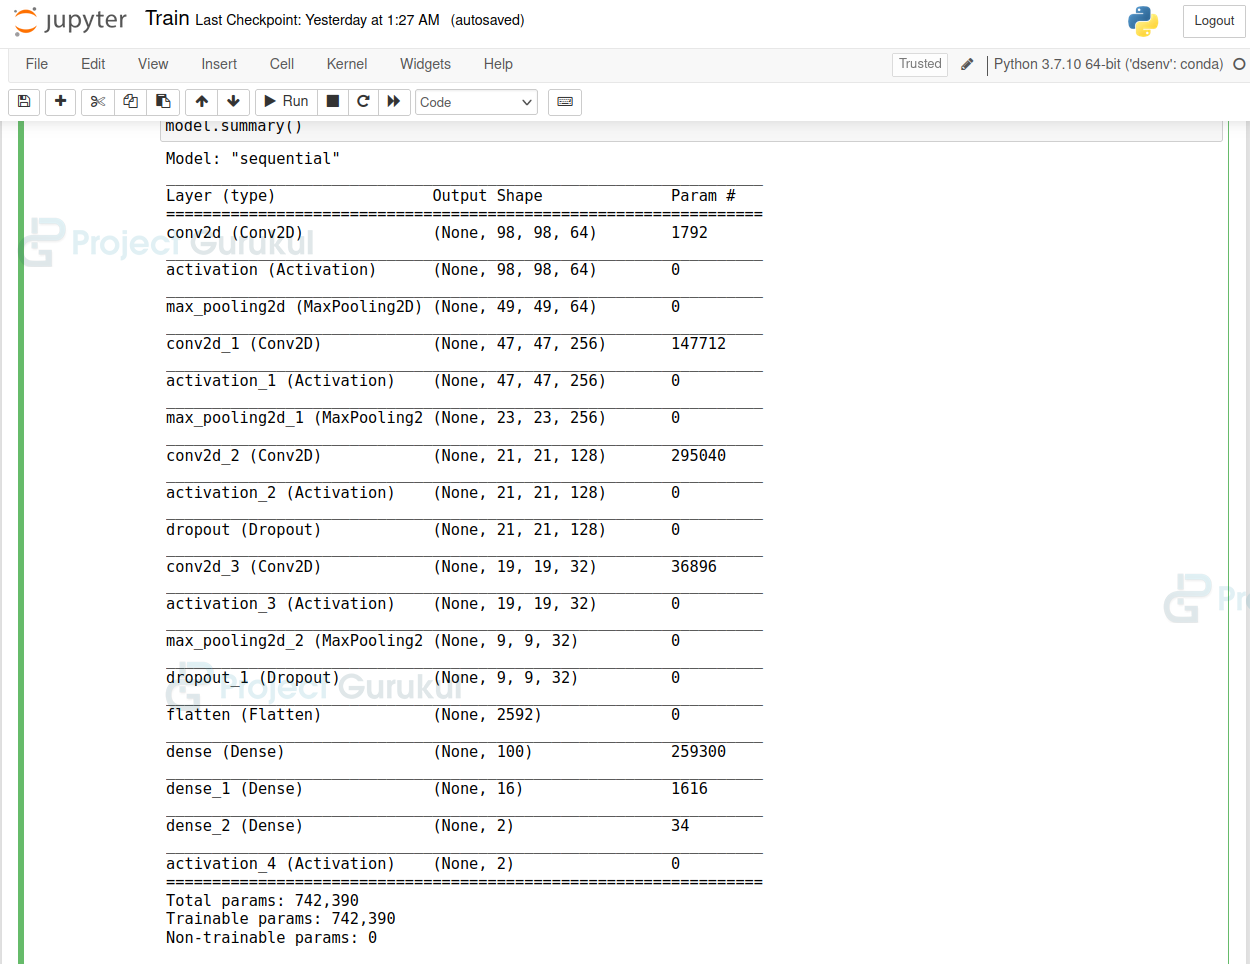
model.summary()
- Sequential API is a plain stack of layers where each layer has one input and one output.
- Using model.add() we can add layers to our model.
- In this model architecture, we have used 4 Convolution layers and 3 Dense layers.
- The first convolution layer takes a batch of arrays. And the input array shape is defined by ‘input_shape’.
- The final Dense layer has 2 outputs. Because our data has only two classes.
- The activation for the last layer is ‘softmax’. Because we have categorical data.
- Finally, we compile the model using model.compile, and set the loss function as ‘’sparse_categorical_crossentropy’’
Step 4 – Train the model:
batch_size = 32
epochs = 15

t1 = time.time()
# fit the model
model.fit(X_train, y_train, batch_size = batch_size, epochs=epochs,
validation_split=0.3, verbose = 1)
model.save('{}.h5'.format("model"))
t2 = time.time()
print('Time taken: ',t2-t1)
- Finally, we start the training using model.fit().
- Here we take a batch size of 32. This means 32 images will be fed into the model at the same time.
- Epochs is a hyperparameter that defines the number of times the model will work through the entire training dataset.
- Since our dataset is very small, it took only 48 seconds to train the model on an NVIDIA GTX 1650 GPU. But in CPU the training could take up to hours. So it is always recommended to train a deep learning model on an NVIDIA GPU that has at least 2 GB of dedicated VRAM.
- After finishing the training, we saved our model using model.save in .h5 format.
Step 5 – Evaluate the model:
validation_loss, validation_accuracy = model.evaluate(X_test, y_test)
Output: loss: 0.0282 – accuracy: 0.9950
Here we can see that the model has over 99% accuracy in the test dataset.
So let’s see how the model works in the real world.
Part 3 – Model Testing:
The model testing is almost the same as the Data collection program. We’ll make some changes just in the while loop.
We’ll need one more extra module to import –
    from tensorflow.keras.models import load_model

# load the model
    model = load_model('model.h5')
- Using the load_model function, we load the trained model in the model test program.
- Then we load the model using load_model().
CATEGORIES = ['no_mask', 'mask']
cap = cv2.VideoCapture(0)
while True:
  _, frame = cap.read()
  img = frame.copy()
  try:
    	x, y, w, h = get_detection(frame)
    	crop_img = img[y:y+h, x:x+w]
    	crop_img = cv2.resize(crop_img, (100, 100))
    	crop_img = np.expand_dims(crop_img, axis=0)
- If you remember in the training program, we reshaped the input array. So for model testing, we need exactly the same shape for input.
- The np.expand_dims() function expands the dimension of the image array. That means if we expand the dimension of a (100, 100, 3) array, the array shape will be (1, 100, 100, 3).
prediction = model.predict(crop_img) index = np.argmax(prediction) res = CATEGORIES[index] if index == 0: color = (0, 0, 255) else: color = (0, 255, 0) cv2.rectangle(frame, (x, y), (x+w, y+h), color, 2) cv2.putText(frame, res, (x, y-10), cv2.FONT_HERSHEY_SIMPLEX, 0.8, color, 2, cv2.LINE_AA) except: pass cv2.imshow("frame", frame) if cv2.waitKey(1) == ord('q'): break - model.predict() takes the image array as input and returns a prediction classes array as output.
- np.argmax() returns the index of maximum value in an array.
- Then using cv2.rectangle() we draw the rectangle around the face and using cv2.putText() we draw the class name on the frame.
Summary:
In this project, we’ve built a mask detector using Deep learning. We’ve used Tensorflow for the deep learning part and OpenCV for the rest of the image processing. Through this project, we’ve learned about deep learning as well as learned to train our own deep learning model.
sir,good project ,I have your help in my project.my project name is ECG biometric authentication .
could you please in my project.