Expense Tracker Android App with Source Code
FREE Online Courses: Dive into Knowledge for Free. Learn More!
In this tutorial, you will understand how to build a basic expense tracker app using Android Studio.
What is an Expense Tracker App?
This app is an expense tracker application. This app will help the user to keep a track of their expenses. Getting your finances in order begins with tracking your spending. You can reduce your expenses by understanding what you spend money on and how much you spend.
Flow of the Expense Tracker App in Android
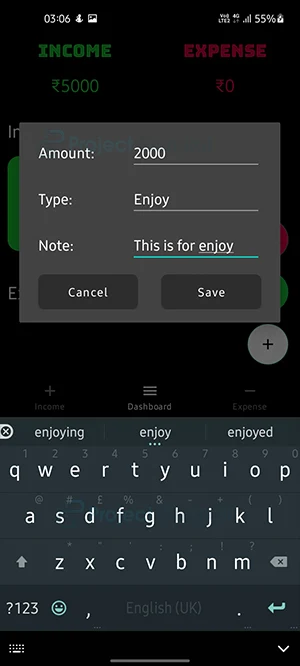
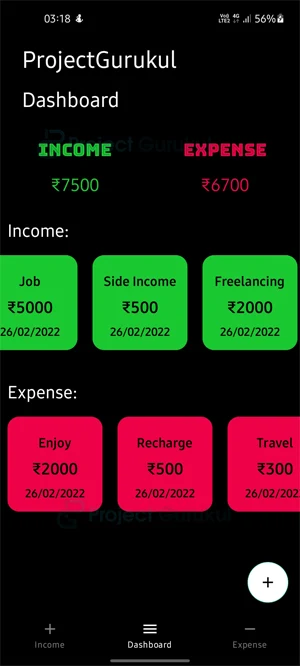
There is a dashboard screen. The dashboard screen will show the user their income and their expenses. There is an add button on the screen that allows users to add expenses and their income. The income button is to add what you have earned. The expense button is to add what you have spent.
There is an income tab. This tab shows users all their incomes. In this tab, users can update their income and even add categories and a note with it.
There is an expense tab. This tab shows users all their expenses. In this tab, users can update their expenses and add categories and a note.
Features of Expense Tracker app
1. There are three tabs on the main screen.
2. The dashboard screen shows all their spending and income.
3. The add button allows users to add new income or spending.
4. They can even add categories and even a note with it.
The income tab shows all the income of the users and updates it.
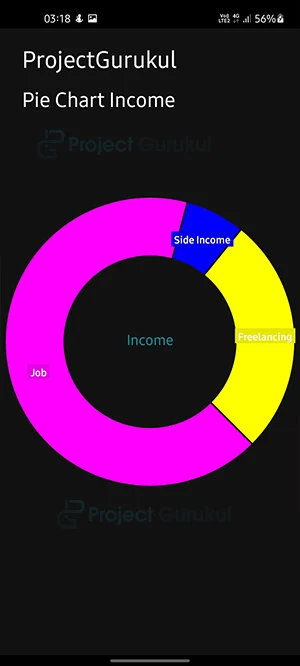
They can also see the graph of their income. This graph is a pie-chart that shows all category-wise income to the user.
The expense tab shows all the expenses of the users. You can also update it.
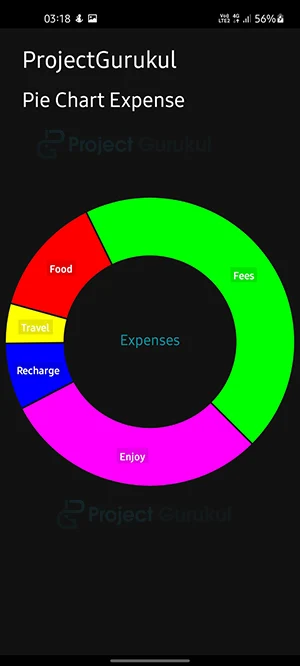
They can also see the graph of their expenses. This graph is a pie-chart which shows all category-wise spending to the user.
Prerequisites
You will be able to understand Android Studio’s workings if you are familiar with them. The following technologies/tools are required for the project.
- Java – The logic of the application will be written in Java.
- XML – The designing portion of our application will be coded in XML.
- Android Studio – We will be using the android studio to create the apps.
- SQLite – You should be familiar with SQLite. This will be used as a database.
Developing the ProjectGurukul Expense Tracker app
Let’s look at the files that we created for the Expense Tracker app before we implement it. Let us see them one by one-
- Activity_dashboard.xml is the file that will contain all the design codes of our dashboard activity.
- The next file is the dashboard.java activity where we will be writing all the logic of our application.
- The next file is income.xml and expense.xml which will contain all the design codes of our income and expense activity.
- The next file is income.java and expense.java which we will be writing all the logic of our application.
- We will also create a databaseHandler.java which will handle all the database activities.
Download Project Source Code
For the actual implementation of the app, please download the project code: Expense Tracker Android App Source Code
Once you have downloaded the Expense Tracker project, you need to download and extract the project in the desired folder.
Steps to implement Expense Tracker Android App Project:
The ProjectGurukul Expense Tracker App can be implemented as follows:
1. Unzipped the project source code on your desktop.
2. Open Android Studio and click file > open and navigate to the desktop and click on expenseTrackerApp there to open the project.
3. After the Gradle build finishes, click on the green button at the top.
4. This way you can run the app on the android virtual device.
Android Expense Tracker App Output
The application will look like this.
Expense Tracker App Dashboard
![]()
Add expense
Showing all expenses and income
Income graph
Expenses graph
Summary
This article helps you understand how the expense tracker app works. You also get the idea of how to build the apps using android studio and how to run the apps. You can take the app to the next level by adding some more features like handling taxes, splitting with friends or people, sync cards, etc.
did u got to know about that ?
how to remove that Project gurukul from which file please tell me
did u got to know about that ?