Driver Drowsiness Detection System with OpenCV & TensorFlow
FREE Online Courses: Elevate Skills, Zero Cost. Enroll Now!
This driver drowsiness detection project is created to prevent accidents. Drowsiness means sleepiness, so it prevents accidents that are caused by drivers who are feeling drowsy or we can say who fell asleep while driving.
So we are creating a Drowsiness detection system that will detect that the person’s eyes are closed or open. And if a person’s eyes are closed for a few seconds, the system will alert the person by ringing an alert sound.
Our approach to Create Drowsiness detection system:
In this project, for collecting images from webcam we will be using OpenCV and feed these images to our Deep learning model which will classify that the person’s eyes is ‘Open’ or ‘Closed’. So we will follow these steps:
- We will take image input from the camera
- Detect face and eyes in the image.
- Create a Region of Interest(ROI), for both detected face and eyes.
- Feed this to our classifier(model), which will categorize whether eyes are open or closed.
- At last, we will calculate the time to check if the person is drowsy or not.
Download Driver Drowsiness Dataset
So firstly we need dataset to train our model, the dataset we will be using in this is yawn-eye-dataset, you can download the dataset from the link: Driver Drowsiness Detection Dataset
In this dataset you will see the train and test folder in which there are subfolders (closed, open, yawn , no_yawn) which consist of 617 images of each closed eyes, open eyes, etc.
Now let’s start creating the project:
After downloading, let’s create a model which will help us to categorize whether a person’s eyes are open or closed.
So, to create a model first we have to set a path to our dataset. When you open the dataset you see there are four subfolders inside train and test folders. From those four folders we only need open and closed folders to train our model on. And after setting the path we will preprocess the images and perform certain operations so that it will be ready for our training.
After preprocessing of images, we will create our model which will classify whether a person’s eyes are open or closed. And after training the model , we save the final weights and model architecture file as “models/custmodel.h5”.
Now let’s understand the model architecture that we have created:
I have used keras to build models using Convolutional Neural Networks(CNN). CNN is a type of deep neural network which performs very accurately and efficiently for image classification. Convolutional Neural Network consists of input layer, output layer, and hidden layers. So this operation is performed on these hidden layers using a filter that performs 2D matrix multiplication on the layers.
The CNN model architecture I have created consist of following layers:
- Convolutional layer; 64 nodes, kernel size 3
- Convolutional layer; 64 nodes, kernel size 3
- Convolutional layer; 64 nodes, kernel size 3
- Fully connected layer; 128 nodes
The output layer is also a fully connected layer with 2 nodes. In all the layers, we use the activation function Relu except the output layer. In the output layer, we have used Softmax as an activation function.
from keras.models import Sequential
from keras.layers import Conv2D , MaxPooling2D , Flatten , Dense
# creating model for driver drowsiness detection project:
model = Sequential()

model.add(Conv2D(64 , (3,3) , activation = 'relu' , input_shape= X.shape[1:]))
model.add(MaxPooling2D((1,1)))

model.add(Conv2D(64 , (3,3) , activation = 'relu'))
model.add(MaxPooling2D((1,1)))

model.add(Conv2D(64 , (3,3) , activation = 'relu'))
model.add(MaxPooling2D((1,1)))

model.add(Flatten())

model.add(Dense(128, activation = 'relu'))

model.add(Dense(2, activation = 'softmax'))
Project Prerequisites
You should have a webcam on your system through which images will be captured. You need to have installed the latest version of python or version (3.6 and above recommended). Now to run this project you are required to install:
OpenCV: to install run following command on cmd:
pip install opencv-python (for webcam and for detection of face and eyes)
TensorFlow
pip install tensorflow (keras uses TensorFlow as backend).
Keras
pip install keras (to build our model)
Pygame
pip install pygame (to play alert sound).
Download Driver Drowsiness Detection Project Code
Please download the source code of driver drowsiness detection with machine learning: Driver Drowsiness Detection Project Code
These all are the files that you are required to have:
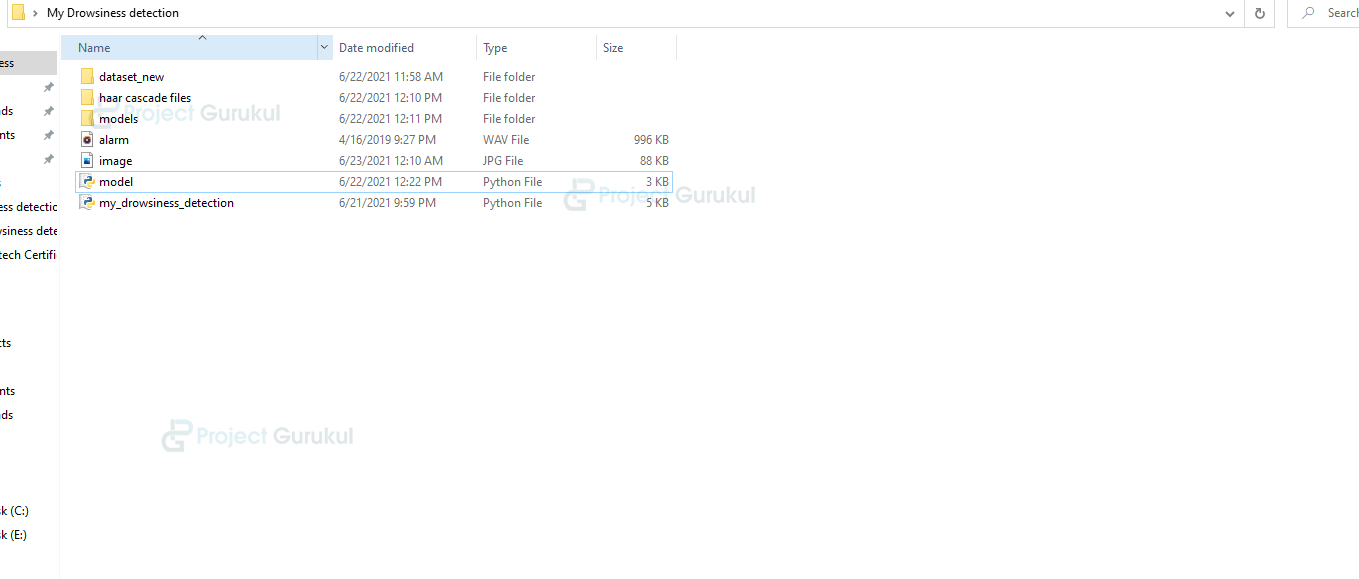
dataset_new: In this folder, we have our dataset that is downloaded by the link given above.
haar cascade files: This folder has files that are used to detect the face and eyes of a person, these files are xml files. The haar cascade files have many xml files that are required to detect objects in an image. You can download this also just by searching on google.
models: In this, we have our model ‘custmodel.h5’ file that we have created above.
alarm: This file is used to play the alert sound when a person closes its eyes for a few seconds.
model.py: It is the python file in which we have created our classification model which is trained on our dataset. You can see the implementation of how we have created the model and how we trained it according to our dataset.
my_drowsiness_detection.py: This file consists of full implementation of our project in which we have loaded the model(custmodel), and used it to alert the person whenever he/she will feel drowsy. So this is the main file, you have to run this file for detection procedure.
Now let’s understand the main file “my_drowsiness_detection.py”
Let’s go step by step:
1. Importing all the needed libraries:
import cv2
import os
from keras.models import load_model
import numpy as np
from pygame import mixer
import time
2. Setting an alarm sound file, and we will set a path of haar cascade files to detect face, detect left eye, and detect right eye.
sec)
mixer.init()
alarm_sound = mixer.Sound('alarm.wav')

# These xml files are used to detect the face, left eye, and right eye of a person.
face_detection = cv2.CascadeClassifier('haar cascade files\haarcascade_frontalface_alt.xml')
left_eye_detection= cv2.CascadeClassifier('haar cascade files\haarcascade_lefteye_2splits.xml')
right_eye_detection= cv2.CascadeClassifier('haar cascade files\haarcascade_righteye_2splits.xml')
labels =['Close','Open']
3. After this we will load our model, and using OpenCV we will access a webcam that will capture each frame.
# load the model, that we have created
model = load_model('models/custmodel.h5')

path = os.getcwd()

# to capture each frame
capture = cv2.VideoCapture(0)

#check if the webcam is opened correctly
if capture.isOpened():
    capture = cv2.VideoCapture(0)
if not capture.isOpened():
    raise IOError("Cannot open webcam")

font = cv2.FONT_HERSHEY_COMPLEX_SMALL
4. Initializing variables
#declaring variables for driver drowsiness detection project
counter = 0
time = 0
thick = 2
right_eye_pred=[99]
left_eye_pred=[99]
5. This is the main logic of code. I have mentioned comments above each line about why it is used, what it will do, so you can understand it very easily.
while(True):
    ret, frame = capture.read()
    height,width = frame.shape[:2]

    #convert the captured image to grey color:
    gray = cv2.cvtColor(frame, cv2.COLOR_BGR2GRAY)

    #perform detection(this will return x,y coordinates , height , width of the boundary boxes object)
    faces = face_detection.detectMultiScale(gray,minNeighbors=5,scaleFactor=1.1,minSize=(25,25))
    left_eye =left_eye_detection.detectMultiScale(gray)
    right_eye =  right_eye_detection.detectMultiScale(gray)

    cv2.rectangle(frame, (0,height-50) , (100,height) , (0,0,0) , thickness=cv2.FILLED )
    cv2.rectangle(frame, (290,height-50) , (540,height) , (0,0,0) , thickness=cv2.FILLED )

    #iterating over faces and drawing boundary boxes for each face:
    for (x,y,w,h) in faces:
        cv2.rectangle(frame, (x,y) , (x+w,y+h) , (100,100,100) , 1 )

    #iterating over right eye:
    for (x,y,w,h) in right_eye:
        #pull out the right eye image from the frame:
        right_one=frame[y:y+h,x:x+w]
        counter += 1
        right_one = cv2.cvtColor(right_one,cv2.COLOR_BGR2GRAY)
        right_one = cv2.resize(right_one,(24,24))
        right_one = right_one/255
        right_one =  right_one.reshape(24,24,-1)
        right_one = np.expand_dims(right_one,axis=0)
        right_eye_pred = model.predict_classes(right_one)
        if(right_eye_pred[0] == 1):
            labels = 'Open'
        if(right_eye_pred[0]==0):
            labels = 'Closed'
        break

    #iterating over left eye:
    for (x,y,w,h) in left_eye:
        #pull out the left eye image from the frame:
        left_one=frame[y:y+h,x:x+w]
        counter += 1
        left_one = cv2.cvtColor(left_one,cv2.COLOR_BGR2GRAY)
        left_one = cv2.resize(left_one,(24,24))
        left_one = left_one/255
        left_one = left_one.reshape(24,24,-1)
        left_one = np.expand_dims(left_one,axis=0)
        left_eye_pred = model.predict_classes(left_one)
        if(left_eye_pred[0] == 1):
            labels ='Open'
        if(left_eye_pred[0] == 0):
            labels ='Closed'
        break
6. In this code we are checking that, if the person’s left eye and right eye are closed, time will increase and if time increases more than 10 the alert sound will start, and if both eyes are open the time decreases and sound stops after some time.
if(right_eye_pred[0] == 0 and left_eye_pred == 0):
time += 1
cv2.putText(frame,"Inactive",(10,height-20), font, 1,(255,255,255),1,cv2.LINE_AA)
# if(right_eye_pred[0]==1 or left_eye_pred[0]==1):
else:
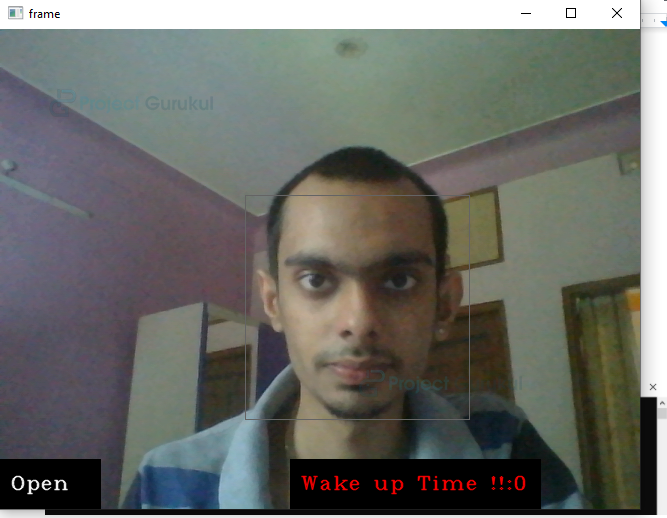
time -= 1
cv2.putText(frame,"Active",(10,height-20), font, 1,(255,255,255),1,cv2.LINE_AA)
if(time<0):
time=0
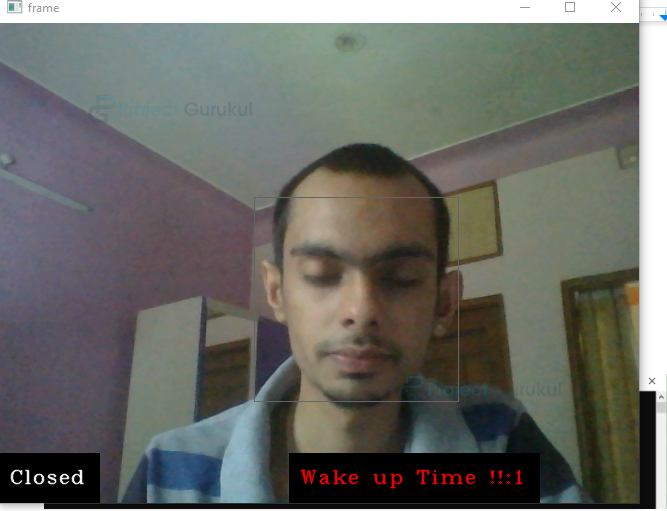
cv2.putText(frame,'Wake up Time !!:'+str(time),(300,height-20), font, 1,(0,0,255),1,cv2.LINE_AA)
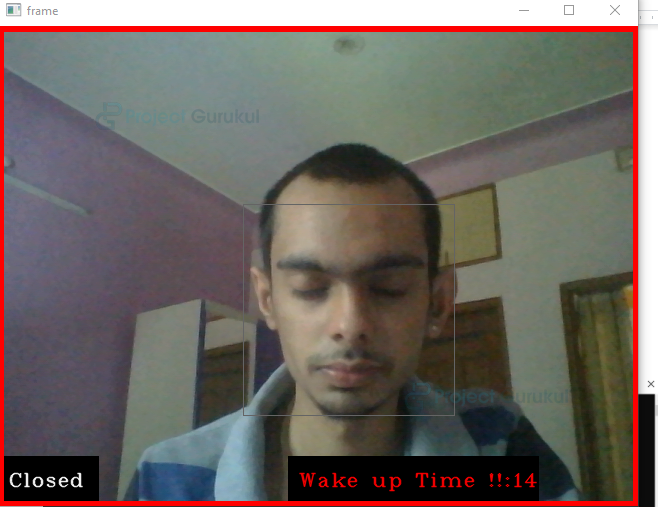
if(time>10):
#person is feeling dazzi we will alert :
cv2.imwrite(os.path.join(path,'image.jpg'),frame)
try:
alarm_sound.play()
except: # isplaying = False
pass
if(thick < 16):
thick = thick+2
else:
thick=thick-2
if(thick<2):
thick=2
cv2.rectangle(frame,(0,0),(width,height),(0,0,255),thick)
cv2.imshow('frame',frame)
if cv2.waitKey(1) & 0xFF == ord('q'):
break
capture.release()
cv2.destroyAllWindows()
So this is the full explanation of the “my_drowsiness_detection.py” file.
To run the project, open cmd and go to the folder which has this “my_drowsiness_detection.py” file and run the following command:
python my_drowsiness_detection.py
Driver Drowsiness Detection Output
Summary
In this project, we learn OpenCV and use a haar cascade classifier to detect faces and eyes of a person, and then we use our convolutional model to predict the status of eyes. With the help of this, we are successfully able to create a drowsy driver alert system.
Can you share the YouTube link of this project demo
I am unable to run this project and i also want to smile detection. so plz help me.
Same error pls give solution..
File “my_drowsiness_detection.py”, line 71, in
right_eye_pred = model.predict_classes(right_one)
AttributeError: ‘Sequential’ object has no attribute ‘predict_classes’
***THIS WAS THE ERROR HOW I CAN CORRECT THESE****
it says:
Traceback (most recent call last):
File “C:\python38\Drowsiness detection\drowsiness detection.py”, line 69, in
lpred = model.predict_classes(l_eye)
AttributeError: ‘Sequential’ object has no attribute ‘predict_classes’
Thanks for this amazing explanation but i’m having a error which says :- name null is not defined in cmd prompt and in jupyter the main logic lines are not interpreting.
Can you please suggest some method which could solve my problem.