Python OpenCV Project – Drawing with Mouse on Images
FREE Online Courses: Dive into Knowledge for Free. Learn More!
Drawing on an image can be tricky when using a mouse, but we can make it easier with Python and OpenCV. Python is a programming language with many libraries, and OpenCV is one of them. OpenCV is a tool that can process images and has excellent features for computer vision.
In this project, we will learn how to draw shapes on an image using Python and OpenCV, using mouse events to detect the cursor’s position.
By the end of the project, you will know how to draw an image using Python and OpenCV, which can be useful for tasks such as image annotation or object tracking.
Use Of Python OpenCV
To enable drawing on an image using Python and OpenCV, you need to use two important concepts: mouse callbacks and drawing functions.
Mouse callbacks are functions provided by OpenCV that can detect and respond to mouse events such as clicks and movements. You can set up a mouse callback function to be triggered when a specific event, such as a mouse click, occurs on the image.
OpenCV provides functions that allow you to draw various shapes, such as lines, circles, and rectangles, on an image. These drawing functions can be used with mouse callbacks to enable drawing on an image in response to user input.
Prerequisites for Python OpenCV Drawing With Mouse On Images
It is important to have a solid understanding of the Python programming language and the OpenCV library. Apart from this, you should have the following system requirements.
- Python 3.7 (64-bit) and above
- Any Python editor (VS code, Pycharm, etc.)
Download Python OpenCV Drawing With Mouse On Image Project
Please download the source code of Python OpenCV Drawing With Mouse On Image Project from the following link: Python OpenCV Drawing With Mouse On Image Project Code
Installation
Open Windows cmd as administrator
1. To install the opencv library, run the command from the cmd.
pip install opencv-python
Let’s Implement
1. We need to import some libraries that will be used in our implementation.
import cv2
2. Initializing boolean variable run to False.
run = False
3. The Declare drawing function enables drawing on an image based on mouse events like clicks and movements. It uses parameters to detect and respond to events, and OpenCV’s drawing functions allow it to draw shapes like lines or circles on the image.
def drawing(event,x,y,flag,param):
4. Global run is used to specify that run is a global variable which can be accessed and modified by any part of the program, including functions
global run
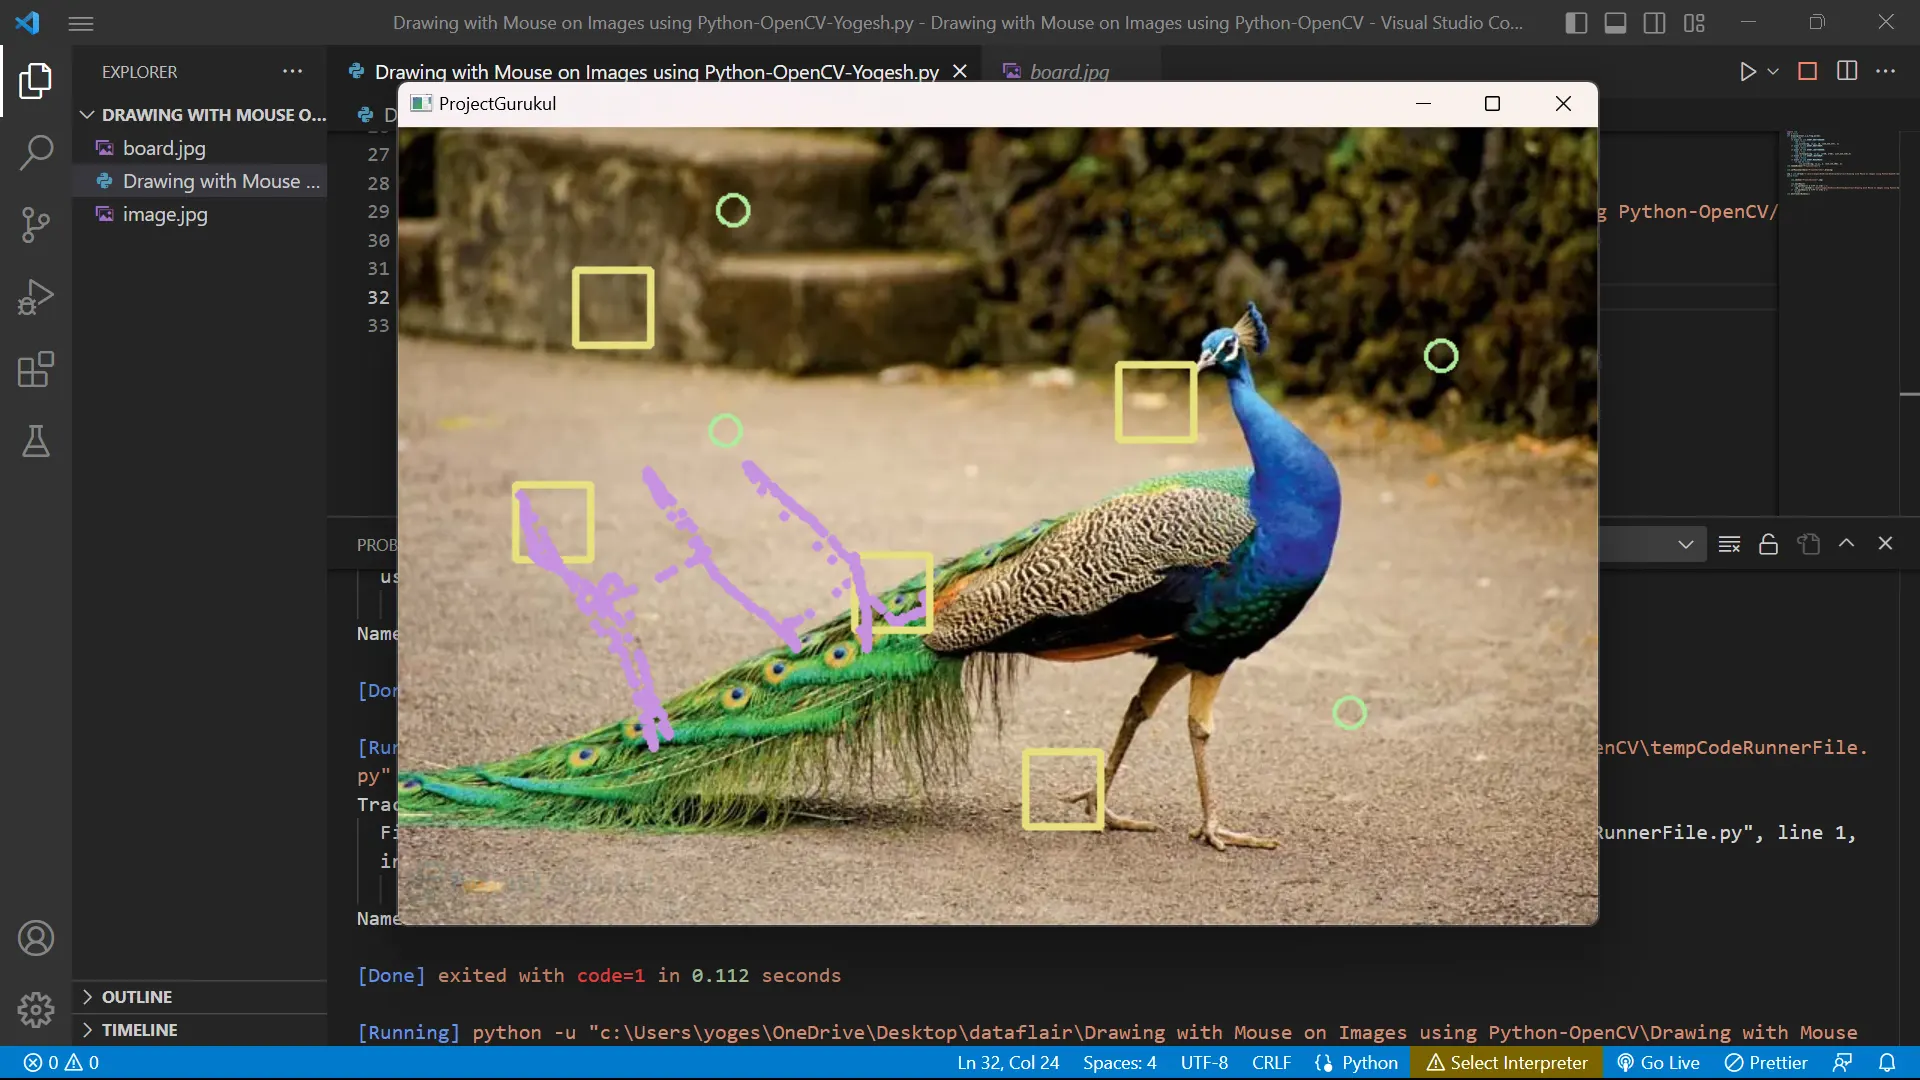
5. This code block checks if the user right-clicks on the image and, if so, sets a variable to True and draws a circle with a radius of 10 and a specific color at the mouse’s location using the cv2.circle() function. This lets the user draw circles on the image by right-clicking on desired points.
if event == cv2.EVENT_RBUTTONDOWN:
        run = True
        cv2.circle(img, (x,y), 10, (156,235,175), 2)
6. This ensures that drawing is stopped when the user releases the right mouse button, setting the run variable to False.
if event == cv2.EVENT_RBUTTONUP:
        run = False
7. This code block lets the user draw a rectangle on the image by left-clicking the desired location. If the mouse event is a left button-down event, it sets a variable to True and draws a rectangle with a width and height of 50 pixels and a specific color at the mouse’s location using the cv2.rectangle() function.
if event == cv2.EVENT_LBUTTONDOWN:
        run = True
        cv2.rectangle(img, (x,y), (x+50, y+50), (127,224,230),3)
8. This ensures that the drawing is stopped when the user releases the left mouse button by setting the run variable to False.
if event == cv2.EVENT_LBUTTONUP:
        run = False
9. This code checks if the mouse moves on the image and if the variable run is true. If both are true, it draws a circle with a small radius and a specific color at the mouse cursor’s position.
if event == cv2.EVENT_MOUSEMOVE:
        if run == True:
            cv2.circle(img, (x,y), 2, (224,145,200), 2)
Note:- Steps 4-9 must be written under the drawing function.
10. This line of code creates a window with the title “ProjectGurukul” using the named window () function from the OpenCV library.
cv2.namedWindow("ProjectGurukul")
11. This code block sets a mouse callback function (drawing) for the named window “ProjectGurukul” using the cv2.setMouseCallback() function in OpenCV.
cv2.setMouseCallback("ProjectGurukul",drawing)
12. This code reads an image file from the specified file path using the cv2.imread() function and stores it in a variable called img.
img = cv2.imread("C:/Users/yoges/OneDrive/Desktop/dataflair/Drawing with Mouse on Images using Python-OpenCV/image.jpg")
13. Start the while loop
while True:
14. Displays the image stored in the variable img in a ” ProjectGurukul ” window using the cv2.imshow() function.
cv2.imshow("ProjectGurukul",img)
15. This code waits for a key event, and if the ‘c’ key is pressed, it resets the image to its original state by reading the image file again.
if cv2.waitKey(1) & 0xFF == ord('c'):
        img = cv2.imread("C:/Users/yoges/OneDrive/Desktop/dataflair/Drawing with Mouse on Images using Python-OpenCV/image.jpg")
16. Once the user presses the ‘q’ key, the loop in the program will break, and the program will stop running.
if cv2.waitKey(1) & 0xFF == ord('q'):
        break
Note:- Steps 14-16 must be written under the while loop.
17. This line of code closes all active windows in OpenCV Python, effectively ending the program’s display of images. It can close all windows simultaneously instead of closing them individually.
cv2.destroyAllWindows()
Python OpenCV Drawing With Mouse On Image Output
Conclusion
To draw on images using OpenCV, you need to use functions like cv2.namedWindow(), cv2.setMouseCallback(), and cv2.imshow(). These functions enable the program to detect and respond to mouse events, allowing you to draw shapes on the image based on the mouse events that occur.
The cv2.waitKey() function also helps handle key events and implement additional functionality. Overall, OpenCV is a powerful and user-friendly tool for drawing on images and adding interactivity to image processing programs.