How to Create a Chatbot with Python & Deep Learning
FREE Online Courses: Your Passport to Excellence - Start Now
After reading the heading of this Project, there are certain questions coming into your mind that is, What is Chatbot?What can it do? Where is it used? How can we create our own chatbot using deep learning?
The answer to all these questions will be discussed below. In a very easy and interesting way, let’s try to understand the answers to these questions.
About ChatBot:
A chatbot is a software that provides human-like conversations with users via text message on chat. Its main task is to help users by providing answers to their asked questions. We will make the software intelligent by using deep learning. So that the chatbot could predict more accurate responses to the user and also understand the user what he/she is trying to ask and give feedback according to its understanding.
Nowadays, chatbots are used alot in customer interaction, you can see the live example of zomato, amazon, etc which are using these chatbots for customer interactions, and also for marketing on social network sites.
There are two types of chatbot models based on how they are built:
- Retrieval based model: This chatbot uses predefined input patterns and responses.
- Generative based model: This chatbot is not based on some predefined responses.
About Creating ChatBot using Deep learning:
There are a lot of powerful bot development frameworks, tools, and platforms available in the market from which we can develop intelligent chatbots. But we will be using Deep learning to create a simple and intelligent chatbot from scratch.
So, in this project, we will develop an intelligent chatbot using Deep learning with Tensorflow and keras from scratch. We will create a model which will be trained on a dataset which contains intents(categories), patterns, and responses. Our model will classify which category the message sent by the user belongs to and provide a random response from the list of responses.

Let’s start Implementing a Deep learning Project, that is Creating a ChatBot using Deep learning.
This project is quite complex to implement, if you follow step by step then it will be easy for you to implement and understand this project better.
Without wasting any time further let’s directly dive into implementing ChatBot by ProjectGurukul.
Needed Libraries
You should have this following libraries in your system which will be required while creating ChatBot :
- Tensorflow (pip install tensorflow)
- Keras (pip install keras)
- Numpy (pip install numpy)
- Natural Language processing (Nltk) (pip install nltk)
- Pickle (pip install pickle)
If you don’t have these libraries please install them using pip, open your command prompt type pip install keras, pip install numpy, etc as written inside the brackets.
Download Chatbot Deep Learning Project Code
Please download the source code of chatbot detection with deep learning: Chatbot Deep learning Project Code
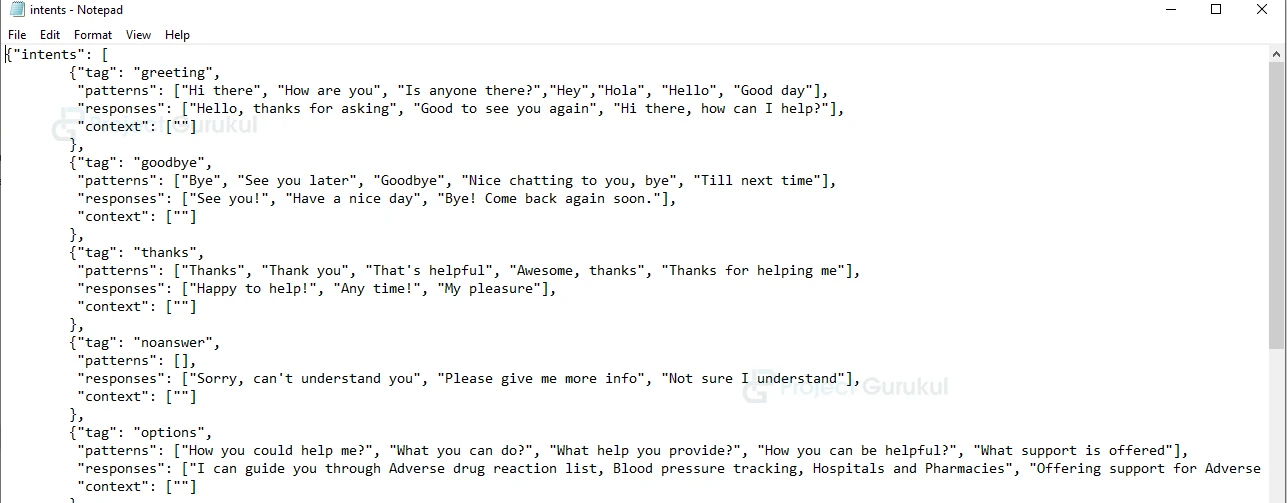
Chatbot Project Dataset
We will be using intents.json file which you will find in source code of this chat bot project, our intents.json file looks like:
Follow below steps to create Chatbot Project Using Deep Learning
1. Import the libraries:
import tensorflow
import nltk
from nltk.stem import WordNetLemmatizer
lemmatizer = WordNetLemmatizer()
import numpy as np
from tensorflow.keras.models import Sequential
from tensorflow.keras.layers import Dense, Dropout , Activation, Flatten , Conv2D, MaxPooling2D
from tensorflow.keras.optimizers import SGD
import random
import json
import pickle
These all are the libraries we will require to create our project. nltk is required to tokenize words and sentences and also to lemmatize words. Basically nltk will be required to preprocess our data(we have to perform certain operations on our data as we will be working on a json file which contains words, and sentences).
And we will be using Tensorflow for creating our model, numpy to convert our data into array form. Random to generate random responses according to the user message. Json to read the json file. Pickle to save our labels and words.
2. Declaring Constants:
In this step, we declare some constants that will be required while separating sentences.
words=[]
labels = []
docs = []
ignore_list = ['?', '!']
3. Loading our dataset that is intents.json file:
Load the json dataset using json.loads() method.
dataset = open('intents.json').read()
intents = json.loads(dataset)
4. Preprocess Data:
for intent in intents['intents']:
    for pattern in intent['patterns']:

        #tokenize each word
        word_token = nltk.word_tokenize(pattern)
        words.extend(word_token)
        #add documents in the corpus
        docs.append((word_token, intent['tag']))

        # add to our labels list
        if intent['tag'] not in labels:
            labels.append(intent['tag'])
As we are working on text data, we need to perform certain operations or say preprocessing on data before creating a model to train on that data. So, in the above code we first iterate through our intents and patterns, and we tokenize each sentence present in that pattern (Tokenizing means breaking text into small parts like words), and then append each tokenize word into the words list. And in this we also create a list of labels for our tags.
5. Lemmatizing Each word:
# lemmatize each word, and sort words by removing duplicates:
words = [lemmatizer.lemmatize(word.lower()) for word in words if word not in ignore_list]
words = sorted(list(set(words)))
# sort labels:
labels = sorted(list(set(labels)))
In this code, we lemmatize each word (Lemmatizing means converting a word into its lemma form) and also remove duplicate words from the list and sort words and labels list.
6. Save words and labels list (using pickle):
Now we will save our words and labels list that we have created using the pickle library.
pickle.dump(words,open('words.pkl','wb'))
pickle.dump(labels,open('labels.pkl','wb'))
7. Creating our Training data:
# creating our training data:
training_data = []
# creating an empty array for our output (with size same as length of labels):
output = [0]*len(labels)

for doc in docs:
    bag_of_words = []
    pattern_words = doc[0]
    #lemmatize pattern words:
    pattern_words = [lemmatizer.lemmatize(word.lower()) for word in pattern_words]

    for w in words:
        if w in pattern_words:
            bag_of_words.append(1)
        else:
            bag_of_words.append(0)

    output_row = list(output)
    output_row[labels.index(doc[1])] = 1

    training_data.append([bag_of_words,output_row])
In this piece of code, we create our training data in which we will provide the input that is bag_of_words that will be pattern and ouput_row which will be the output which tells us in which label our pattern belongs to. As the computer doesn’t understand text, that is why we have converted it to numbers.
8. Shuffle and Convert our Training data to array:
We shuffle our training data using random.shuffle() method, and also convert our data to a numpy array using numpy library.
# convert training_data to numpy array and shuffle the data:
random.shuffle(training_data)
training_data = np.array(training_data)
9. Splitting the data into x_train and y_train:
Splitting our training data into x_train and y_train. X_train consist of words and y_train consists of its corresponding label.
# Now we have to create training list:
x_train = list(training_data[:,0])
y_train = list(training_data[:,1])
10. Model Creation:
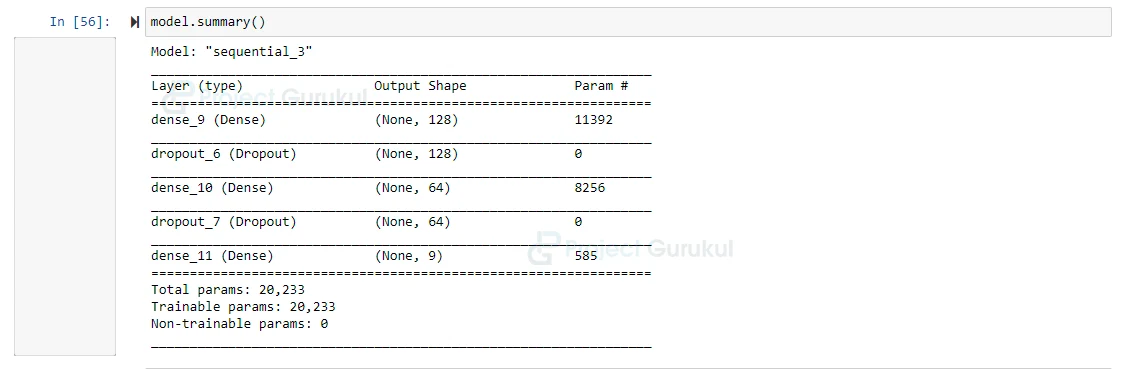
# Creating Model:

model = Sequential()
model.add(Dense(128, input_shape=(len(x_train[0]),), activation='relu'))
model.add(Dropout(0.5))
model.add(Dense(64, activation='relu'))
model.add(Dropout(0.5))
model.add(Dense(len(y_train[0]), activation='softmax'))
In this model, we will create 3 fully connected layers in which there is one input layer and one output layer. As you can see in the above code.
11. Model Summary:
model.summary()
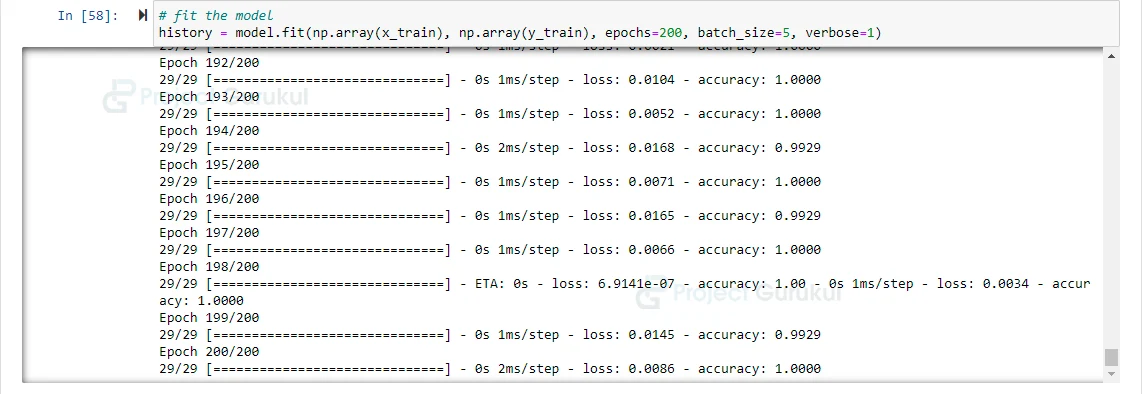
12. Compile and Fit our model to find the accuracy:
sgd_optimizer = SGD(lr=0.01, decay=1e-6, momentum=0.9, nesterov=True)
model.compile(loss='categorical_crossentropy', optimizer=sgd_optimizer, metrics=['accuracy'])
In this, we will be using a Stochastic gradient descent(sgd) optimizer with Nesterov accelerated gradient.
# fit the model
history = model.fit(np.array(x_train), np.array(y_train), epochs=200, batch_size=5, verbose=1)
13. Save the model:
Now after creating the model we will save our model using save() method.
model.save('chatbot_Application_model.h5', history)
14. Final step to predict the sentences and get responses:
Now, we have to create one more python file in which we load our model, we load our words list, labels list that we have saved above. As we know that our model will only predict the label in which it belongs to, so we have to create certain functions which will identify the label and provide random responses from the list of responses.
import nltk
from nltk.stem import WordNetLemmatizer
lemmatizer = WordNetLemmatizer()
import pickle
import numpy as np
import json
import random
from keras.models import load_model

model = load_model('chatbot_Application_model.h5')

intents = json.loads(open('intents.json').read())
words = pickle.load(open('words.pkl','rb'))
labels = pickle.load(open('labels.pkl','rb'))
To run our model we have to provide the input in the same way as we have done while creating our model. So for this we have created a function which will perform text operations and then predict the label.
def bank_of_words(s,words, show_details=True):
    bag_of_words = [0 for _ in range(len(words))]
    sent_words = nltk.word_tokenize(s)
    sent_words = [lemmatizer.lemmatize(word.lower()) for word in sent_words]
    for sent in sent_words:
        for i,w in enumerate(words):
            if w == sent:
                bag_of_words[i] = 1
    return np.array(bag_of_words)

def predict_label(s, model):
    # filtering out predictions
    pred = bank_of_words(s, words,show_details=False)
    response = model.predict(np.array([pred]))[0]
    ERROR_THRESHOLD = 0.25
    final_results = [[i,r] for i,r in enumerate(response) if r>ERROR_THRESHOLD]
    final_results.sort(key=lambda x: x[1], reverse=True)
    return_list = []
    for r in final_results:
        return_list.append({"intent": labels[r[0]], "probability": str(r[1])})
    return return_list
After prediction, now we will create a function which will give responses from the list of intents.
def Response(ints, intents_json):
    tags = ints[0]['intent']
    list_of_intents = intents_json['intents']
    for i in list_of_intents:
        if(i['tag']== tags):
            response = random.choice(i['responses'])
            break
    return response

def chatbot_response(msg):
    ints = predict_label(msg, model)
    response = Response(ints, intents)
    return response
Now after responses in this we have created a function which will make user and Bot interact:
def chat():
    print("Start chat with ChatBot of ProjectGurukul")
    while True:
        inp = input("You: ")
        if inp.lower() == 'quit':
            break
        response = chatbot_response(inp)
        print("\n BOT: " + response + '\n\n')

chat()
15. Now Run this python file:
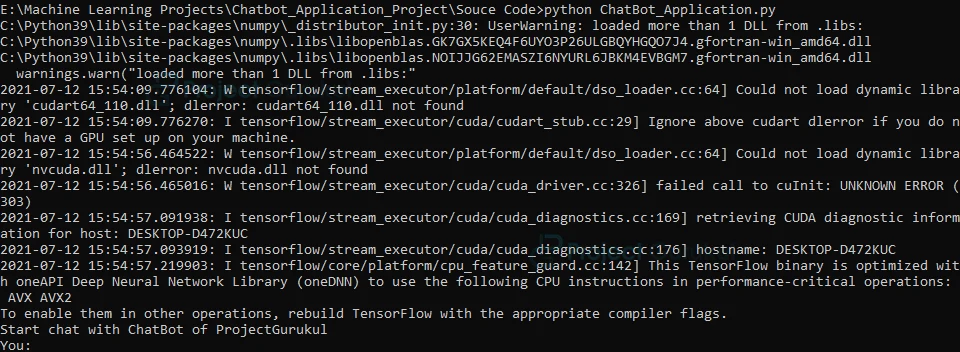
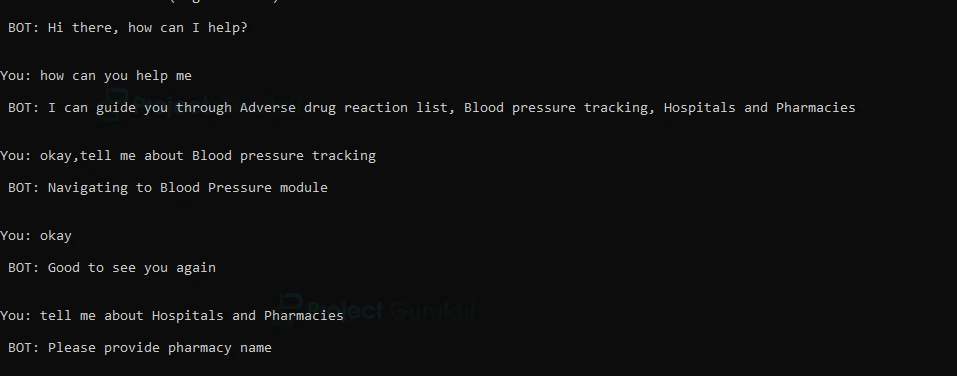
Deep Learning Chatbot Output
Summary
In this Deep learning Project, we successfully developed an intelligent Retrieval based ChatBot which can understand and respond according to your message. Here, we have created a model which accurately predicts the label to which user message belongs to, and then it gives random responses from a list of intents which makes our ChatBot smart or we say intelligent.
In this project, the main thing that we have learned is preprocessing on text data and using nltk to perform certain tasks.
good
hai bro wsl is not intall what i do