Cats and Dogs Classification using Deep Learning
FREE Online Courses: Dive into Knowledge for Free. Learn More!
To start your Deep Learning Journey with Python, Cats vs Dog classification is the best fundamental Deep Learning project. In this project, we will create a model with the help of Python keras which will classify whether the image is of dog or cat.
About Cats and Dogs Prediction Project
In this project, we will be using a Convolutional Neural Network to create our model which will predict whether the image is of dog or cat. We will create a GUI in which we will directly upload the image and predict whether the image contains a dog or cat.
Now, let’s directly dive into the implementation of this project:
Dataset we will be using:
In this we will be using the famous dataset that is the Asirra( animal species image recognition for restricting access) dataset, which was introduced in 2013 for a machine learning competition. The dataset consist of 25,000 images with equal numbers of cats and dogs.
You can download the Dogs and Cats dataset using the following link: Dogs and Cats Dataset
Project Prerequisites:
You should firstly install all the required libraries in your system with the help of pip installer. The name of libraries you should install are:
- Numpy
- Pandas
- Matplotlib
- Tensorflow
- Keras
- sklearn
You can install this using pip by opening your cmd and type (For ex: pip install numpy, pip install tensorflow, pip install pandas, etc).
Download Cats vs Dogs Classification Project Code
Please download the source code of cats and dogs classification with machine learning: Cats and Dogs Classification Project Code
After installing all the required libraries, follow the steps to build cats and dogs classifiers.
1. Import required libraries:
import numpy as np
import pandas as pd
from keras.preprocessing.image import ImageDataGenerator,load_img
from tensorflow.keras.utils import to_categorical
from sklearn.model_selection import train_test_split
import matplotlib.pyplot as plt
import random
import os
2. Define constants which will be required later:
We will fix our image size to (128,128), and image channels will be 3.
img_width=128
img_height=128
img_size=(128,128)
img_channels=3
3. Now, we will prepare our training data:
Firstly by setting the path of our train images present in our dataset and then specifying the categories if the image is of dog we will append value 1 in categories, and if the image is of cat we will append 0 in categories.
And also we will create a dataframe of the images name and its corresponding categories.
Directory = os.listdir("./train/train")

# Directory = r'C:\Users\KRISHNA\CatsDogData\train\train'

labels=[]
for name in Directory:
    label =name.split('.')[0]
    if label=='dog':
        labels.append(1)
    else:
        labels.append(0)

df=pd.DataFrame({
    'filename':Directory,
    'label':labels
})
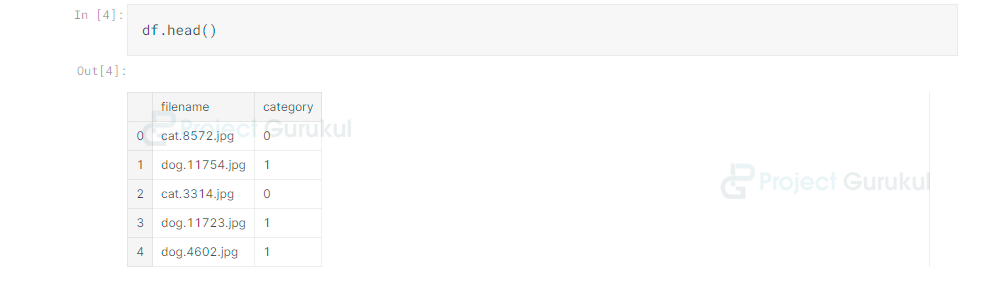
4. To see the data frame we have created above, use df.head() method.
df.head()
5. Now, let’s build our model:
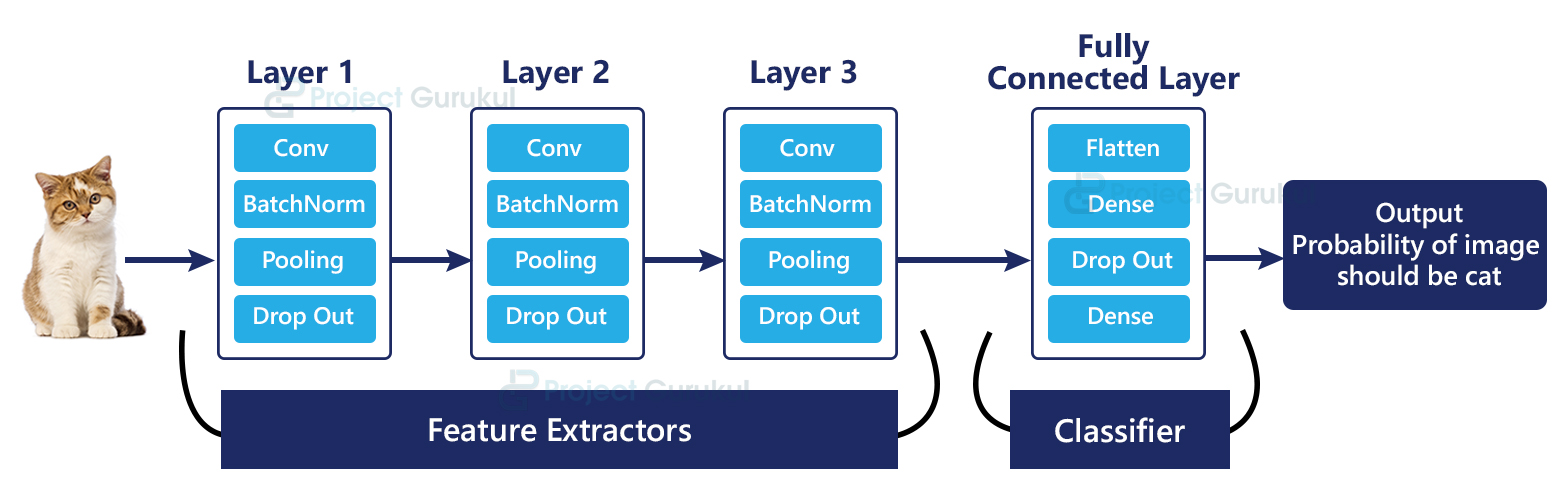
In our model we will have an:
- Input layer which represents input image data, which will reshape the image into a single dimensional array. In this we also have,
- convolutional layer, which will extract features from image,
- pooling layer, which will reduce spatial volume of input image after convolution,
- fully connected layer, which connects the network from a layer to another layer and,
- output layer, which will predict values.
This is the model we have created which will classify that the image is of cats or dogs:
from keras.models import Sequential
from keras.layers import Conv2D,MaxPooling2D,Dropout,Flatten,Dense,Activation,BatchNormalization

model=Sequential()

model.add(Conv2D(64,(3,3),activation='relu',input_shape=(128,128,3)))
model.add(BatchNormalization())
model.add(MaxPooling2D(2,2))
model.add(Dropout(0.25))

model.add(Conv2D(64,(3,3),activation='relu'))
model.add(BatchNormalization())
model.add(MaxPooling2D(2,2))
model.add(Dropout(0.25))

model.add(Conv2D(128,(3,3),activation='relu'))
model.add(BatchNormalization())
model.add(MaxPooling2D(2,2))
model.add(Dropout(0.25))

model.add(Flatten())
model.add(Dense(512,activation='relu'))
model.add(BatchNormalization())
model.add(Dropout(0.5))
model.add(Dense(2,activation='softmax'))

model.compile(loss='categorical_crossentropy',
  optimizer='rmsprop',metrics=['accuracy'])
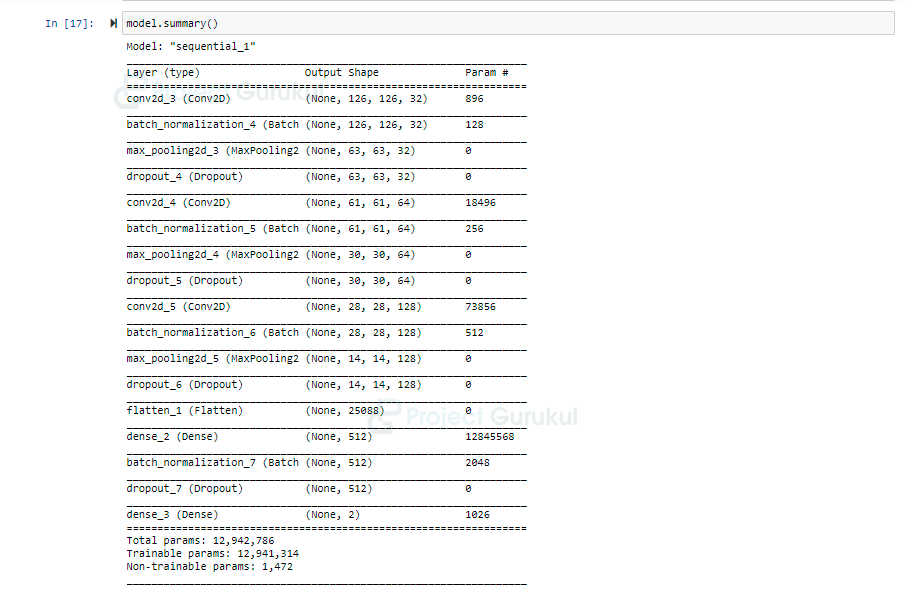
6. This is the model summary that we have created:
model.summary()
7. Defining Callbacks:
First let’s understand the meaning of callback, so callback is a set of functions to be applied at a given stage of the training procedure. This will include stopping training when you reach a certain accuracy/loss score, saving the model after each successful epoch, adjusting the learning rates, etc. We will be using keras callbacks api, so from keras.callbacks we will import EarlyStopping, ReduceLROnPlateau.
from keras.callbacks import EarlyStopping, ReduceLROnPlateau
- Early Stop: To prevent overfitting, we will stop the learning after 10 epochs and the val_loss value will not decrease.
- Learning Rate Reduction : We will reduce the learning rate when accuracy does not increase for 2 steps.
earlystop = EarlyStopping(patience=10)
learning_rate_reduction = ReduceLROnPlateau(monitor='val_acc',
                                            patience=2,
                                            verbose=1,
                                            factor=0.5,
                                            min_lr=0.00001)
callbacks = [earlystop, learning_rate_reduction]
8. Prepare Data:
As we will use an image generator with class_mode = “categorical”, we need to convert categories into strings. Then the image generator will convert it to one-hot encoding which is good for our classification.
So we convert 1 to dog and 0 to cat.
df["label"] = df["label"].replace({0: 'cat', 1: 'dog'})
train_data, validation_data = train_test_split(df, test_size=0.20, random_state=42)
train_data = train_data.reset_index(drop=True)
validation_data = validation_data.reset_index(drop=True)

final_train_data = train_data.shape[0]
final_validation_data = validation_data.shape[0]
batch_size=15
9. Now we will create a training generator:
The main thing in this is that we have to set the path of our train folder so that it can generate training images . So you should keep that in mind that the path should be correct. If path is not correct it will show- found 0 validated Image filename belonging to 0 classes.
generate_train_data = ImageDataGenerator(rotation_range=15,
                                rescale=1./255,
                                shear_range=0.1,
                                zoom_range=0.2,
                                horizontal_flip=True,
                                width_shift_range=0.1,
                                height_shift_range=0.1
                                )

train_gen = generate_train_data.flow_from_dataframe(train_data,
                                             "./train/train/",x_col='filename',y_col='label',
                                                 target_size=img_size,
                                                 class_mode='categorical',
                                                 batch_size=batch_size)
10. Creating Validation data generator:
It is the same as training data generators. In this also you should keep in mind that you have set the correct path.
generate_validation_data = ImageDataGenerator(rescale=1./255)
validation_gen = generate_validation_data.flow_from_dataframe(
    validation_data,
    "./train/train/",
    x_col='filename',
    y_col='label',
    target_size=img_size,
    class_mode='categorical',
    batch_size=batch_size
)
11. Now it’s time to train our model:
epochs=10
history = model.fit_generator(
    train_gen,
    epochs=epochs,
    validation_data=validation_gen,
    validation_steps=final_validation_data//batch_size,
    steps_per_epoch=final_train_data//batch_size,
    callbacks=callbacks
)

12. After training of our model is completed we will save our model:
model.save("model1_catsVSdogs_10epoch.h5")
13. After training our model on our training dataset and validation dataset, we have to create our test dataset also to check whether our model is classifying cats and dogs correctly or not.
To prepare the test dataset, we will follow the same procedure as we have done while creating train dataset:
test_filenames = os.listdir("./test1/test1")
test_data = pd.DataFrame({
    'filename': test_filenames
})
nb_samples = test_data.shape[0]
Creating Test data generator:
generate_test_data= ImageDataGenerator(rescale=1./255)
test_gen = generate_test_data.flow_from_dataframe(
    test_data,
    "./test1/test1/",
    x_col='filename',
    y_col=None,
    class_mode=None,
    target_size=img_size,
    batch_size=batch_size,
    shuffle=False
)
14. Now we have to perform predictions:
So for that, we have to perform categorical classification in which the prediction will come with probability of each category. So we will pick the category that has the highest probability with numpy average max.
prediction = model.predict_generator(test_gen, steps=np.ceil(nb_samples/batch_size))
And now we will convert the predicted category back into our generator classes by using train_generator.class_indices. It is the classes that map image generator maps while converting data into computer vision from our prepared data part. We map data with {1: ‘dog’, 0: ‘cat’}. Now we will map the result back to dog 1 and cat is 0.
test_data['label'] = np.argmax(prediction, axis=-1)

label_map = dict((v,k) for k,v in train_gen.class_indices.items())
test_data['label'] = test_data['label'].replace(label_map)

test_data['label'] = test_data['label'].replace({ 'dog': 1, 'cat': 0 })
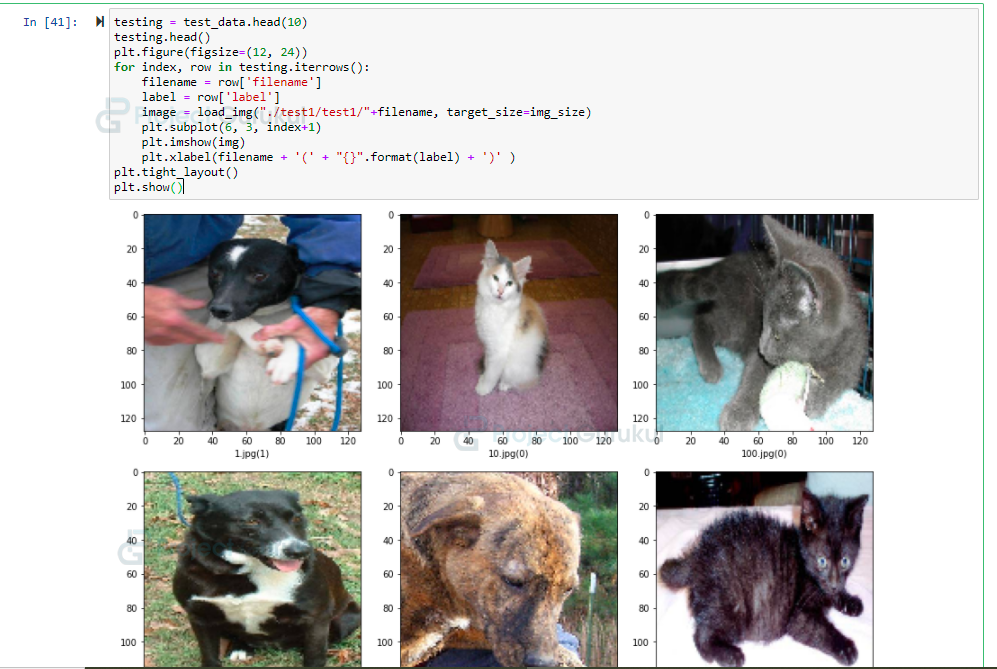
15. Let’s visualize the predicted results:
testing = test_data.head(10)
testing.head()
plt.figure(figsize=(12, 24))
for index, row in testing.iterrows():
    filename = row['filename']
    label = row['label']
    image = load_img("./test1/test1/"+filename, target_size=img_size)
    plt.subplot(6, 3, index+1)
    plt.imshow(img)
    plt.xlabel(filename + '(' + "{}".format(label) + ')' )
plt.tight_layout()
plt.show()
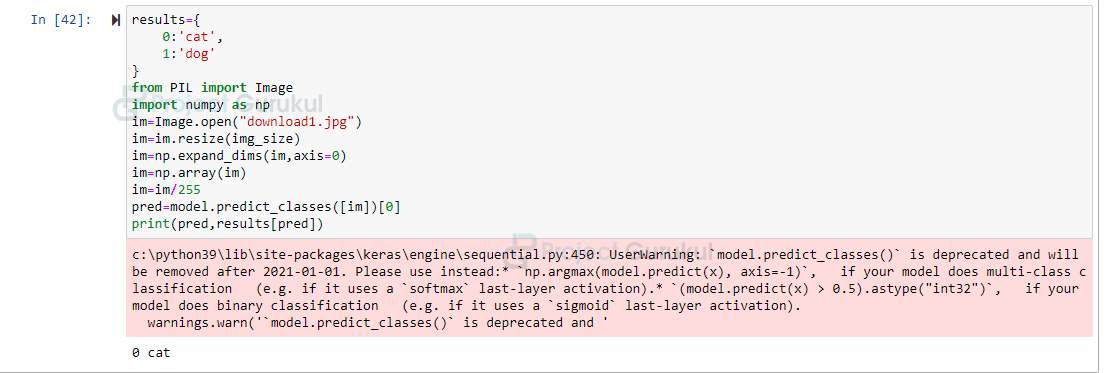
16. Lastly let’s test our model on custom data:
results={
    0:'cat',
    1:'dog'
}
from PIL import Image
import numpy as np
im=Image.open("download1.jpg")
im=im.resize(img_size)
im=np.expand_dims(im,axis=0)
im=np.array(im)
im=im/255
pred=model.predict_classes([im])[0]
print(pred,results[pred])
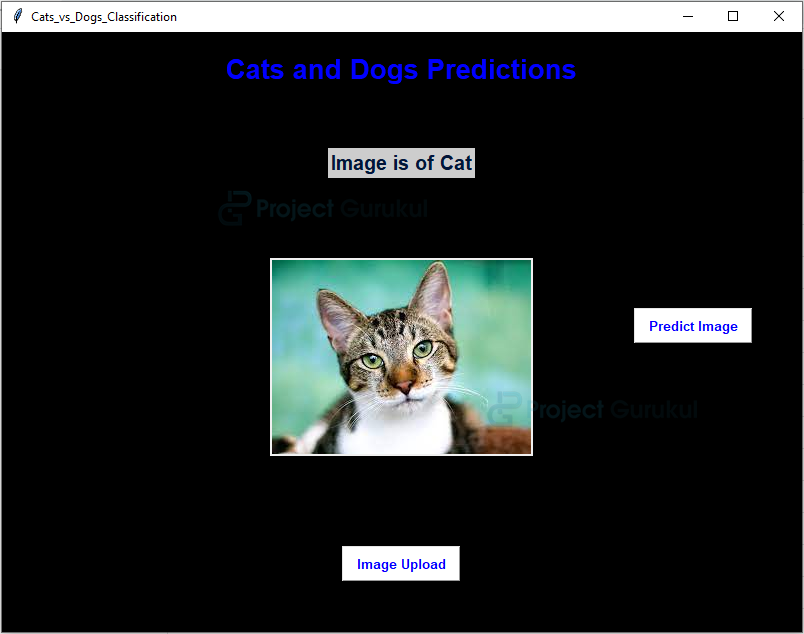
Making GUI which will classify whether the image is of dog or cat:
Now finally lets create a GUI so that we don’t have to run the predict_classes method every time to test our model or to classify the image. So we will create a GUI with the help of Tkinter Python.
Firstly you need to install tkinter, so to install this, run following command on your system cmd the command is:
pip install tk
Now you have to create a new directory, copy the model we have created above to that directly and create a file cat_and_dog_recognizer.py and paste the below code.
import tkinter as tk
from tkinter import filedialog
from tkinter import *
from PIL import ImageTk, Image
import numpy

from keras.models import load_model
model = load_model('model1_catsVSdogs_10epoch.h5')

classes = {
    0:'Image is of Cat',
    1:'Image is of Dog',
}
#initialise GUI
top=tk.Tk()
top.geometry('800x600')
top.title('Cats_vs_Dogs_Classification')
top.configure(background='black')
label=Label(top,background='#CDCDCD', font=('arial',15,'bold'))
sign_image = Label(top)
def prediction_image(file_path):
    global label_packed
    open_img = Image.open(file_path)
    reshape_image = open_img.resize((128,128))
    image = numpy.expand_dims(reshape_image, axis=0)
    img_arr = numpy.array(image)
    img_arr =img_arr/255
    prediction = model.predict_classes([img_arr])[0]
    sign = classes[prediction]
    print(sign)
    label.configure(foreground='#011638', text=sign)
def show_prediction_button(file_path):
    pred_b=Button(top,text="Predict Image",
   command=lambda: prediction_image(file_path),
   padx=10,pady=5)
    pred_b.configure(background='white', foreground='blue',
font=('arial',10,'bold'))
    pred_b.place(relx=0.79,rely=0.46)

def to_image_upload():
    try:
        path=filedialog.askopenfilename()
        upload=Image.open(path)
        upload.thumbnail(((top.winfo_width()/2.25),
    (top.winfo_height()/2.25)))
        image=ImageTk.PhotoImage(upload)
        sign_image.configure(image=image)
        sign_image.image=image
        label.configure(text='')
        show_prediction_button(file_path)
    except:
        pass
upload_b=Button(top,text="Image Upload",command=to_image_upload,padx=10,pady=5)
upload_b.configure(background='white', foreground='blue',font=('arial',10,'bold'))
upload_b.pack(side=BOTTOM,pady=50)
sign_image.pack(side=BOTTOM,expand=True)
label.pack(side=BOTTOM,expand=True)
heading = Label(top, text="Cats and Dogs Predictions",pady=20, font=('arial',20,'bold'))
heading.configure(background='black',foreground='blue')
heading.pack()
top.mainloop()
You can find the code in cat_and_dog_recognizer.py file from the downloads section
Cats Dogs Classification Output
Summary
We have successfully created a Cats and dogs prediction project. In this, we have built and trained the convolutional neural network model which will classify the image as a dog or cat. In this, we have also learned how to prepare training and testing dataset and learned how to visualize that dataset. We also learned how to create a GUI using Tkinter for the execution of deep learning projects.
Hello, i’m beginer. What do I do if I want to add a function that returns “undefined” when a photo is not a dog or a cat?