Cartoonify Image using OpenCV and Python
FREE Online Courses: Click for Success, Learn for Free - Start Now!
With this Machine Learning Project, we will be building a system that will convert any image into its cartoon version. We are going to use OpenCV for this project. This project will take an input image and the result will give us a cartoonified version of the image. This project sounds fun. Any artist would take hours and a lot of money for doing this, but with this project, you can do this for free. You can also convert this project into an app and give it to your friends.
So, let’s start with the project.
Cartoonifying Image
The process of creating a cartoon-like effect is time-consuming and requires a lot of space. Currently, there are no simple solutions to provide cartoon-like effects to images. In some cases, users need to install complex photo editing software, such as Photoshop, while in other cases, they have to perform some tasks themselves.
There are many existing website to perform such tasks, however, it is difficult to use as users have to mark down points and lines on the image to apply effects, which isn’t user-friendly and the options are limited. A user-friendly website that performs the task of applying effects to images very well is therefore required.
The Cartoon Effect is available on most photo editing websites. Apps that convert photos to cartoon effects online offer simplicity and quickness as their main benefits. Upload a photo from your computer or from the web, choose Cartoon Effect in the tool set, select a style or variant of this funny photo effect, and click Apply (or Go). Depending on the image, the processing may take a few seconds to a few minutes.
The Model Architecture
It is possible to divide the process of creating a cartoon effect image into two segments
Finding, blurring, and bolding the edges of the actual RGB color image.
After this, smooth, quantize, and conversion of the RGB image to grayscale. In order to accomplish the desired result, combining the image is necessary.
Identifying the Edges
To achieve a quality image, finding a smooth outline or boundary that represents the image’s shape is important. The Edge processing tasks are as follows:
MEDIAN FILTER – Applied to the original image, this filter reduces the noise created during downscaling and later converts it to a cartoon image by applying the bilateral filter. Specks are smoothed over if they are too extreme.
EDGE DETECTION – The photo is first smoothened by removing noise. After that, the picture element’s cells are divided horizontally and vertically (both x and y dimensions) to filter out the noise.
MORPHOLOGICAL OPERATIONS – By using this method, the edges will be Bolden and smoothed in a variably controlled manner. We remove pixels that appear far but are highlighted. In this way, the edge lines become thinner, resulting in a thinner outline.
EDGE FILTERING – In the second division of the constituent regions, any region that pertains below a certain threshold is removed. Small outline which are identified by the detection method is removed from the final image
Colors to the RGB Image
The most important aspect is to eliminate the color regions and apply cartoon effects. Through thisalgorithm, the colors are smoothened on multiple filtrations so as to create a equal color regions.
BILATERAL FILTERING – This filter has the important job of smoothing images without creating noise and preserving the edges at the same time. Matrix objects are used to store images read from files for filtering. The first step is to create an empty matrix to hold the result and apply a bilateral filter. This totally depends on the kernel size and how many iterations are run.
QUANTIZE COLOURS – Last but not least, the conversion involves reducing the number of colors in each pixel
Recombine
When both the color and edge image processing is complete, the edges are overlayed onto the color image.
Project Prerequisites
The required modules for this project are :
OpenCV – pip install cv2
That’s all we have to use for this project.
Cartoonify Image Project
There is no such database used in this project. All we have used is an image that we want to cartoonify. Please download the cartoonify image project source code from from the following link: Cartoonify Image Project
Steps to Implement Cartoonify Image Project
1. Here is a function to read and display the image using imshow function of the OpenCV.
import cv2
def Image(img):
    cv2.imshow("img",img)
    cv2.waitKey(0)
    cv2.destroyAllWindows()

path = "test2.jpg"
img = cv2.imread(path)
Image(img)

2. Here we are using filters on our image and we are getting the edges in black and white from our image. We are only getting the edges of the important features.
col_img = cv2.bilateralFilter(img,5,255,255)

gray = cv2.cvtColor(img,cv2.COLOR_BGR2GRAY)
gray = cv2.medianBlur(gray,3)
edges = cv2.adaptiveThreshold(gray,255,cv2.ADAPTIVE_THRESH_MEAN_C,cv2.THRESH_BINARY,5,5)

Image(edges)
3. Here we are just using the above image as a mask on our original image which will give us an image that will look like a cartoon image.
cartoon = cv2.bitwise_and(col_img,col_img,mask=edges)

Image(cartoon)
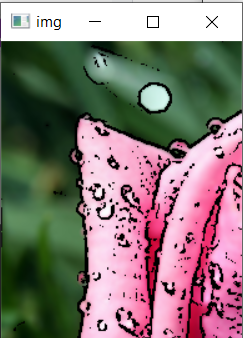
Cartoonify Image Output

Summary
In this Machine Learning project, we learned how to cartoonify an image. In this project, we have used OpenCV and we used the black and white edge of our original image and used it as a mask on our original image. We hope you learned something new in this project.