Brain Tumor Detection with CNN (Source Code Included)
FREE Online Courses: Elevate Your Skills, Zero Cost Attached - Enroll Now!
With this Machine Learning Project, we will be building a brain tumor detection system. The brain tumor detection system is used by hospitals nowadays. As the name suggests itself that this system will detect whether the MRI of the brain image has a tumor or not.
So, let’s build this brain tumor detection system using convolutional neural networks.
Brain Tumor Detection System
So, what is this Brain Tumor Detection System?
A brain tumor detection system is a system that will predict whether the given image of the brain has a tumor or not. The system will be used by hospitals to detect the patient’s brain. The doctor will take the MRI of the patient’s brain and will provide the image into the system and the system will then determine whether the brain has a tumor or not.
The system we are building needs to be built with the highest accuracy. Because this system is used by hospitals and a person’s life depends on it.
So, let’s build this system using convolutional neural networks.
Convolutional Neural Networks
So, what are convolutional neural networks?
It is a type of machine learning algorithm which is highly used in classification problems. It can be used in both binary classification and multi-classification problems. We will provide an input image to this algorithm and it will classify the image whether the brain has a tumor or not.
It works in a way that the model has to be pre-trained with images. There are already pre-built functions in the TensorFlow library. We will be using those functions. We can also create neural networks ourselves but it will not be that optimized. Tensorflow already contains functions for creating a neural network that can create neural networks for us within 5-8 lines of code. These neural networks provided by the TensorFlow library are highly optimised. Then, we test it by providing our test data set.
Let’s see how convolutional neural networks work.
CNN is created using four layers. Let’s see them one by one.
1. Input layer: This is the first layer in convolutional neural networks. We will pass a 2D image to this layer. The computer sees the image as a rectangle of pixels. We will be using the ImageDataGenerator function of the Keras library which can read them directly from the directory and classify them based on folders.
2. To explain the above, I have created a folder named train which contains the images which we will give to the model while training. It contains two folders. One is ‘no’ which contains all the images of the brain which don’t have tumors. The other folder is ‘yes’ which contains the images of the brain which has a tumor. So the ImageDataGenerator will directly read this data_set folder and will automatically do the work for classifying images.
3. Convolutional Layer: This layer consists of a set of filters. The image passes through these filters and important features of the image are extracted from it. These filters perform some calculations on the input matrix and the result of this calculation is stored in a separate matrix.
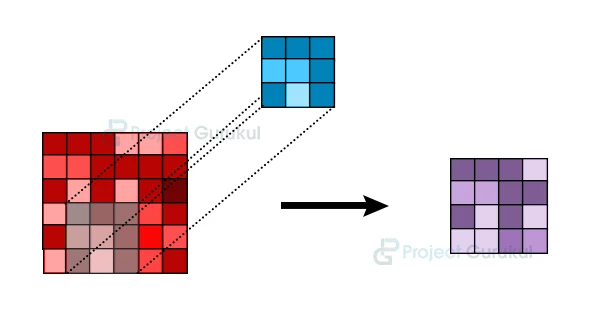
4. Pooling layer: This is another layer from which our matrix passes. This layer is added to downsample the number of parameters in the matrix. This prevents the overfitting of the model.
There are two types of POOLING:
MAX_POOLING: In this, we take the maximum value of the patch.
AVG_POOLING: In this, we take the average value of the patch.
5. Dropout Layer: This is an optional layer that you can add to your model. This layer will prevent overfitting by dropping some of the units.
6. Fully Connected Layer: This is the final step in building our neural networks. This layer will flatten the matrix obtained after the pooling layer and the image will be passed through hidden layers. This hidden layer will perform some computations and will finally predict the data.
The Model Architecture
The model that we build can be compared to neural networks in brain. Just we feed the information into the brain and with time our neurons gets trained and our brain starts learning, same is the case with neural networks. We train the neural networks with images and it will start finding important features from the image by doing some processing and will eventually find some similarities in the images.
The image has to pass through a lot of layers. All the layers that our image has to pass are explained above. So after we trained our model by providing the training dataset and testing dataset, we need to test our final model by providing an image to be predicted.
The project is really simple. With just in few lines of code, TensorFlow will create your model, and then with one line, it will start training. The main problem is how to improve accuracy. For that, there are some steps you can follow –
- By changing the activation function. There is a lot of activation function. You can see it on https://keras.io/api/. You can try different activation functions and check which one is best for your model.
- By changing the optimizers. You can also see it on the above website. There are a bunch of different options for optimizers. You can find one which fits your model.
- By changing the size of the filters. You can try changing the size of your filters.
Project Prerequisites
The requirement for this project is Python 3.6 and anaconda installed on your computer. I have used Jupyter notebook for this project. You can use whatever you want.
The required modules for this project are –
- Numpy – pip install numpy
- Tensorflow – pip install tensorflow
- Keras – pip install keras
That’s all we need for our Convolutional neural networks. All the functions for creating an optimized Convolutional Neural Network are there in the tensorflow module.
Brain Tumor Detection Project
We provide the brain tumor detection project code and dataset for you. This dataset is already divided into train, test, and prediction. The train folder contains the images which will be passed as a training dataset. The test folder contains the images which will be passed as a test dataset. Then we finally predict the result by passing an image from our prediction dataset. Please download the brain tumor detection machine learning project code and dataset from the following link: Brain Tumor Detection Project
Steps to Implement Brain Tumor Detection
1. Import the Modules required during the project.
import numpy as np
import tensorflow as tf

from keras.preprocessing.image import ImageDataGenerator
2. Here we are reading the training dataset using imageDataGenerator described above.
train_datagen = ImageDataGenerator(
    rescale=1./255,
    shear_range = 0.2,
    zoom_range = 0.2,
    horizontal_flip=True)
training_set = train_datagen.flow_from_directory('train',target_size=(224,224),batch_size=32,shuffle=True,class_mode='binary')
3. Here We are reading the test dataset.
test_datagen = ImageDataGenerator(rescale=1./255)
test_set = test_datagen.flow_from_directory('test',target_size=(224,224),batch_size=16,shuffle=False,class_mode='binary')
4. Here we are building our neural network. Tensorflow contains all the functions for creating the neural networks easily. We are just triggering the function. You can see all the functions explained above are called here & nothing hard.
cnn = tf.keras.models.Sequential()

cnn.add(tf.keras.layers.Conv2D(filters=224 , kernel_size=3 , activation='relu' , input_shape=[224,224,3]))
cnn.add(tf.keras.layers.MaxPool2D(pool_size=2,strides=2))

cnn.add(tf.keras.layers.Conv2D(filters=224 , kernel_size=3 , activation='relu' ))
cnn.add(tf.keras.layers.MaxPool2D(pool_size=2 , strides=2))

cnn.add(tf.keras.layers.Dropout(0.5))
cnn.add(tf.keras.layers.Flatten())
cnn.add(tf.keras.layers.Dense(units=128, activation='relu'))
cnn.add(tf.keras.layers.Dense(units=1 , activation='sigmoid'))
cnn.compile(optimizer = 'Adam' , loss = 'binary_crossentropy' , metrics = ['accuracy'])
5. Here we are triggering the fit function that will start fitting the training dataset into our neural networks and will test our network against the test dataset
cnn.fit(x = training_set , validation_data = test_set , epochs = 10)
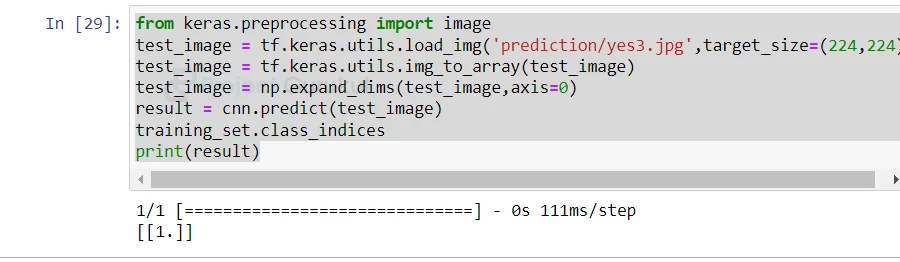
6. Now because our model is created and successfully trained and tested. It’s time to use some images for prediction. Here in this code, we are loading the image using the load_img function of Keras and then converting it into an array so that it can be passed through neural networks.
Finally, we called cnn.predict to predict the result.
from keras.preprocessing import image
test_image = tf.keras.utils.load_img('prediction/yes3.jpg',target_size=(224,224))
test_image = tf.keras.utils.img_to_array(test_image)
test_image = np.expand_dims(test_image,axis=0)

result = cnn.predict(test_image)
training_set.class_indices

print(result)
7. Here is a code to print ‘yes’ if a person has a tumor and ‘no’ if a person doesn’t have a tumor.
if result[0][0] == 1:
    print('yes')
else:
    print('no')

Summary
In this Machine Learning project, we built a brain tumor detection system. We used Convolutional Neural Networks in our project. We hope you learn how to make a detect brain tumor detection system.
yeah very well it does , you just need to put the url of ‘test’ and train folders{your dataset } at the begining properly
nice program , used it for my school project
THis really work it?