Android Reminder App – Your Memory’s New BFF
FREE Online Courses: Enroll Now, Thank us Later!
Hey there Android enthusiasts, today we are going to see and learn to implement an Android Project that is a Reminder App in android studio. We’ll understand the complete project development in this article.
This reminder app will be useful to remind yourself to complete a task at a specific day and time. With the assistance of this application, you can create a reminder for yourself by entering the task name, task details, date, and time. A notification will appear on your Android device precisely at the time and date you specify.
About Android Reminder App
This is a simple project for those just learning the fundamentals of developing Android applications. The user interface of this Android app comprises a number of text fields and buttons. We will use Android Studio and the programming language Kotlin to develop this android application. Let’s look over its list of features that the user interface will include:
1. The user interface will have two text fields where they may enter the task’s name and details.
2. The user interface will have a date picker where they may choose the date for the reminder to be set.
3. The user interface will have a time picker so they can specify when the app should send them a reminder.
4. A “Set Reminder” button will be available on the user interface to confirm and schedule a notification reminder and save the information in the ROOM database.
5. The “Latest Reminder” button on the user interface will show the most recent reminder that has been scheduled.
Prerequisites for Reminder App using Android
To develop this android application the requirements and prerequisites are as follows:
- Kotlin: You need first be familiar with Kotlin programming. Given that we will write the app code in the programming language Kotlin, it is necessary.
- XML: Another crucial component of our Android application is XML. It will be applied to the development of the application’s user interface.
- Android Studio: The core of our application is Android Studio because that is how we will develop it. Also included with Android Studio is an Android virtual device that can be used to test the functionality of applications.
- ROOM DAOs: These refer to the queries that will be required to insert/write the data into the database. Basic database management knowledge is important.
Download Android Reminder App Project
Please download the source code of Android Reminder App Project from the following link: Android Reminder App Project Code
Description of the project
You are prepared to begin developing the reminder app once you are familiar with all of the mentioned prerequisites. You will acquire some understanding of the LinearLayout, ROOM, AlarmManager, and Notification Manager in this section.
1. LinearLayout
In Android Studio, LinearLayout is a fundamental layout manager that places its child views in a single row or column. The views can be arranged in a linear form in either a vertical or horizontal direction using this method, which is the easiest.
2. ROOM database
Room for Android is a strong and effective database library that makes it easier to create database-driven apps. It is a component of Android Jetpack, a set of tools, libraries, and instructions for creating Android apps.
Room provides an abstraction layer over SQLite, which is a popular open-source relational database management system. Room allows you to work with SQLite databases in a more intuitive and productive way.
3. AlarmManager
AlarmManager is a class in Android that provides a way to schedule actions to be performed at a later time. Even if your app is not operating, it can be handy in situations when you need to complete a task at a specified time.
4. NotificationManager
NotificationManager is a class in Android that allows you to show notifications to the user. Even when the app is not open in the foreground, notifications can be used to notify the user of critical events or information.
Steps to Create Reminder App Project using Android
Following are the steps for developing the Android Reminder App Project:
We’ll now start working on developing a reminder app. Before putting the code into practice, we will learn about its purpose and function throughout this article. So let’s look at the files and functions needed to run the code:
You must complete a set of steps in order to create this Android task reminder app. We are here to walk you through every stage of developing an app.
1. Extract all the files from the downloaded zip file to the location of your choice.
2. Open Android Studio.
3. Click on File then Open.
4. Find and select the folder you extracted earlier and click on OK.
You have successfully opened the reminder app’s source code in android studio.
Let’s go through each file in this project one at a time as we comprehend how the application works.
1. The “activity_main” is a XML file which is responsible for creating the text fields and buttons included in the user interface.
Code:
<?xml version="1.0" encoding="utf-8"?>
<LinearLayout
    xmlns:android="http://schemas.android.com/apk/res/android"
    xmlns:tools="http://schemas.android.com/tools"
    android:layout_width="match_parent"
    android:layout_height="match_parent"
    android:orientation="vertical"
    tools:context=".MainActivity"
    android:gravity="center"
    android:layout_marginBottom="30dp">


    <com.google.android.material.textfield.TextInputLayout
        android:layout_width="match_parent"
        android:layout_height="wrap_content"
        android:paddingHorizontal="20dp"
        style="@style/Widget.MaterialComponents.TextInputLayout.OutlinedBox.Dense">

        <com.google.android.material.textfield.TextInputEditText
            android:id="@+id/titleET"
            android:layout_width="match_parent"
            android:layout_height="wrap_content"
            android:hint="Task" />

    </com.google.android.material.textfield.TextInputLayout>

    <com.google.android.material.textfield.TextInputLayout
        android:layout_width="match_parent"
        android:layout_height="wrap_content"
        android:paddingHorizontal="20dp"
        android:layout_marginTop="10dp"
        style="@style/Widget.MaterialComponents.TextInputLayout.OutlinedBox.Dense">

        <com.google.android.material.textfield.TextInputEditText
            android:id="@+id/messageET"
            android:layout_width="match_parent"
            android:layout_height="wrap_content"
            android:hint="Description" />

    </com.google.android.material.textfield.TextInputLayout>

    <LinearLayout
        android:layout_width="match_parent"
        android:layout_height="wrap_content"
        android:layout_marginTop="20dp">

        <DatePicker
            android:id="@+id/datePicker"
            android:layout_width="0dp"
            android:layout_weight="1"
            android:layout_height="wrap_content"
            android:datePickerMode="spinner"
            android:calendarViewShown="false"
            android:layout_gravity="center"
            android:scaleY="0.8"
            android:scaleX="0.8"
            android:layout_marginLeft="-30dp"
            android:layout_marginRight="-30dp"
         />

        <TimePicker
            android:id="@+id/timePicker"
            android:layout_width="0dp"
            android:layout_weight="1"
            android:layout_height="wrap_content"
            android:timePickerMode="spinner"
            android:layout_gravity="center"
            android:scaleY="0.8"
            android:scaleX="0.8"
            android:layout_marginLeft="-30dp"
            android:layout_marginRight="-30dp"/>
    </LinearLayout>

    <Button
        android:id="@+id/submitButton"
        android:layout_width="200dp"
        android:layout_height="wrap_content"
        android:layout_gravity="center"
        android:layout_marginTop="20dp"
        android:text="Set Reminder"/>

    <Button
        android:id="@+id/reminders"
        android:layout_width="200dp"
        android:layout_height="wrap_content"
        android:layout_gravity="center"
        android:layout_marginTop="20dp"
        android:text="Latest Reminder"/>

</LinearLayout>

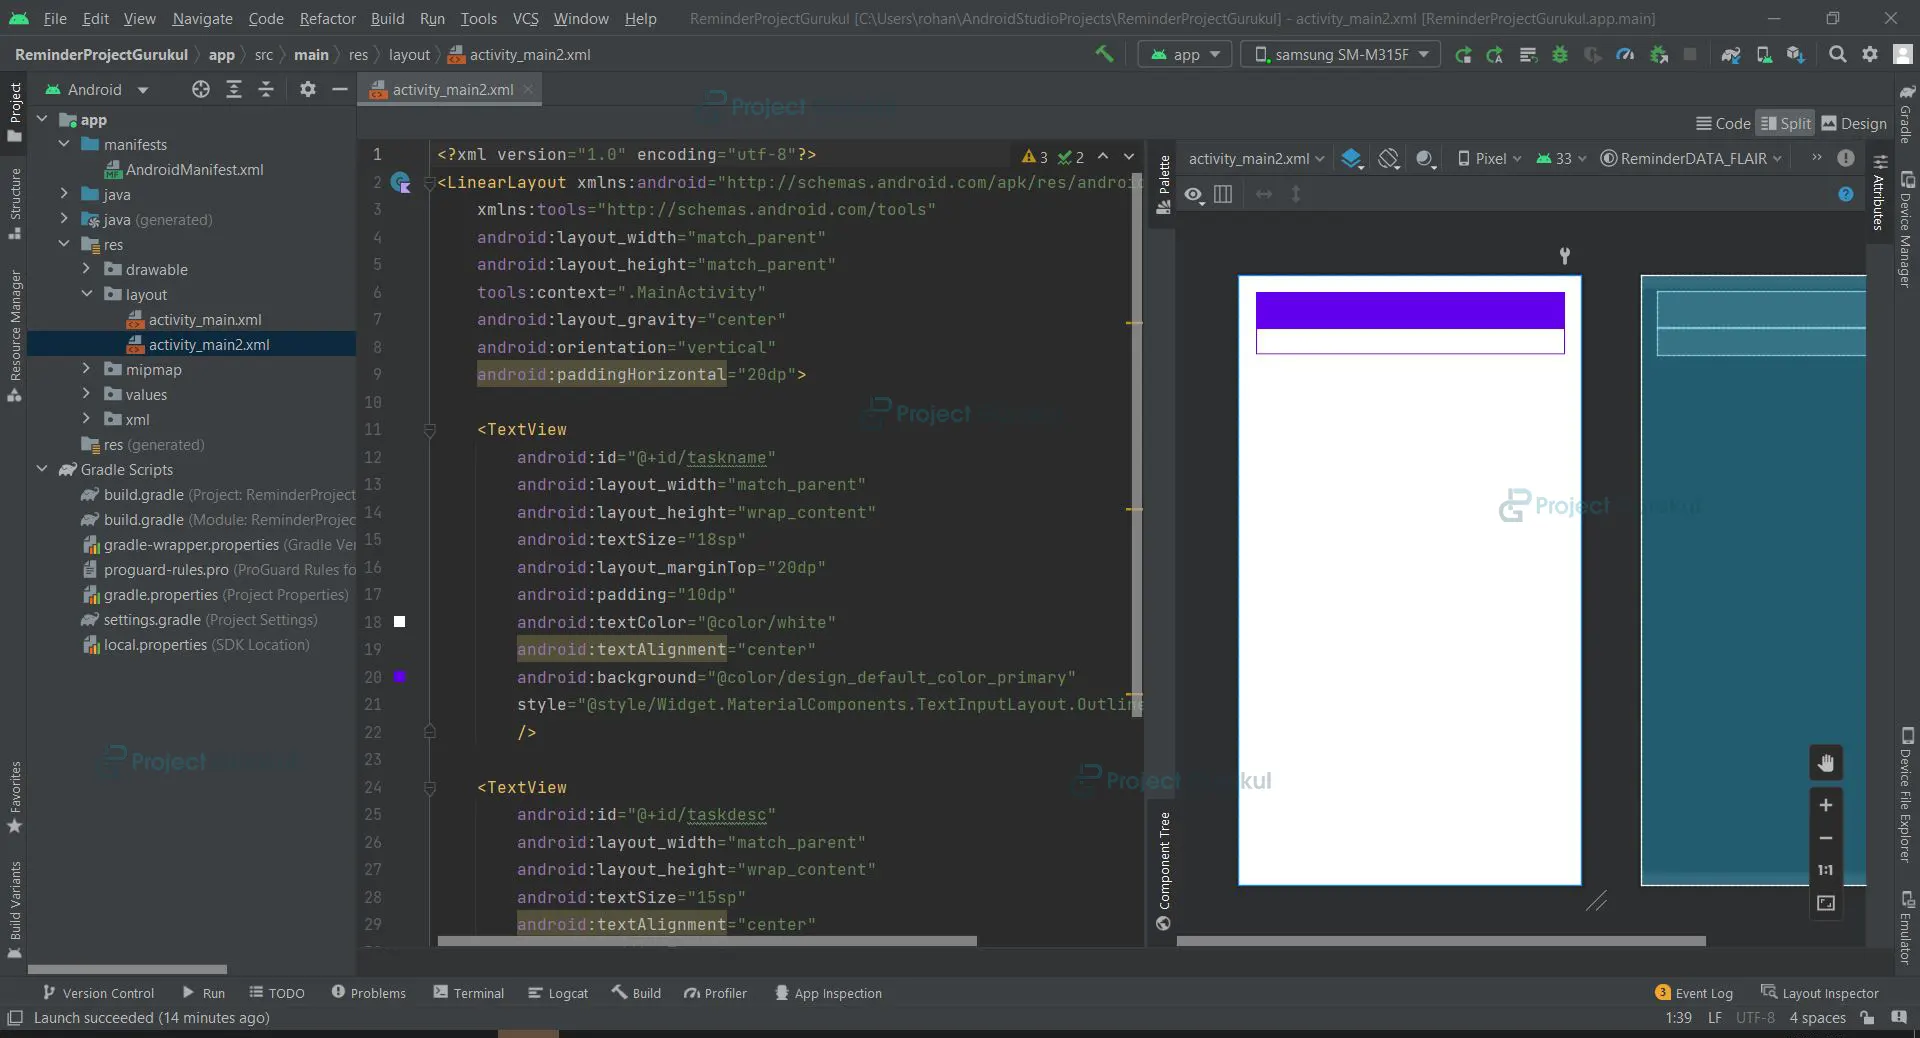
2. The “acitivity_main2” is a XML file which is responsible for creating the text views that will display the latest reminder when “Latest Reminder” button included in the “activity_main” is clicked.
Code:
<?xml version="1.0" encoding="utf-8"?>
<LinearLayout xmlns:android="http://schemas.android.com/apk/res/android"
    xmlns:tools="http://schemas.android.com/tools"
    android:layout_width="match_parent"
    android:layout_height="match_parent"
    tools:context=".MainActivity"
    android:layout_gravity="center"
    android:orientation="vertical"
    android:paddingHorizontal="20dp">

    <TextView
        android:id="@+id/taskname"
        android:layout_width="match_parent"
        android:layout_height="wrap_content"
        android:textSize="18sp"
        android:layout_marginTop="20dp"
        android:padding="10dp"
        android:textColor="@color/white"
        android:textAlignment="center"
        android:background="@color/design_default_color_primary"
        style="@style/Widget.MaterialComponents.TextInputLayout.OutlinedBox.Dense"
        />

    <TextView
        android:id="@+id/taskdesc"
        android:layout_width="match_parent"
        android:layout_height="wrap_content"
        android:textSize="15sp"
        android:textAlignment="center"
        android:paddingTop="6dp"
        android:paddingBottom="5dp"
        android:paddingRight="5dp"
        android:paddingLeft="5dp"
        android:background="@drawable/border"
        style="@style/Widget.MaterialComponents.TextInputLayout.OutlinedBox.Dense"/>
</LinearLayout>
Moving onto the files that are responsible for the working and functioning of the application.
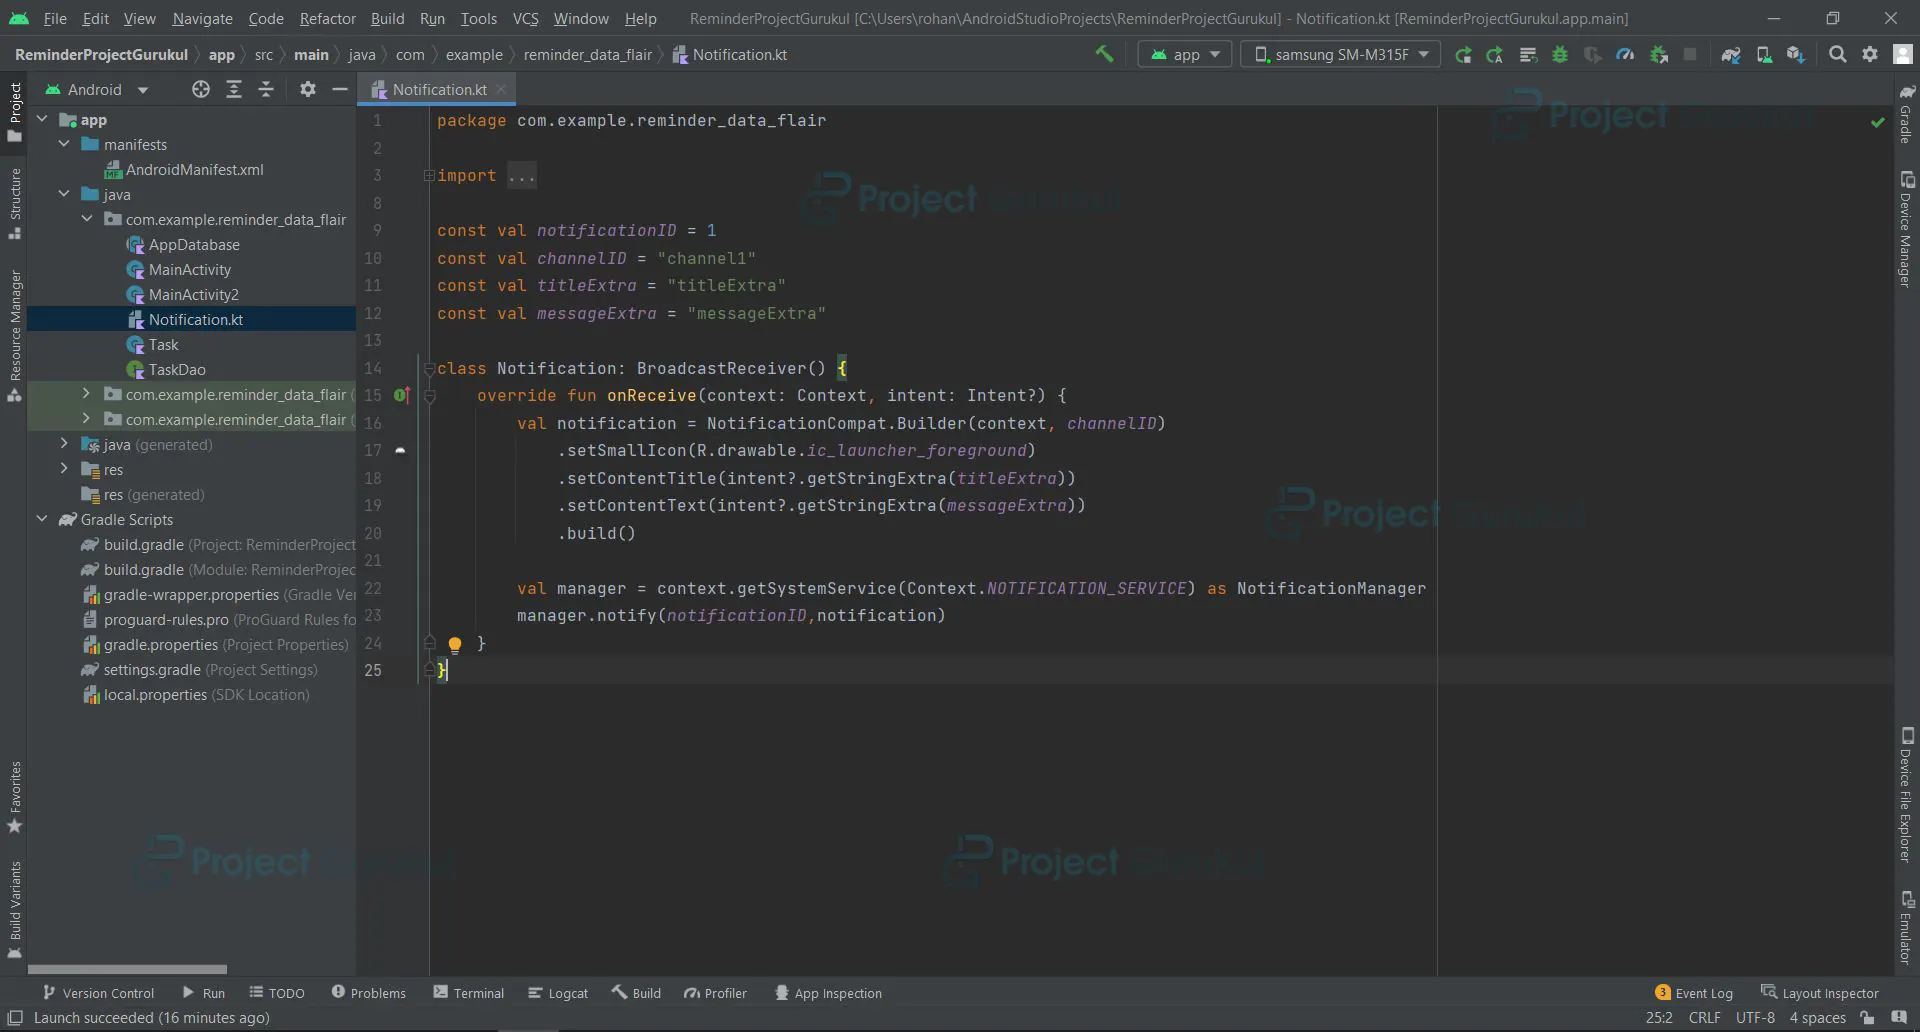
1. Starting with ‘Notification.kt’ file, this file is responsible is necessary to set up our notification manager which will be responsible for creating notification reminders.
Code:
import android.app.NotificationManager
import android.content.BroadcastReceiver
import android.content.Context
import android.content.Intent
import androidx.core.app.NotificationCompat

const val notificationID = 1
const val channelID = "channel1"
const val titleExtra = "titleExtra"
const val messageExtra = "messageExtra"

class Notification: BroadcastReceiver() {
    override fun onReceive(context: Context, intent: Intent?) {
        val notification = NotificationCompat.Builder(context, channelID)
            .setSmallIcon(R.drawable.ic_launcher_foreground)
            .setContentTitle(intent?.getStringExtra(titleExtra))
            .setContentText(intent?.getStringExtra(messageExtra))
            .build()

        val manager = context.getSystemService(Context.NOTIFICATION_SERVICE) as NotificationManager
        manager.notify(notificationID,notification)
    }
}
2. Before starting with room database files, we need add some dependencies in the build.gradle file which provides support for the ROOM database.
Add the following the code under dependencies in build.gradle file
def room_version = "2.4.3"
kapt "androidx.room:room-compiler:$room_version"
implementation "androidx.room:room-ktx:$room_version"
implementation "androidx.room:room-runtime:$room_version"
annotationProcessor "androidx.room:room-compiler:$room_version"
implementation "androidx.lifecycle:lifecycle-viewmodel-ktx:2.4.1"
implementation "androidx.lifecycle:lifecycle-runtime-ktx:2.4.1"
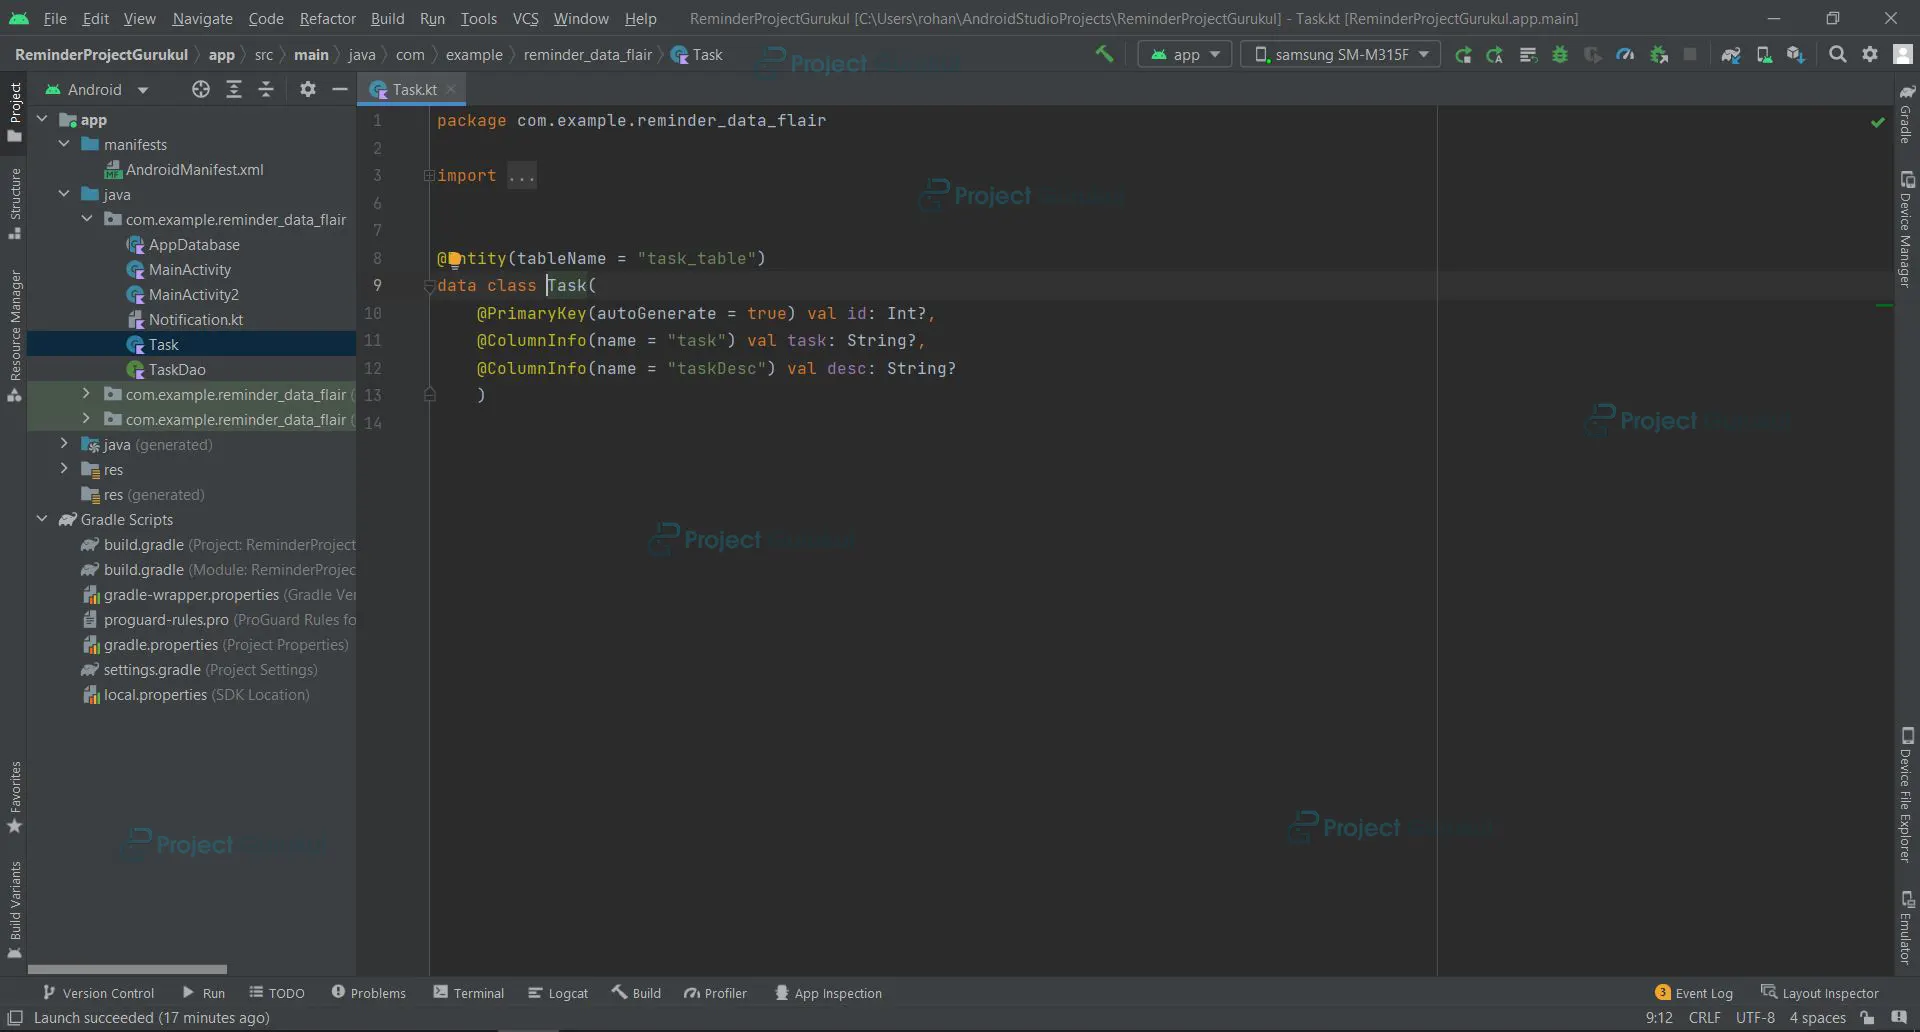
3. ‘Task.kt’ is an entity file for the ROOM database that will be created when database is initialized. With the help of this file, respective table and columns will be created in the database.
Code:
import androidx.room.ColumnInfo
import androidx.room.Entity
import androidx.room.PrimaryKey


@Entity(tableName = "task_table")
data class Task(
    @PrimaryKey(autoGenerate = true) val id: Int?,
    @ColumnInfo(name = "task") val task: String?,
    @ColumnInfo(name = "taskDesc") val desc: String?
    )
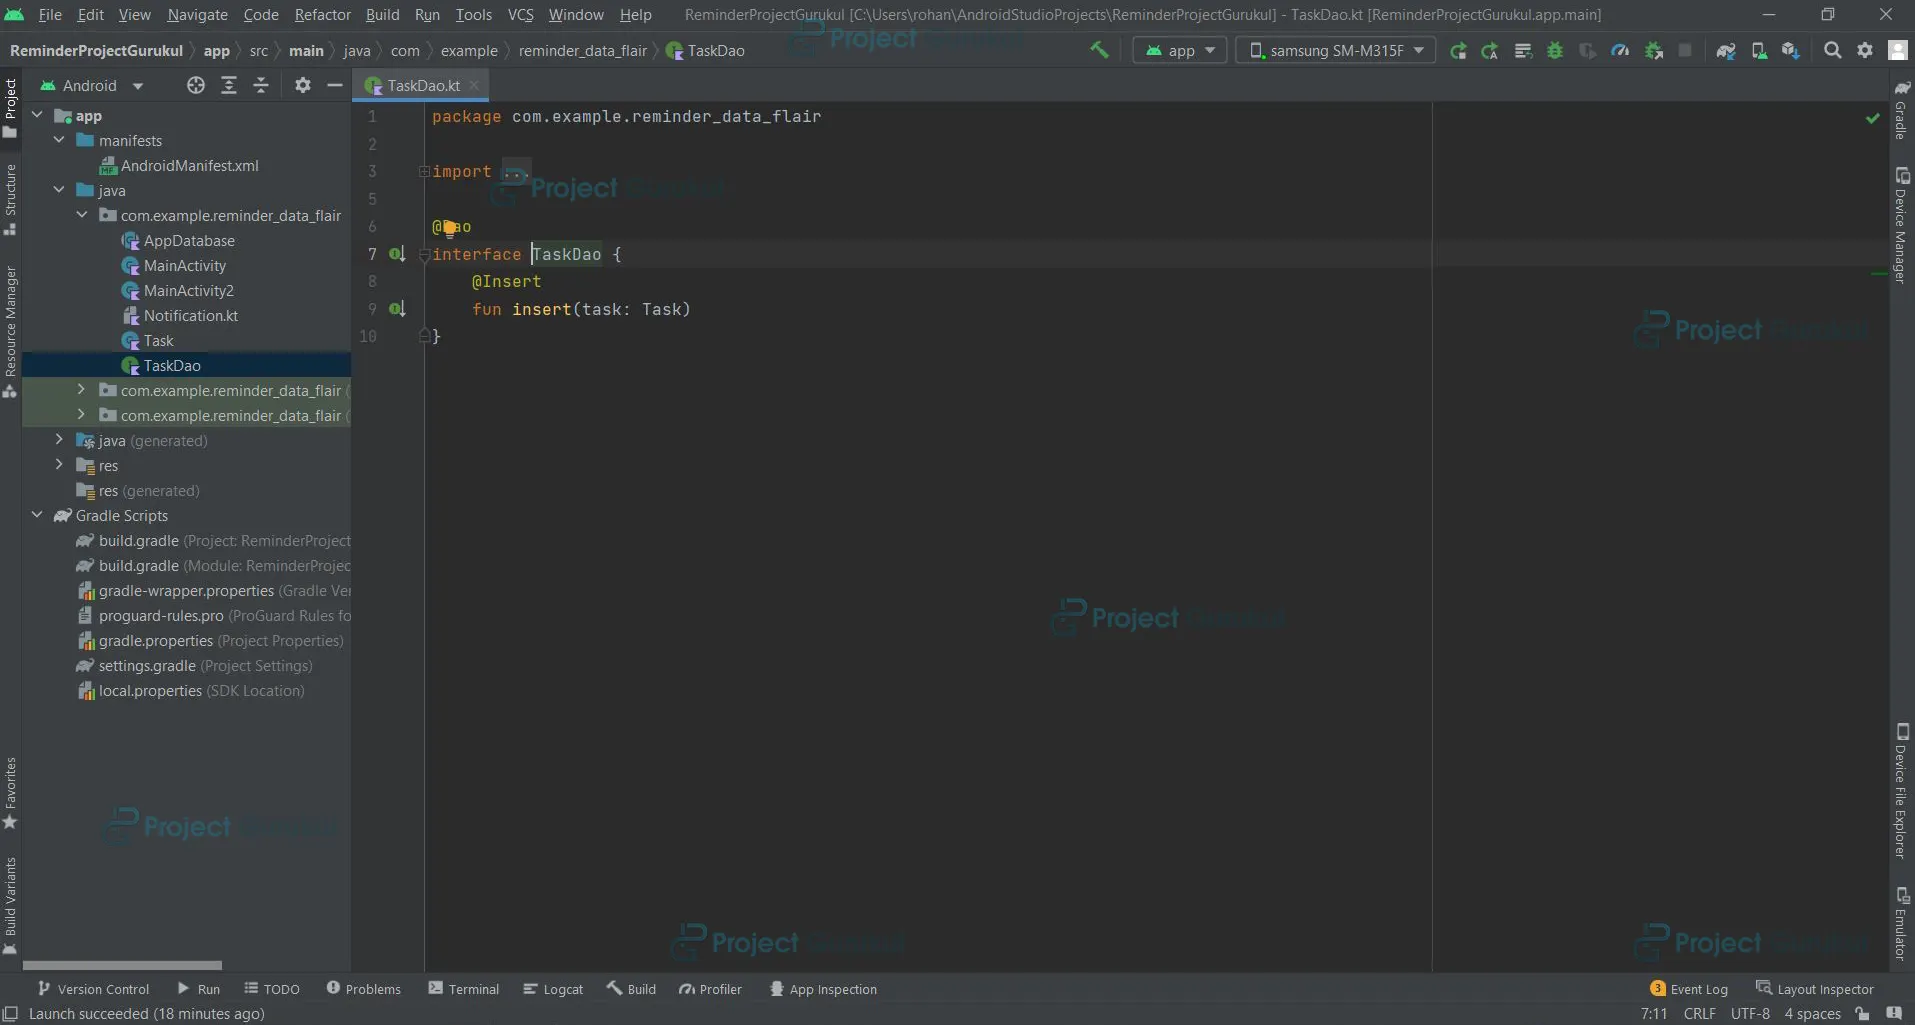
4. ‘TaskDAO.kt’ is an interface which is a data access object responsible for defining the methods that can access the database. Using annotations, we have defined ‘insert’ query in this file which will insert the data in the specified database table.
Code:
import androidx.room.Dao
import androidx.room.Insert

@Dao
interface TaskDao {
    @Insert
    fun insert(task: Task)
}
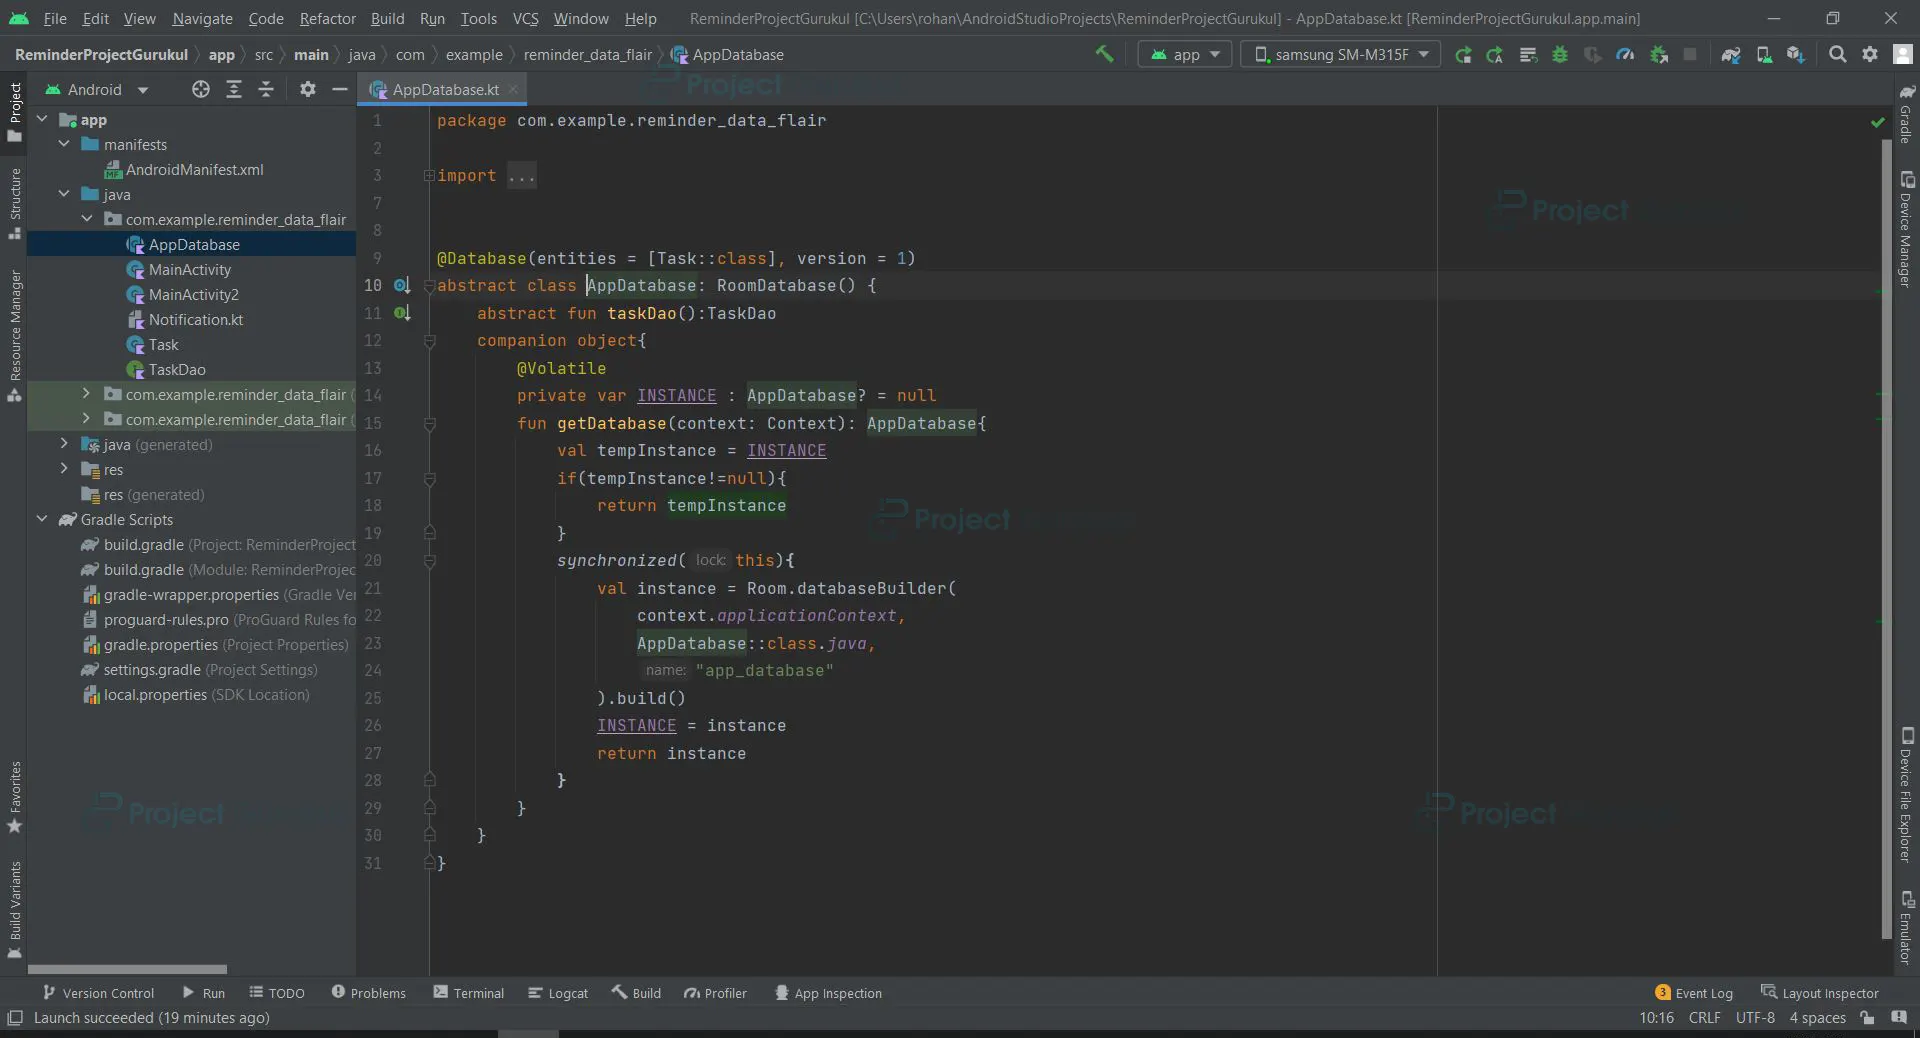
5. ‘AppDatabase.kt’ is an abstract class file which is responsible to initialize the database. In this file, the code makes sure that only one instance of the database is created even if it is a triggered multiple time.
Code:
import android.content.Context
import androidx.room.Database
import androidx.room.Room
import androidx.room.RoomDatabase
@Database(entities = [Task::class], version = 1)
abstract class AppDatabase: RoomDatabase() {
    abstract fun taskDao():TaskDao
    companion object{
        @Volatile
        private var INSTANCE : AppDatabase? = null
        fun getDatabase(context: Context): AppDatabase{
            val tempInstance = INSTANCE
            if(tempInstance!=null){
                return tempInstance
            }
            synchronized(this){
                val instance = Room.databaseBuilder(
                    context.applicationContext,
                    AppDatabase::class.java,
                    "app_database"
                ).build()
                INSTANCE = instance
                return instance
            }
        }
    }
}
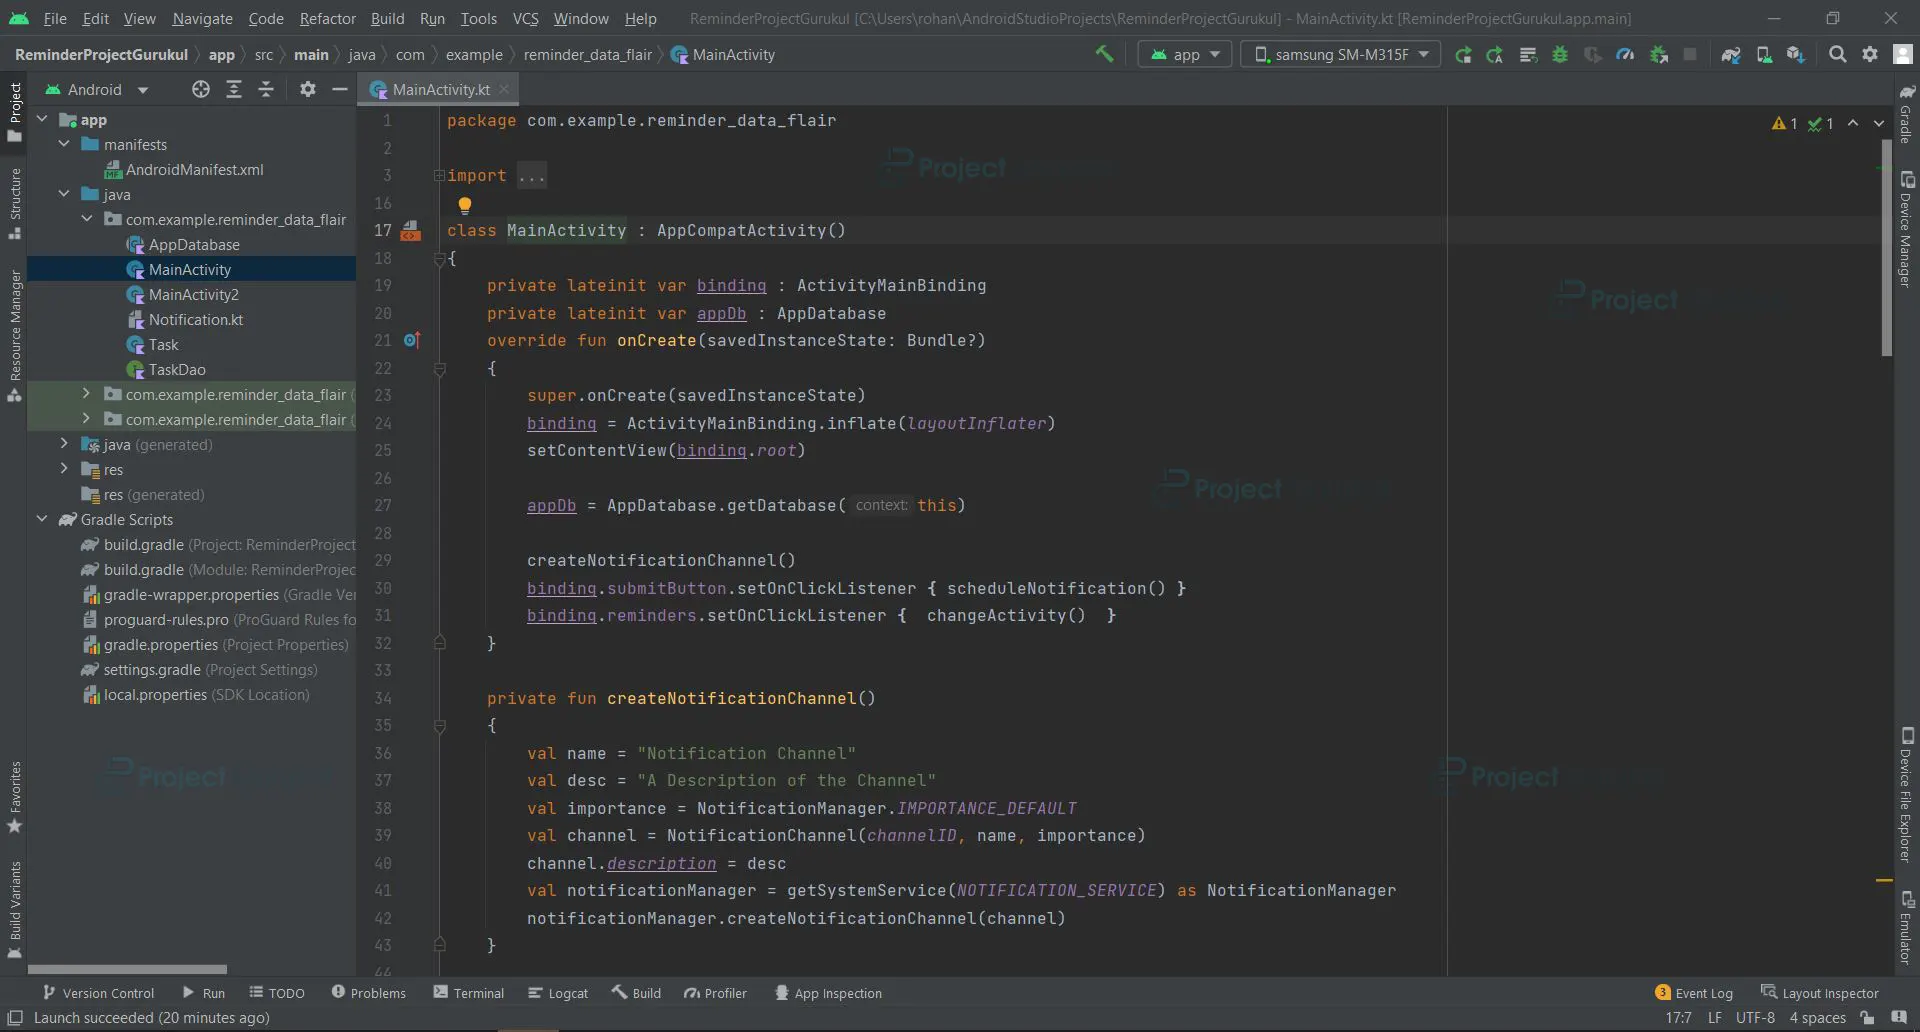
6. “MainActivity” is a kotlin file which is responsible to initialize our application.
This file contains various functions that are responsible for the working and functioning of our reminder application.
Code:
import android.app.*
import android.content.Intent
import androidx.appcompat.app.AppCompatActivity
import android.os.Bundle
import android.text.format.DateFormat
import android.widget.EditText
import android.widget.Toast
import com.example.reminder_data_flair.databinding.ActivityMainBinding
import kotlinx.coroutines.DelicateCoroutinesApi
import kotlinx.coroutines.Dispatchers
import kotlinx.coroutines.GlobalScope
import kotlinx.coroutines.launch
import java.util.*

class MainActivity : AppCompatActivity()
{
    private lateinit var binding : ActivityMainBinding
    private lateinit var appDb : AppDatabase
    override fun onCreate(savedInstanceState: Bundle?)
    {
        super.onCreate(savedInstanceState)
        binding = ActivityMainBinding.inflate(layoutInflater)
        setContentView(binding.root)

        appDb = AppDatabase.getDatabase(this)

        createNotificationChannel()
        binding.submitButton.setOnClickListener { scheduleNotification() }
        binding.reminders.setOnClickListener {  changeActivity()  }
    }

    private fun createNotificationChannel()
    {
        val name = "Notification Channel"
        val desc = "A Description of the Channel"
        val importance = NotificationManager.IMPORTANCE_DEFAULT
        val channel = NotificationChannel(channelID, name, importance)
        channel.description = desc
        val notificationManager = getSystemService(NOTIFICATION_SERVICE) as NotificationManager
        notificationManager.createNotificationChannel(channel)
    }

    private fun scheduleNotification()
    {
        val intent = Intent(applicationContext, Notification::class.java)
        val title = binding.titleET.text.toString()
        val message = binding.messageET.text.toString()
        intent.putExtra(titleExtra, title)
        intent.putExtra(messageExtra, message)
        val pendingIntent = PendingIntent.getBroadcast(
            applicationContext,
            notificationID,
            intent,
            PendingIntent.FLAG_IMMUTABLE or PendingIntent.FLAG_UPDATE_CURRENT
        )

        val alarmManager = getSystemService(ALARM_SERVICE) as AlarmManager
        val time = getTime()
        alarmManager.setExactAndAllowWhileIdle(
            AlarmManager.RTC_WAKEUP,
            time,
            pendingIntent
        )
        showAlert(time, title, message)
    }

    private fun getTime(): Long
    {
        val minute = binding.timePicker.minute
        val hour = binding.timePicker.hour
        val day = binding.datePicker.dayOfMonth
        val month = binding.datePicker.month
        val year = binding.datePicker.year

        val calendar = Calendar.getInstance()
        calendar.set(year, month, day, hour, minute)
        return calendar.timeInMillis
    }

    private fun showAlert(time: Long, title: String, message: String)
    {
        val date = Date(time)
        val dateFormat = DateFormat.getLongDateFormat(applicationContext)
        val timeFormat = DateFormat.getTimeFormat(applicationContext)

        AlertDialog.Builder(this)
            .setTitle("Reminder Scheduled")
            .setMessage(
                "Title: " + title +
                        "\nMessage: " + message +
                        "\nAt: " + dateFormat.format(date) + " " + timeFormat.format(date))
            .setPositiveButton("Okay"){_,_ ->writeData()}
            .show()
    }

    @OptIn(DelicateCoroutinesApi::class)
    private fun writeData() {
        val tasktitle = binding.titleET.text.toString()
        val desc = binding.messageET.text.toString()

        if(tasktitle.isNotEmpty() && desc.isNotEmpty()){
            val task = Task(
                null,tasktitle,desc
            )
            GlobalScope.launch(Dispatchers.IO){
                appDb.taskDao().insert(task)
            }
            Toast.makeText(this, "Reminder saved to database", Toast.LENGTH_SHORT).show()
        }
    }

    private fun changeActivity() {
        val task = findViewById<EditText>(R.id.titleET)
        val desc = findViewById<EditText>(R.id.messageET)
        val taskTitle = task.text.toString()
        val taskDetails = desc.text.toString()

        val intent = Intent(this, MainActivity2::class.java).also {
            it.putExtra("title", taskTitle)
            it.putExtra("desc", taskDetails)
            startActivity(it)
        }
    }

}
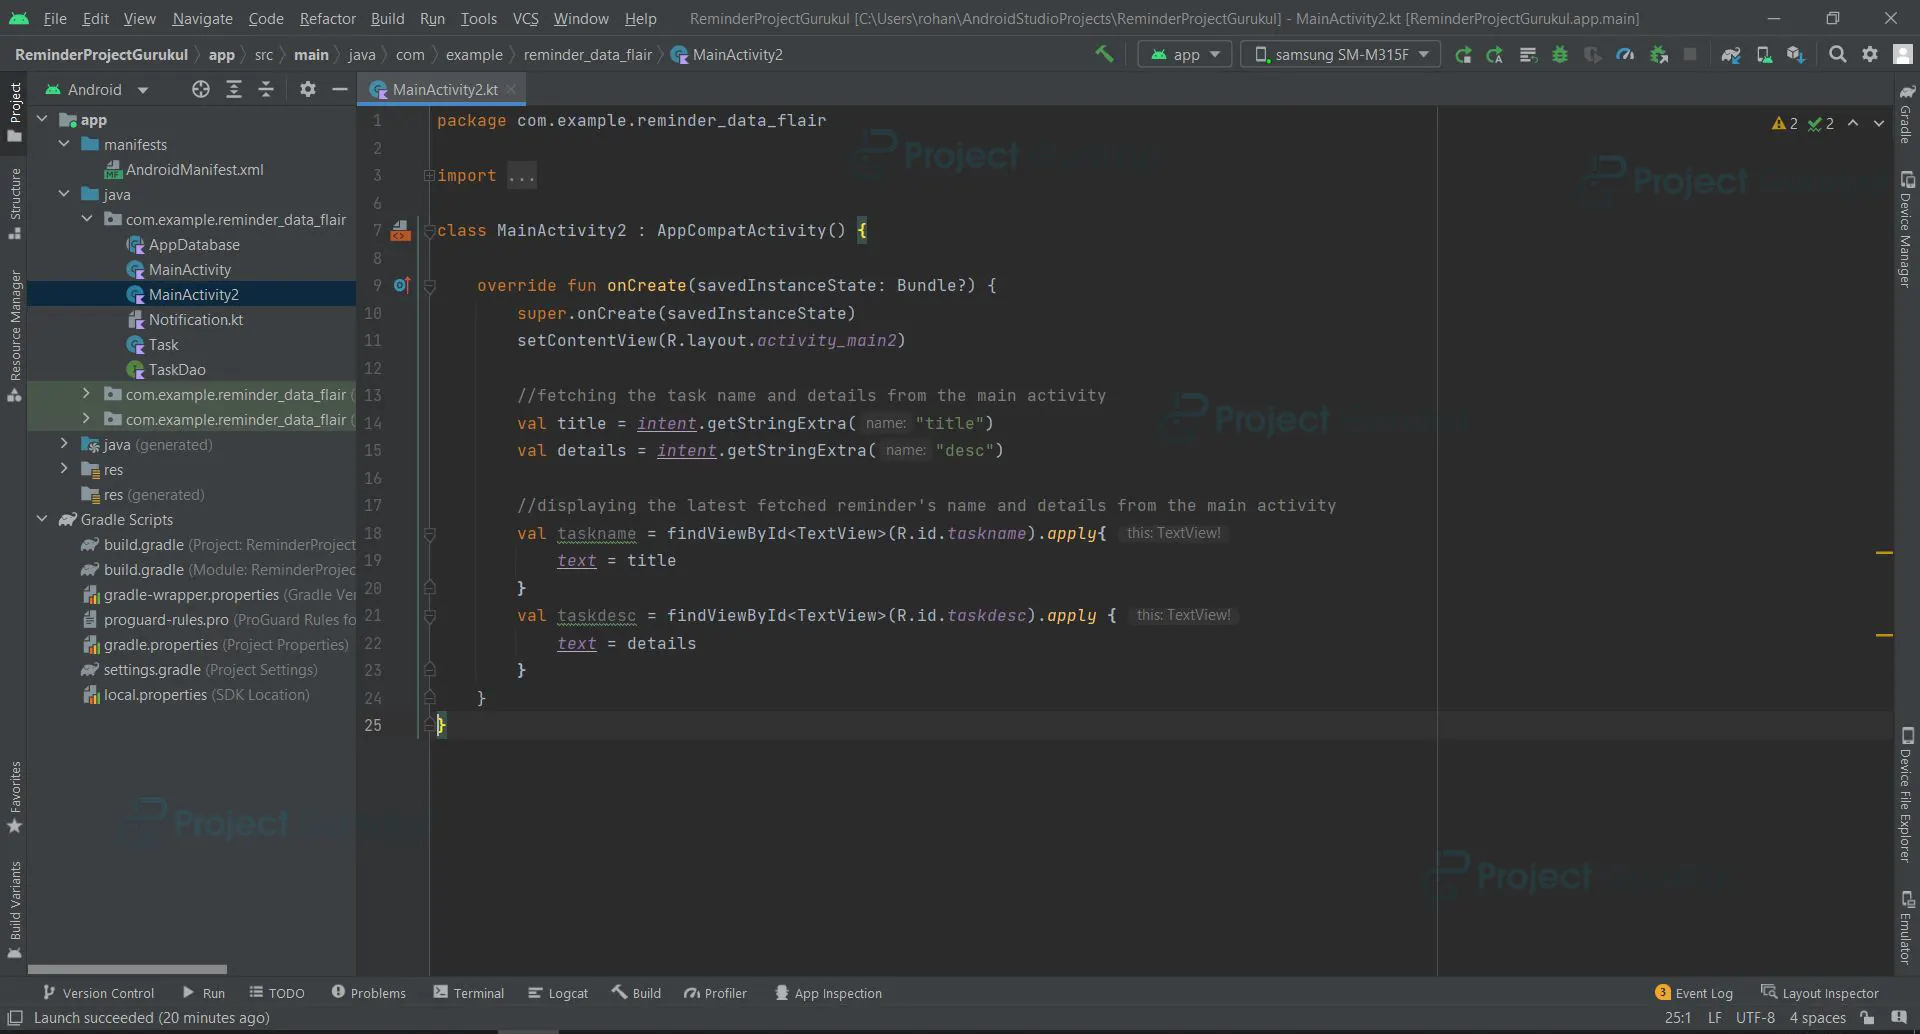
7. “MainActivity2” is a kotlin file which initializes the activity displaying the latest reminder that is fetch from the main activity.
Code:
import androidx.appcompat.app.AppCompatActivity
import android.os.Bundle
import android.widget.TextView

class MainActivity2 : AppCompatActivity() {

    override fun onCreate(savedInstanceState: Bundle?) {
        super.onCreate(savedInstanceState)
        setContentView(R.layout.activity_main2)

        //fetching the task name and details from the main activity
        val title = intent.getStringExtra("title")
        val details = intent.getStringExtra("desc")

        //displaying the latest fetched reminder's name and details from the main activity
        val taskname = findViewById<TextView>(R.id.taskname).apply{
            text = title
        }
        val taskdesc = findViewById<TextView>(R.id.taskdesc).apply {
            text = details
        }
    }
}
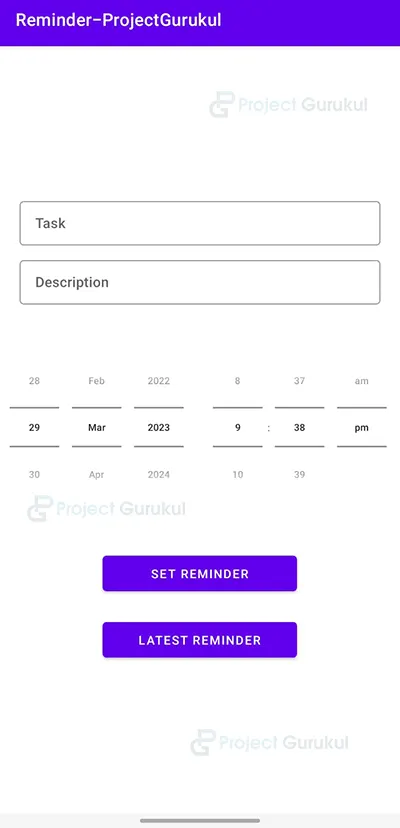
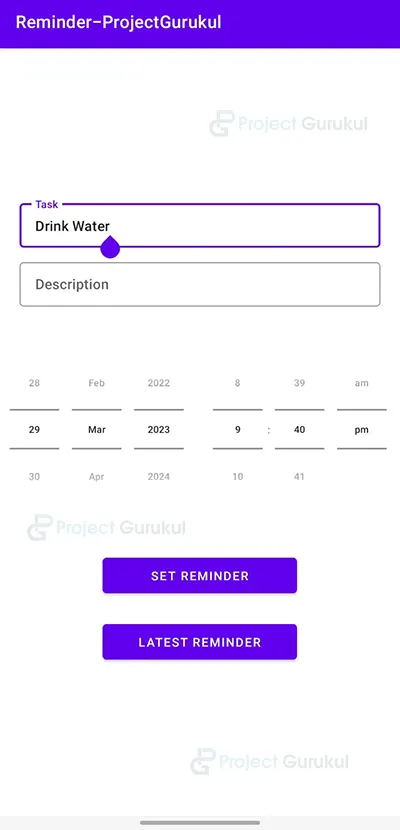
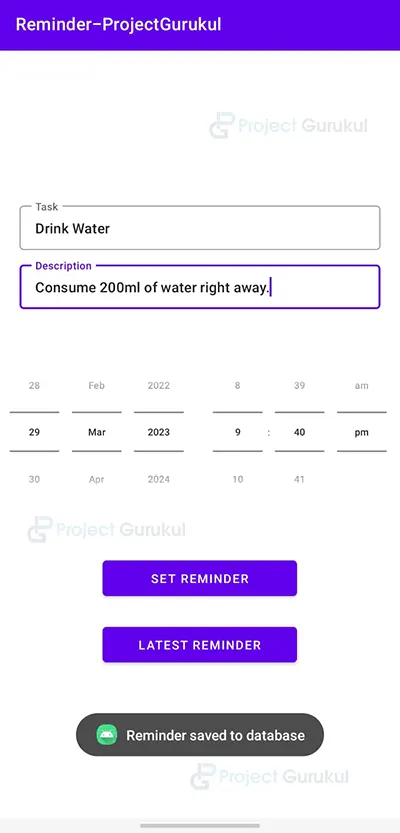
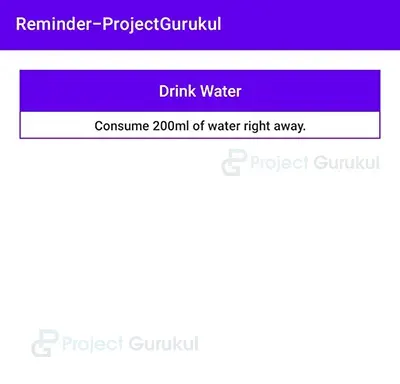
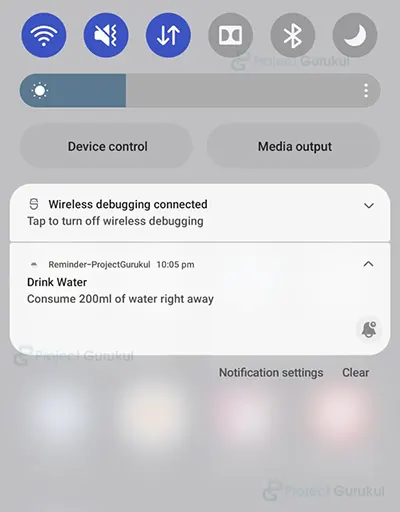
Android Reminder App Output
1. Home Screen
2. Enter the title of the task.
3. Enter the description of the task
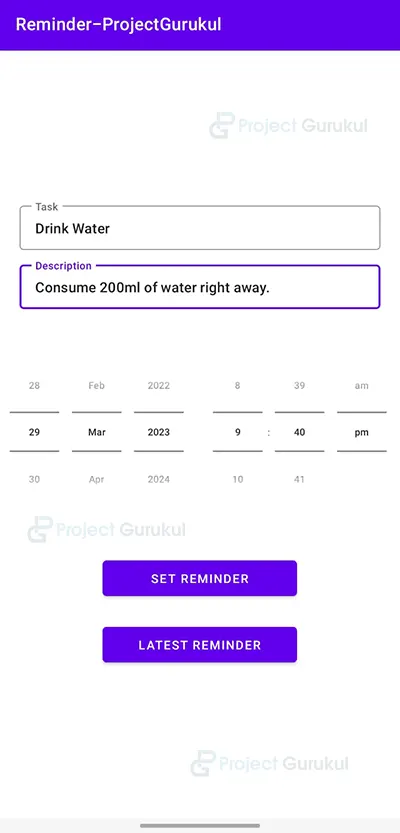
4. Select the date and time of the reminder.

5. Confirming the reminder by clicking on the “Set Reminder” button.
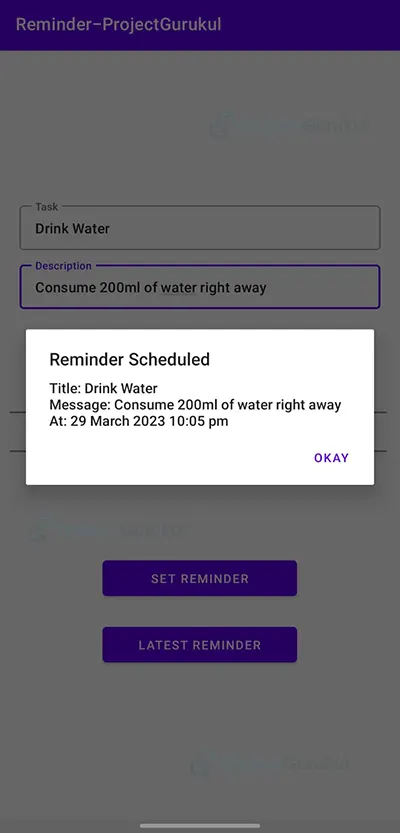
6. Confirmation that the reminder details has been saved to the database.
7. Latest reminder getting displayed when the ‘Latest Reminder’ is clicked on the home screen.
8. The final output i.e. the reminder notification.
Summary
So in this project, we have learned how to create and develop a reminder app in android studio. This project is highly beneficial for beginners since it familiarizes users with utilizing XML to create user interfaces, switching between activities by clicking a button, using libraries like NotificationManager and AlarmManager, as well as the ROOM database, especially when inserting data into the database. We sincerely hope you enjoyed it, and we are sure you will enjoy implementing it into reality.
CAN YOU SEND TO ME THE APK?