Android Kotlin Project – Tic-Tac-Toe Game App
FREE Online Courses: Your Passport to Excellence - Start Now
Hello there, Android enthusiasts! Today we will look at and learn how to develop an Android project that is a Tic Tac Toe app in Android Studio. In this android kotlin project, we’ll learn about the entire project’s development.
The classic game of tic tac toe has been played for years by people of all ages. It’s a straightforward game where two players alternately mark a 3×3 grid with their respective symbols (X or O). The game is won by the player who successfully arranges three of their marks in a row that is either horizontal, vertical, or diagonal.
About Android Kotlin Tic Tac Toe App
This is a simple project for those just learning the fundamentals of developing Android applications. This Android app’s user interface contains a 3×3 grid-type structure. To create a tic-tac-toe application, we will work with Android Studio and Kotlin.
Below is a list of the functionalities that the user interface will have:
1. The user interface will have a grid-like structure where the user will be able to enter noughts and crosses to play the tic tac toe game.
2. The user interface will also consist of a textview above, which will indicate the turn, i.e. either noughts or crosses.
3. Once the game has concluded, the result will be displayed in the alert box that appears when none of the cells of the grid are empty.
4. The alert box will also have a ‘Reset’ button. When clicked, the cells of the grid will be cleared for starting a new match.
Prerequisites for Android Kotlin Tic Tac Toe App
To develop this Android application, the requirements and prerequisites are as follows:
Kotlin: You must become acquainted with Kotlin programming first. It is necessary because we’ll be writing the app’s code in the programming language Kotlin.
XML: XML is a further essential part of our Android application. It will be used to create the user interface for the application.
Android Studio: Android Studio is at the core of our application because it is how we will create it. An Android virtual device that can be used to test an application’s functionality is also available with Android Studio.
Download Android Kotlin Tic Tac Toe Project
Please download the source code of the Android Tic Tac Toe Project from the following link: Android Tic Tac Toe App Project Code.
Steps to Create Android Kotlin Tic Tac Toe App
We’ll now start working on developing a tic-tac-toe app. Before actually implementing and executing the code, we will learn about its working. So, let’s look at the files and functions needed to run the code:
In order to make this Android tic-tac-toe application, you must follow a set of instructions. We are here to guide you through each step of creating an app.
1. To the location of your choice, extract all the files from the downloaded zip file.
2. Launch Android Studio.
3. Open by selecting File.
4. Locate and choose the extracted folder, then select OK.
The tic tac toe app’s source code has been successfully opened in Android Studio.
Before starting with the ‘MainActivity.kt’ and ‘acitivity_main.xml’ files, we need to set up some things in the values folder.
1. We’ll use columns, rows, horizontal and vertical lines many times while designing the user interface of the tic tac toe application. Therefore, defining xml code for these components in the ‘styles.xml’ file will be very useful.
<resources>

    <style name="row">
        <item name="android:layout_weight">1</item>
        <item name="android:layout_width">match_parent</item>
        <item name="android:layout_height">0dp</item>
    </style>

    <style name="column">
        <item name="android:layout_weight">1</item>
        <item name="android:layout_width">0dp</item>
        <item name="android:layout_height">match_parent</item>
        <item name="android:textColor">@color/black</item>
        <item name="android:background">@android:color/transparent</item>
        <item name="android:textSize">40sp</item>
        <item name="android:textStyle">bold</item>
        <item name="android:onClick">boardTapped</item>
    </style>

    <style name="verticalLine">
        <item name="android:background">@color/black</item>
        <item name="android:layout_width">5dp</item>
        <item name="android:layout_height">match_parent</item>
    </style>

    <style name="horizontalLine">
        <item name="android:background">@color/black</item>
        <item name="android:layout_width">match_parent</item>
        <item name="android:layout_height">5dp</item>
    </style>

</resources>
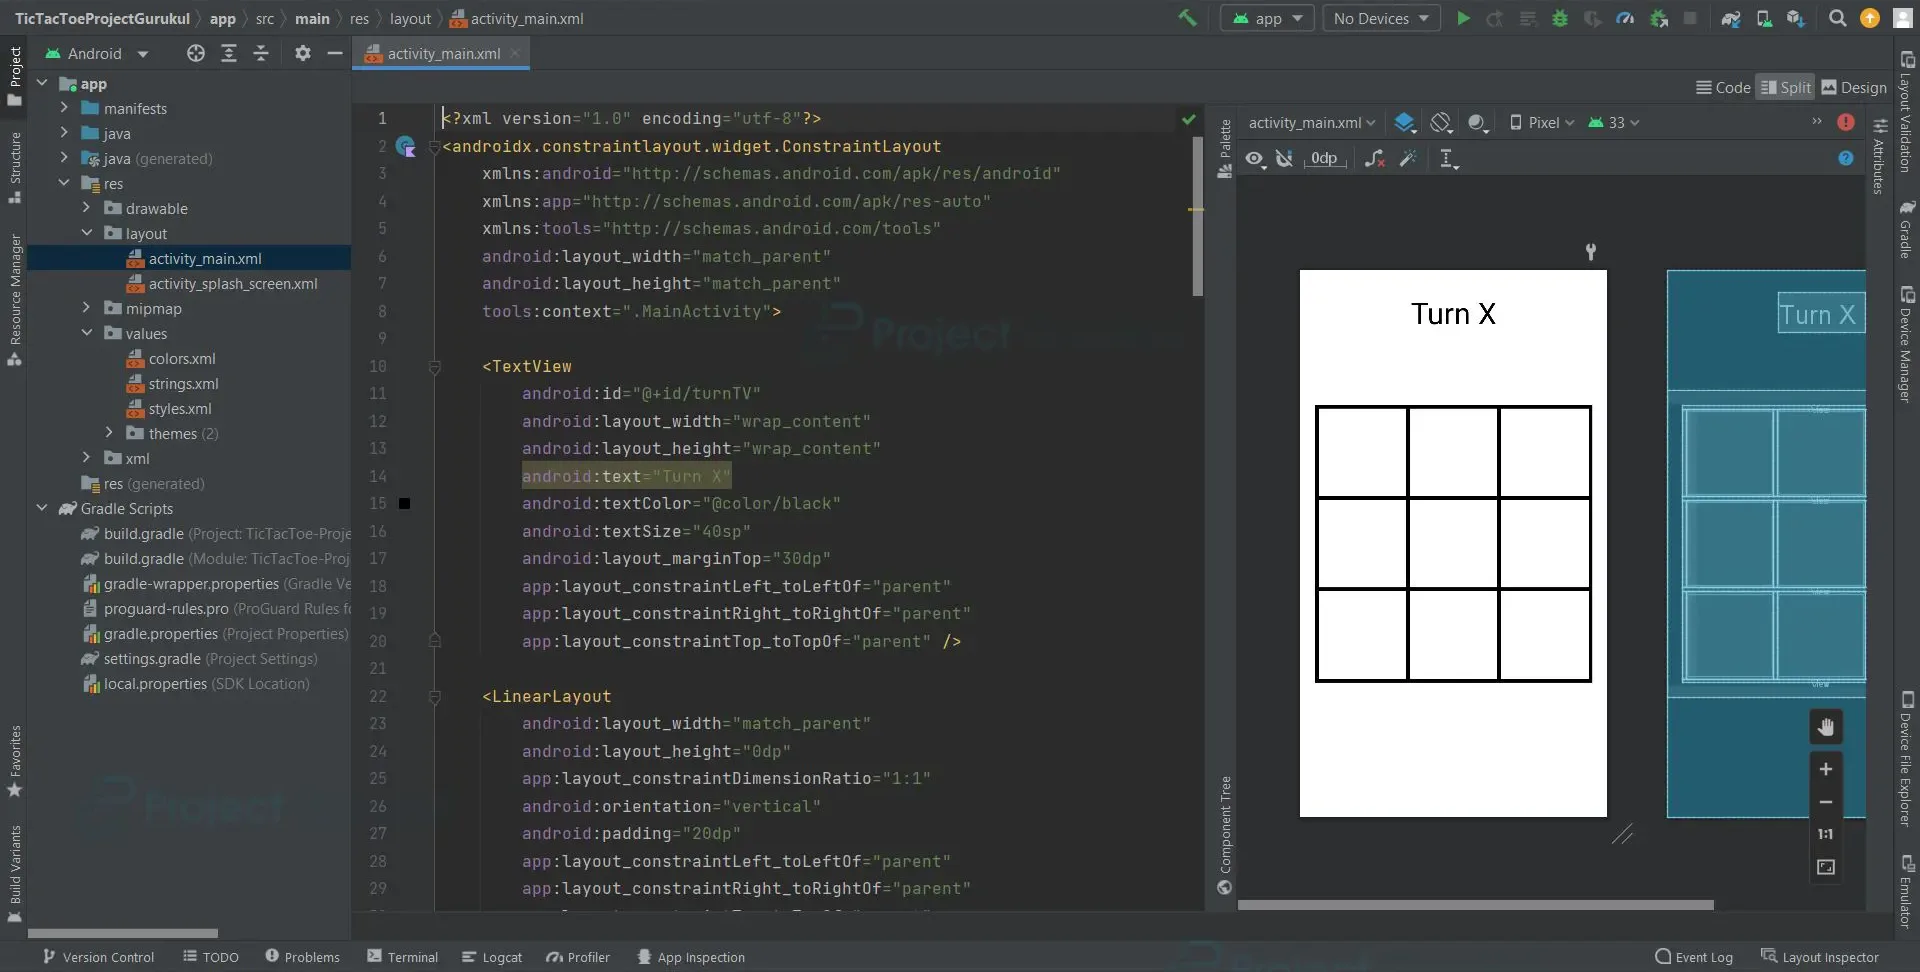
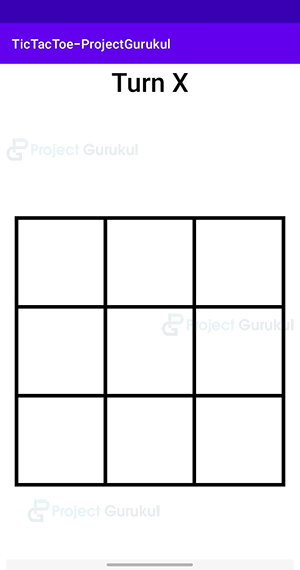
1. The “activity_main” is an XML file which is responsible for creating a grid, i.e., a game board where the users can enter noughts and crosses (X and O).
Code:
<?xml version="1.0" encoding="utf-8"?>
<androidx.constraintlayout.widget.ConstraintLayout
    xmlns:android="http://schemas.android.com/apk/res/android"
    xmlns:app="http://schemas.android.com/apk/res-auto"
    xmlns:tools="http://schemas.android.com/tools"
    android:layout_width="match_parent"
    android:layout_height="match_parent"
    tools:context=".MainActivity">

    <TextView
        android:id="@+id/turnTV"
        android:layout_width="wrap_content"
        android:layout_height="wrap_content"
        android:text="Turn X"
        android:textColor="@color/black"
        android:textSize="40sp"
        android:layout_marginTop="30dp"
        app:layout_constraintLeft_toLeftOf="parent"
        app:layout_constraintRight_toRightOf="parent"
        app:layout_constraintTop_toTopOf="parent" />

    <LinearLayout
        android:layout_width="match_parent"
        android:layout_height="0dp"
        app:layout_constraintDimensionRatio="1:1"
        android:orientation="vertical"
        android:padding="20dp"
        app:layout_constraintLeft_toLeftOf="parent"
        app:layout_constraintRight_toRightOf="parent"
        app:layout_constraintTop_toTopOf="parent"
        app:layout_constraintBottom_toBottomOf="parent">

        <View
            style="@style/horizontalLine"/>
        <LinearLayout
            style="@style/row">
            <View
                style="@style/verticalLine" />
            <Button
                android:id="@+id/a1"
                style="@style/column" />
            <View
                style="@style/verticalLine"/>

            <Button
                android:id="@+id/a2"
                style="@style/column" />
            <View
                style="@style/verticalLine"/>
            <Button
                android:id="@+id/a3"
              	 style="@style/column" />
            <View
                style="@style/verticalLine" />
        </LinearLayout>
        <View
            style="@style/horizontalLine"/>
        <LinearLayout
            style="@style/row"
            <View
                style="@style/verticalLine" />
            <Button
                android:id="@+id/b1"
                style="@style/column" />
            <View
                style="@style/verticalLine"/>
            <Button
                android:id="@+id/b2"
                style="@style/column" />
            <View
                style="@style/verticalLine"/>
            <Button
                android:id="@+id/b3"
                style="@style/column" />
            <View
                style="@style/verticalLine" />
        </LinearLayout>
        <View
            style="@style/horizontalLine"/>
        <LinearLayout
            style="@style/row">
            <View
                style="@style/verticalLine" />
            <Button
                android:id="@+id/c1"
                style="@style/column" />

            <View
                style="@style/verticalLine"/>
            <Button
                android:id="@+id/c2"
                style="@style/column" />
            <View
                style="@style/verticalLine"/>
            <Button
                android:id="@+id/c3"
                style="@style/column" />
            <View
                style="@style/verticalLine" />
        </LinearLayout>
        <View
            style="@style/horizontalLine"/>
    </LinearLayout>

</androidx.constraintlayout.widget.ConstraintLayout>
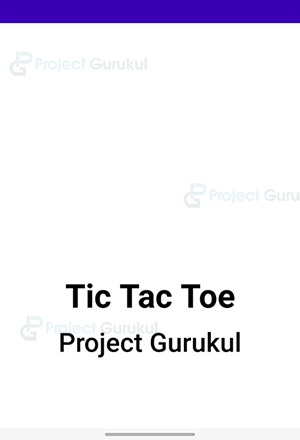
2. “activity_splash_screen” is an XML file which is responsible for creating the user interface of the splash screen when the app is initialized.
Code:
<?xml version="1.0" encoding="utf-8"?>
<androidx.constraintlayout.widget.ConstraintLayout xmlns:android="http://schemas.android.com/apk/res/android"
    xmlns:app="http://schemas.android.com/apk/res-auto"
    xmlns:tools="http://schemas.android.com/tools"
    android:layout_width="match_parent"
    android:layout_height="match_parent"
    android:background="#fff"
    tools:context=".SplashScreen">

    <TextView
        android:id="@+id/title"
        android:layout_width="match_parent"
        android:layout_height="wrap_content"
        android:text="Tic Tac Toe"
        android:textSize="50sp"
        android:gravity="center"
        android:textStyle="bold"
        android:textColor="@color/black"
        android:layout_marginBottom="100dp"
        app:layout_constraintBottom_toBottomOf="parent"
        app:layout_constraintLeft_toLeftOf="parent"
        app:layout_constraintRight_toRightOf="parent"
        app:layout_constraintTop_toTopOf="parent"/>

    <TextView
        android:id="@+id/Subtitle"
        android:layout_width="wrap_content"
        android:layout_height="wrap_content"
        android:text="Project Gurukul"
        android:layout_marginTop="7dp"
        android:textColor="@color/black"
        android:textSize="35sp"
        app:layout_constraintTop_toBottomOf="@+id/title"
        app:layout_constraintLeft_toLeftOf="parent"
        app:layout_constraintRight_toRightOf="parent"
        />

</androidx.constraintlayout.widget.ConstraintLayout>
3. ‘SplashScreen’ is a kotlin file which responsible for the functioning of the splash screen when the application is initialized.
Code:
class SplashScreen : AppCompatActivity() {
    override fun onCreate(savedInstanceState: Bundle?) {
        super.onCreate(savedInstanceState)
        setContentView(R.layout.activity_splash_screen)

        val actionBar = supportActionBar
        actionBar!!.hide()

        Handler().postDelayed({
            startActivity(Intent(this@SplashScreen, MainActivity::class.java))
            finish()
        }, 2000)
    }
}
4. ‘MainActivity’ is a kotlin file, where all the game logic has been defined and programmed, it is solely responsible for the functioning of the tic tac toe application.
Code:
class MainActivity : AppCompatActivity() {
    enum class Turn
    {
        NOUGHT,
        CROSS
    }

    private var firstTurn = Turn.CROSS
    private var currentTurn = Turn.CROSS

    private var crossesScore = 0
    private var noughtsScore = 0

    private var boardList = mutableListOf<Button>()

    private lateinit var binding : ActivityMainBinding

    override fun onCreate(savedInstanceState: Bundle?)
    {
        super.onCreate(savedInstanceState)
        binding = ActivityMainBinding.inflate(layoutInflater)
        setContentView(binding.root)
        initBoard()
    }

    private fun initBoard()
    {
        boardList.add(binding.a1)
        boardList.add(binding.a2)
        boardList.add(binding.a3)
        boardList.add(binding.b1)
        boardList.add(binding.b2)
        boardList.add(binding.b3)
        boardList.add(binding.c1)
        boardList.add(binding.c2)
        boardList.add(binding.c3)
    }

    fun boardTapped(view: View)
    {
        if(view !is Button)
            return
        addToBoard(view)

        if(checkForVictory(NOUGHT))
        {
            noughtsScore++
            result("Noughts Win!")
        }
        else if(checkForVictory(CROSS))
        {
            crossesScore++
            result("Crosses Win!")
        }

        if(fullBoard())
        {
            result("Draw")
        }

    }

    private fun checkForVictory(s: String): Boolean
    {
        //Horizontal Victory
        if(match(binding.a1,s) && match(binding.a2,s) && match(binding.a3,s))
            return true
        if(match(binding.b1,s) && match(binding.b2,s) && match(binding.b3,s))
            return true
        if(match(binding.c1,s) && match(binding.c2,s) && match(binding.c3,s))
            return true

        //Vertical Victory
        if(match(binding.a1,s) && match(binding.b1,s) && match(binding.c1,s))
            return true
        if(match(binding.a2,s) && match(binding.b2,s) && match(binding.c2,s))
            return true
        if(match(binding.a3,s) && match(binding.b3,s) && match(binding.c3,s))
            return true

        //Diagonal Victory
        if(match(binding.a1,s) && match(binding.b2,s) && match(binding.c3,s))
            return true
        if(match(binding.a3,s) && match(binding.b2,s) && match(binding.c1,s))
            return true

        return false
    }

    private fun match(button: Button, symbol : String): Boolean = button.text == symbol

    private fun result(title: String)
    {
        val message = "\nNoughts $noughtsScore\n\nCrosses $crossesScore"
        AlertDialog.Builder(this)
            .setTitle(title)
            .setMessage(message)
            .setPositiveButton("Reset")
            { _,_ ->
                resetBoard()
            }
            .setCancelable(false)
            .show()
    }

    private fun resetBoard()
    {
        for(button in boardList)
        {
            button.text = ""
        }

        if(firstTurn == Turn.NOUGHT)
            firstTurn = Turn.CROSS
        else if(firstTurn == Turn.CROSS)
            firstTurn = Turn.NOUGHT

        currentTurn = firstTurn
        setTurnLabel()
    }

    private fun fullBoard(): Boolean
    {
        for(button in boardList)
        {
            if(button.text == "")
                return false
        }
        return true
    }

    private fun addToBoard(button: Button)
    {
        if(button.text != "")
            return

        if(currentTurn == Turn.NOUGHT)
        {
            button.text = NOUGHT
            currentTurn = Turn.CROSS
        }
        else if(currentTurn == Turn.CROSS)
        {
            button.text = CROSS
            currentTurn = Turn.NOUGHT
        }
        setTurnLabel()
    }

    private fun setTurnLabel()
    {
        var turnText = ""
        if(currentTurn == Turn.CROSS)
            turnText = "Turn $CROSS"
        else if(currentTurn == Turn.NOUGHT)
            turnText = "Turn $NOUGHT"

        binding.turnTV.text = turnText
    }

    companion object
    {
        const val NOUGHT = "O"
        const val CROSS = "X"
    }

}
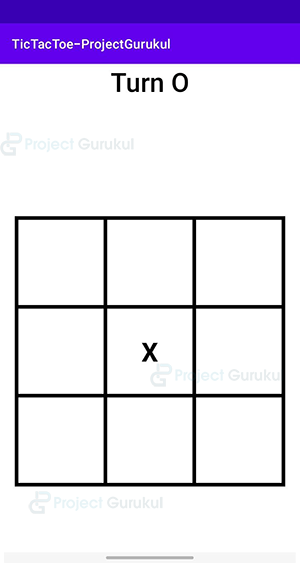
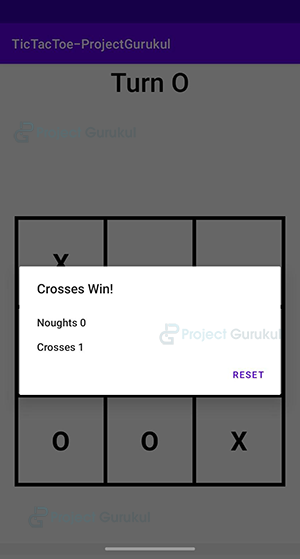
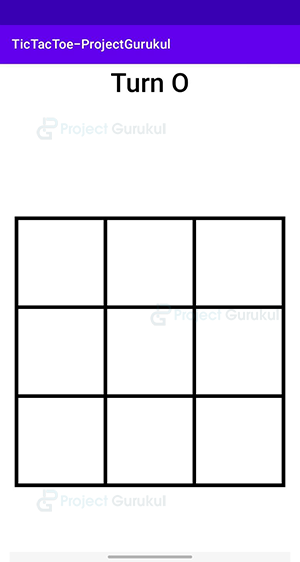
Android Tic Tac Toe App Output:
1. Splash Screen
2. Home Screen
3. Next player’s turn
4. Alert Box Displaying result and score
5. Board Reset
Summary
So, in this Android Kotlin tic-tac-toe project, we learnt how to use Android Studio to develop a tic-tac-toe application. This Android project is suitable for beginners as it will improve your ability to use logic while coding and creating user interfaces. We hope you enjoyed it, and we are confident that you will like putting it into practice.