Age and Gender Detection using Deep Learning
FREE Online Courses: Dive into Knowledge for Free. Learn More!
About Gender and Age Detection Project:
Due to the rise of social platforms and social media nowadays, there is also an increase in the number of applications that want automatic age and gender classification. As we know, age and Gender are two key facial attributes that play a very important role in social interactions.
So, in this deep learning project. we will be creating real-time gender and age detection using Deep Learning, and also in this, we will be using pre-trained models that classify the gender and age of the person. So the model will predict the gender as ‘Male’ and ‘Female’, and the predicted age will be in one of the following ranges- (0-2),(4-6),(8-12),(15-20),(25-32),(38-43),(48-53),(60-100) ( so there are 8 nodes in the final output layer or say softmax layer).
It is very difficult to predict the exact age of the person due to many reasons like (makeup, light, facial expressions, etc.) so that’s why we have considered this as a classification problem instead of a regression problem.
The process we will follow to create this Python project is that:
- First we detect faces,
- Predict their Gender (Classify them into Male/Female)
- Predict their Age ( Classify them into 8 age ranges that is mentioned above)
- And at last put the results on the person’s face and display it.
Let’s Understand the Pre-trained Model Architecture that we will be going to use:
The model is a CNN model. CNN is a Convolutional Neural Network. It is a type of deep neural network (DNN) that is very popular in classification problems, and also widely used for the purposes of image recognition and processing. CNN Model consists of the input layer, multiple hidden layers, and at last output layer.
So the CNN Model that is created for this project consists of 3 convolutional layers. The first convolutional layer has 96 nodes with kernel size 7, second convolutional layer has 256 nodes, with kernel size 5, and third layer has 384 nodes with kernel size 3.
It also has 2 fully connected layers, each with 512 nodes, and a final output layer of softmax type.
Age and Gender Classification Machine Learning Project Code
To learn and implement Gender and Age Classification please download the zip which consists of a source folder: Gender and Age Classification Project
Now let’s understand what are files present in our source code folder:

So the Source Code folder for gender and age detection project consists of the following files:
- age_deploy.prototxt: This is the file that will be required to run the age classification model.
- age_net.caffemodle: This is the model file that contains the trained model which classifies the age in the specified range.
- gender_deploy.prototxt: This is the file which will be required to run the gender classification model.
- gender_net.caffemodel: This file contains the trained model which predicts the gender of a person present in an image or frame.
- opencv_face_detector.pbtxt: This file will be required to detect faces in a particular image.
- opencv_face_detector_unit8.pb : With the help of this file we will be able to detect faces.
- Real_time_gender_age_detection.py: This is our main python file which contains whole code in which we have used all the models and classify persons gender and age in real-time.
Now let’s understand the code of Real_time_gender_age_detection.py file:
It is very easy to detect Gender and Age of a person in real-time if you know openCV library. And also it will be easy as we are using pre-trained models that will classify gender (as ‘Male ‘or ‘ Female’) and also classify the age of a person in a specific range. So let’s start implementing and understanding :
So firstly you need to install the openCV library in your system. The full form of OpenCV is Open Source Computer Vision. It is widely used in machine learning as it is capable of processing real-time image and video.
So to install OpenCV please open your command prompt and type:
pip install opencv-python
After installing follow the steps and understand what are we doing:
1. Import libraries for Gender and age detection project:
Import OpenCV as we are doing real-time gender and age classification. So we are only required to import the OpenCV library.
import cv2
2. Initialize the face detection protocol buffer and model:
Now the first step is to detect all the faces present in a frame. So we are going to load opencv_face_detector.pbtxt and opencv_face_detector_unit8.pb in faceProto and faceModel variables.
faceProto = 'opencv_face_detector.pbtxt'
faceModel = 'opencv_face_detector_uint8.pb'
3.) Now we will create Bounding box:
In this step, we will create a function faceBox which creates bounding boxes around the face that is detected.
def faceBox(faceNet,frame):
    frame_height = frame.shape[0]
    frame_width = frame.shape[1]
    blob = cv2.dnn.blobFromImage(frame, 1.0 , (227,227), [104,117,123], swapRB = False)
    faceNet.setInput(blob)
    detection = faceNet.forward()
    bboxs = []
    for i in range(detection.shape[2]):
        confidence = detection[0,0,i,2]
        if confidence > 0.7:
            x1 = int(detection[0,0,i,3]*frame_width)
            y1 = int(detection[0,0,i,4]*frame_height)
            x2 = int(detection[0,0,i,5]*frame_width)
            y2 = int(detection[0,0,i,6]*frame_height)
            bboxs.append([x1,y1,x2,y2])
            cv2.rectangle(frame, (x1,y1),(x2,y2),(0,255,0), 1)
    return frame, bboxs
4.) Initialize Age and Gender protocol buffer and model:
Now we will load the age model and gender model in the same way as we have loaded the face detection model.
ageProto = 'age_deploy.prototxt'
ageModel = 'age_net.caffemodel'

genderProto = 'gender_deploy.prototxt'
genderModel = 'gender_net.caffemodel'
5.) Now we will load the networks:
In this step we will read all the models that are faceModel, ageModel, genderModel using cv2.dnn.readNet() method given by OpenCV.
faceNet = cv2.dnn.readNet(faceModel,faceProto)
ageNet = cv2.dnn.readNet(ageModel,ageProto)
genderNet = cv2.dnn.readNet(genderModel,genderProto)
6.) Declaring Certain Variables:
We will create age_list and gender_list and also model _mean_value as this is required while creating blobs from an image.
age_list = ['(0-2)','(4-6)', '(8-12)', '(15-20)','(25-32)','(38-43)','(48-53)','(60-100)']
gender_list = ['Male', 'Female']
model_mean_value = (78.4263377603,87.7689143744, 114.895847746)
7.) Open Webcam and start detecting Gender and Age of person present in frame:
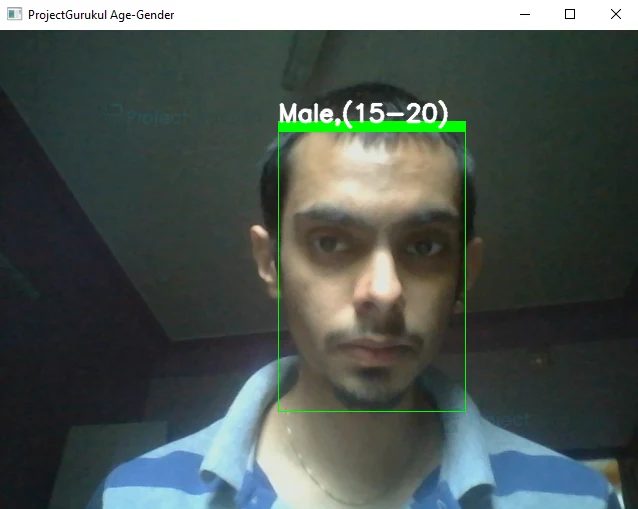
This is the final step for Real-time Classification of Gender and Age. In this we first get the frame and all the bounding boxes present in the frame from the faceBox() function that we have created above. Then for each box we predict its gender and age using genderNet and ageNet and after predicting it, we show them in a frame. As you can see in Output.
video  = cv2.VideoCapture(0)
padding = 20

while True:
    ret,frame= video.read()
    frame,bboxs = faceBox(faceNet,frame)
    for bbox in bboxs:
        face= frame[bbox[1]:bbox[3], bbox[0]:bbox[2]]
        blob = cv2.dnn.blobFromImage(face,1.0 , (227,227),model_mean_value,swapRB = False)


        genderNet.setInput(blob)
        gender_pred = genderNet.forward()
        gender = gender_list[gender_pred[0].argmax()]


        ageNet.setInput(blob)
        age_pred = ageNet.forward()
        age = age_list[age_pred[0].argmax()]

        label = "{},{}".format(gender,age)
        cv2.rectangle(frame, (bbox[0], bbox[1]-10), (bbox[2], bbox[1]),(0,255,0),-1)
        cv2.putText(frame, label, (bbox[0], bbox[1]-10), cv2.FONT_HERSHEY_SIMPLEX,0.8,(255,255,255),2, cv2.LINE_AA)


    cv2.imshow('ProjectGurukul Age-Gender', frame)
    k = cv2.waitKey(1)
    if k==ord('q'):
        break

video.release()
cv2.destroyAllWindows()
Age and Gender Detection Output
Summary
In this Python project we have accurately detected gender and age of a person in real-time using OpenCV and pretrained models of age and gender classification.
In this we have learned how to use OpenCV and various methods of OpenCV. This is a very good project if you want to learn openCV library and how to use it .
I want to purchase the Age and Gender Detection using Deep Learning project. Can you please provide all the details and steps for how we can proceed.